
The first Christmas cactus I owned wasn’t mine. It was a cutting my nan snapped off her own plant.
That cutting became more than one plant that sit on my windowsill. And that’s why learning how to propagate a Christmas cactus is so great.
One plant becomes two. Two becomes five. And before long you’ve got more than you know what to do with and you’re giving them out all throughout Christmas.
But Christmas cactus are very easy to propagate. If you’ve ever struggled to root a cutting before then this is the plant that’ll finally make you feel like you know what you’re doing. So I’m going to take you through how to do it.
Quick Answer
- Take a Cutting: Twist off a healthy piece with 2 to 3 leaf segments at a joint.
- Let it Callus: Leave the cutting out for a day or two so the cut end dries out. This stops it rotting.
- Pot it Up: Push the dry end about an inch into well draining soil, keep it lightly moist in bright indirect light and the will roots form in a few weeks.
What Kind of Christmas Cactus Do You Have?
The plant most people call a Christmas cactus is usually a Thanksgiving cactus. Its easy to get them mixed up.
Both belong to the genus Schlumbergera and they look almost identical. The easiest way to tell them apart is the leaf segments.
A true Christmas cactus (Schlumbergera x buckleyi) has smooth rounded scalloped edges. A Thanksgiving cactus (Schlumbergera truncata) has pointed claw like teeth and tends to bloom a few weeks earlier. According to NC State Extension most plants sold in shops are actually the Thanksgiving type even when the label says otherwise.
Both types propagate in exactly the same way though. So do Easter cacti while we’re at it.
So you don’t really need to identify yours before you start. The method below works for all of them.
When to Propagate a Christmas Cactus
The best time to propagate a Christmas cactus is late spring through early summer once the plant has finished flowering and is putting out fresh growth.
At that point the plant is actively growing so cuttings root faster. Trying to root cuttings in the middle of winter when the plant is either blooming or resting is going to work much slower and be far more frustrating.
The one time you really want to avoid is when your plant is covered in buds or in full flower. When a Christmas cactus is blooming it puts all its energy into those flowers.
A cutting taken at that point has very little left to give toward growing roots. You might also not want to snap off a stem that was about to flower.
That said I’m not going to pretend I’ve never propagated one at the wrong time. I’ve rooted late summer cuttings that did perfectly fine. They just took a little longer.
If you’ve got a broken piece that snapped off by accident there’s nothing to say you have to throw it away just because it’s September. Try potting it. The worst that happens is it doesn’t do much for a few extra weeks.
 Purple Christmas Cactus Plants
How to Propagate a Christmas Cactus in Soil
Soil propagation is the method I think works the most reliably. It’s more reliable than water and the roots that form are stronger and better suited to life in a pot from day one.
Much like propagating a snake plant, the whole thing comes down to taking a bit of stem and letting it grow its own roots.
Step 1: Take Your Cuttings
Find a healthy stem and follow it down two or three segments from the tip. The flat sections are called phylloclades if you want the proper word for them but I think they’re mostly called segments.
You don’t need scissors. Just hold the stem below where you want to cut and twist it.
It should come away cleanly right at the joint. If you’d prefer to snip it that’s fine too just wipe the blades with a bit of rubbing alcohol first so you’re not introducing anything nasty.
Take a few more cuttings than you think you need. Not every single one will root and it’s better to lose one of six than the only one you’ve taken.
If you see any little brownish aerial roots already poking out at a joint then get that piece as it’ll root even quicker.
Step 2: Let the Cuttings Callus
Don’t skip this step as it makes a big difference.
Don’t pot your cuttings straight away. Instead lay them on a windowsill or a bit of paper towel and leave them for a day or two.
The cut end will dry out and form a slightly hardened layer. Iowa State Extension recommends letting the cut ends callus over before planting and I follow that every time.
Why do this? Because a fresh and wet wound put in damp soil is asking to rot. That callus is a scab. It seals things up so the cutting can put its energy into roots instead of fighting off infection.
When I skipped this step in a hurry I lost all of the cuttings.
Step 3: Pot Them Up
While your cuttings are drying you can sort out the soil. Christmas cacti hate sitting in soggy compost so you want something that drains well.
I mix regular houseplant potting soil with a handful of perlite or coarse sand, roughly two parts soil to one part grit.
Fill a small pot. A little 4 inch pot is enough as these plants have small roots.
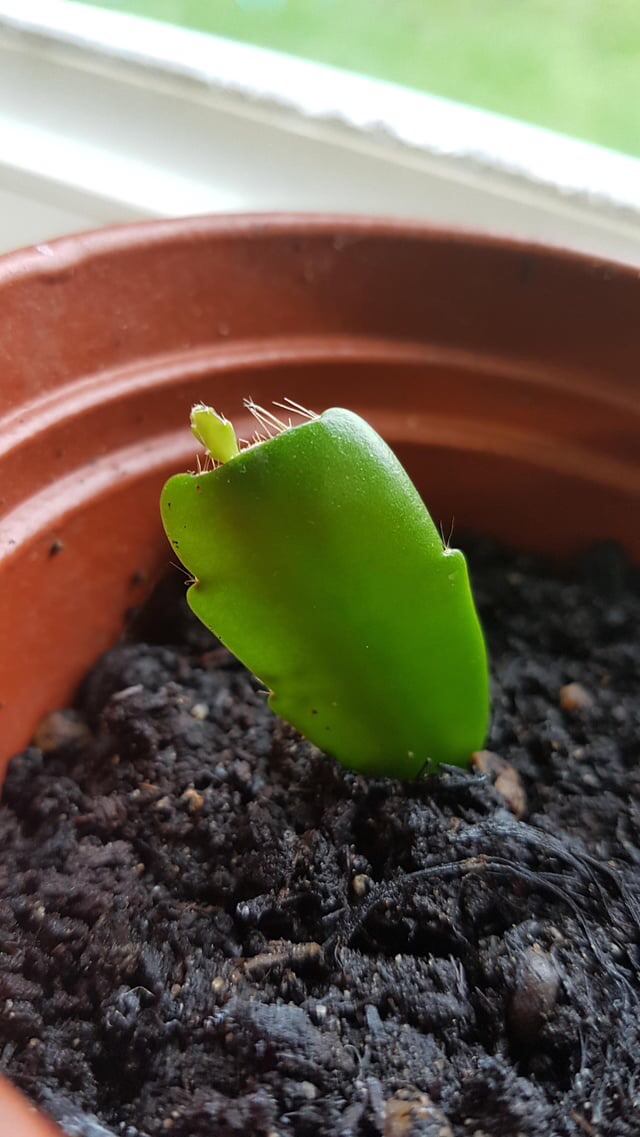
Push the calloused end of each cutting about an inch into the soil, just deep enough that it stands up on its own. You can put three or four cuttings around the edge of one pot to get a fuller plant faster.
Give it a light water to settle the soil and then leave it alone.
Step 4: The Aftercare
Put your pot somewhere with bright indirect light. Not a south facing windowsill that gets a lot of sun.
Remember these are rainforest plants at heart, native to coastal Brazil, so harsh direct sun will burn them.
After that you have to leave the watering alone.
Your cuttings might look a bit limp and wilted for the first week. Do not panic and start giving them a lot of water.
That wilting is normal and it does not mean they need water. Only water again once the top of the soil has properly dried out.
Overwatering at this stage is the going to kill them all. If you have a tendency to overwater then it’s worth reading up on how to revive a dying succulent because a Christmas cactus is a succulent and it rots the same way.
Stop killing your plants by accident.
Get my free guide 7 Gardening Mistakes That Are Killing Your Plants — the most common reasons plants fail, and the simple fixes that turn them around.
How to Propagate a Christmas Cactus in Water
You can root Christmas cactus cuttings in water and plenty of people love it. It’s always fun to watch the roots form through the glass which you don’t get to see with soil.
To do it take your cuttings the same way as before and let them callus for a day. Then put them in a small jar with just the very bottom of the lowest segment sitting in the water.
You don’t want the whole cutting submerged though. Change the water every few days so it stays fresh and clear. In a few weeks you should see little white roots appearing.
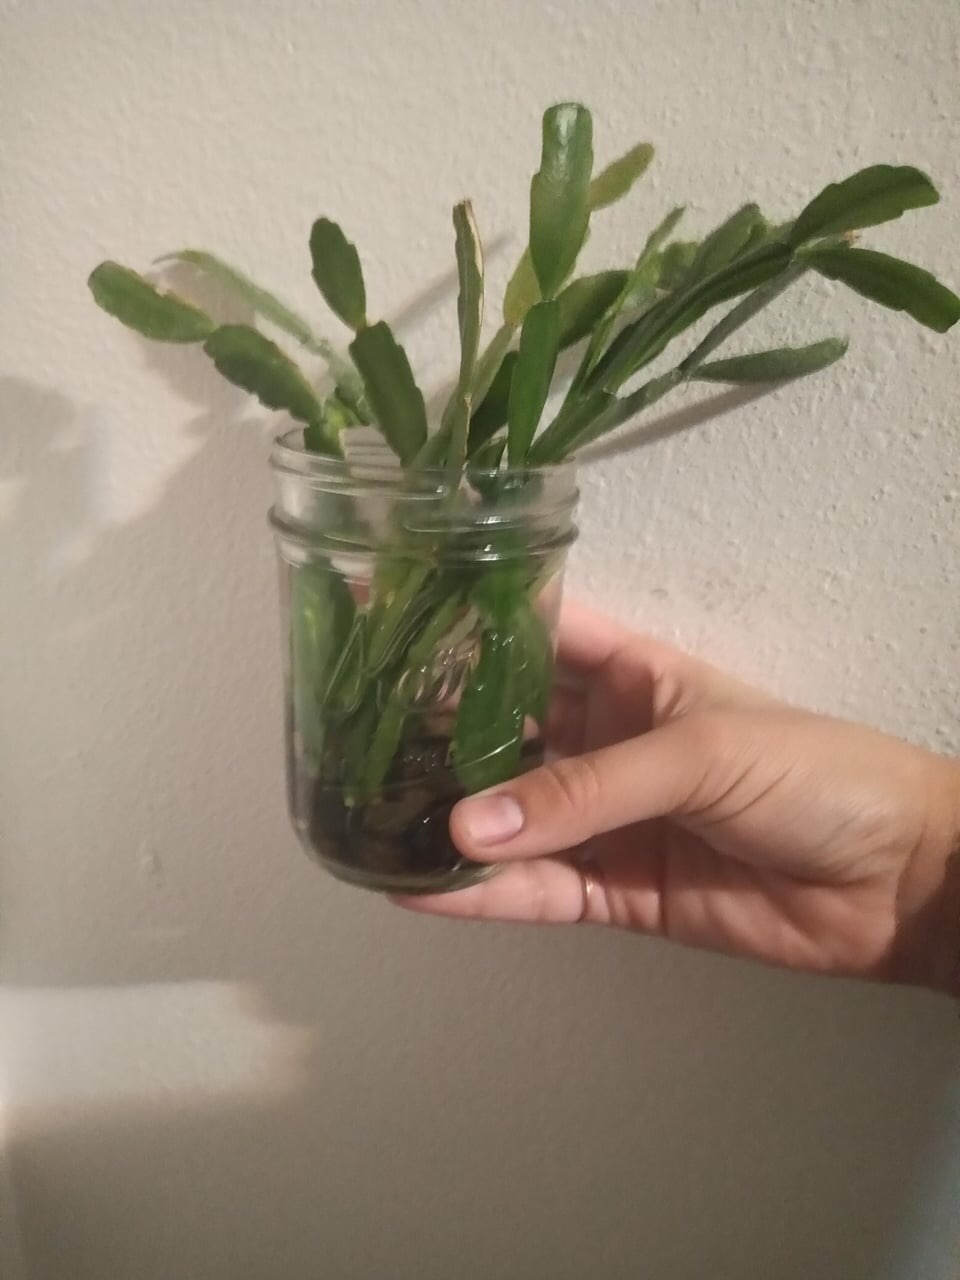
One thing though. Water propagation is the more fragile way of propagating Christmas cacti.
Cuttings sitting in water end up rotting far more easily than they do in soil and the roots grown in water are a bit weaker when you eventually move them across to a pot.
So my advice is to transfer them into soil as soon as the roots are an inch or so long. Don’t leave them sat in the water for months.
If you love the water method in general then pothos are the plant to try it with. They’re basically impossible to kill in a jar and far more forgiving than a Christmas cactus.

How Long Does it Take to Root?
Christmas cactus cuttings usually root in about three to eight weeks depending on the time of year and how warm your home is.
Cuttings taken in late spring in a warm room can root in as little as three weeks. The same cuttings taken in a cold room in autumn might take two or three months. Warmth speeds everything up so somewhere around 65 to 70°F is ideal.
The tricky thing is you can’t see what’s happening under the soil. So how do you know it’s working?
Give the cutting a very small tug after a few weeks. Be gentle though!
If it resists and feels anchored then roots have formed. If it comes straight out then it needs more time (just pir it back).
The other big giveaway is new growth. Once you see a fresh little segment coming from the tip, often a bit red at the edges, you know your cutting has rooted.
Try not to keep pulling at them to check though. I know it’s tempting but every tug disturbs the new roots, and they’re delicate, so check once a fortnight at most and otherwise leave them alone.
Mistakes That Kill Cuttings
Almost every failed Christmas cactus cutting comes down to one of these.
Overwatering. By far the most common killer. A cutting has no roots to take up the excess moisture so wet soil just rots the stem. Let the soil dry between waterings and when in doubt wait another few days.
Skipping the callus. As I said earlier that potting a fresh wet cut straight into damp soil is asking for rot. Give it that day or two to dry first.
Too much direct sun. These aren’t desert cacti. Subject them to harsh direct light and the segments become pale and washed out. Bright but indirect is what they like.
Propagating while it’s blooming. The plant doesn’t have anything to spare to give a cutting when it’s flowering. Wait until after.
Giving up too soon. Wilted floppy cuttings in the first week look alarming but that’s normal. Don’t dig them up to check and don’t overwater them in a panic. Being patient will help in the long run.
Getting Your New Plants to Bloom
Rooting the cutting is the easy bit. It really pays off a year or two later when your plant bursts into flower for the first time.
Christmas cacti bloom based on light and temperature. To trigger buds they need long uninterrupted nights and cooler temperatures in the autumn.
NC State Extension notes they need around 13 hours of complete darkness each night starting in mid September along with cool night temperatures of roughly 55 to 65°F. If your plant refuses to bloom it’s usually because it’s getting artificial light in the evenings from a lamp or the telly which is without you knowing interrupting the darkness it needs.
A young cutting won’t flower straight away. It needs a year or two to establish first.
So don’t be disappointed if your new plant skips its first Christmas. It’s just getting settled.
For more on the botany and bloom timing of these plants the University of Florida’s guide to Christmas cactus is a good read.
What to Do Right Now
If you want to propagate your Christmas cactus today try this:
- Pick a healthy stem and twist off a few cuttings, each with 2 or 3 segments.
- Lay them on a windowsill for a day or two so they get calluses.
- Mix up a gritty well draining soil and push the dry ends about an inch in.
- Set the pot in bright indirect light and resist the urge to overwater it.
- Then just wait. Check for rooting with a tug after a few weeks, not before.
That’s all there is to it. You don’t need rooting hormone, any special tools or a greenhouse. Just a healthy plant, a bit of patience and a windowsill.
Christmas Cactus Propagation FAQs
Can You Propagate a Christmas Cactus From a Single Segment?
You can but it’s slower and less reliable. A single segment has very little stored energy so it takes longer to root and is more likely to shrivel up. For the best results use cuttings of at least two or three segments.
Do You Need Rooting Hormone?
No. Christmas cacti root so easily that rooting hormone is unnecessary. I’ve never used it on a single cutting and my success rate is high. If you’ve got some lying around it won’t hurt but don’t bother buying it just for this.
Can You Propagate a Broken Piece That Snapped Off?
Yes and it’s one of the best reasons to keep these plants. If a segment breaks off by accident don’t throw it away. Let the broken end develop a callus over a day then pot it up exactly like a cutting you took deliberately. Some of my best plants started as accidents.
How Many Cuttings Should You Put in One Pot?
To get a fuller looking plant faster use three or four cuttings around the edge of a small 4 inch pot. Christmas cacti have small roots so they don’t mind sharing. A single cutting will work too it’ll just look sparse for its first year.
Final Thoughts
Learning how to propagate a Christmas cactus is really easy. The plant does nearly all the work for you. Your only real job is to not overwater it and not not panic in the limp first week.
So take a few cuttings. In a couple of years you’ll have new plants flowering on your windowsill in the middle of winter, which is when we all need a bit of colour the most.
Stop killing your plants by accident.
Get my free guide 7 Gardening Mistakes That Are Killing Your Plants — the most common reasons plants fail, and the simple fixes that turn them around.
