Orchids are one of the most mesmerizing plants you can have in your garden or home. But the idea of propagating them might seem daunting. Fear not!
You might want to share an orchid with friends or just grow your own collection of orchids, but whatever the reason this guide will take you through the different methods for propagating orchids with some clever tips to help make it less complicated.
Video: How to Easily Propagate Orchids
Understanding Your Orchid: Monopodial vs. Sympodial
Before we get into the methods of propagating it’s important to know what type of orchid you’re dealing with.
Orchids generally fall into two categories: monopodial and sympodial.
Monopodial orchids like Phalaenopsis and Vanda grow vertically from a single stem. Along this stem you will find aerial roots sprouting.
Sympodial orchids such as Cattleya, Oncidium and Dendrobium grow horizontally, forming pseudobulbs along a rhizome.
Understanding these differences will let you pick which is the right and most suitable way to propagate your orchid.
Worried you're killing your orchid?
Orchids fail for a small handful of specific reasons. My free guide 7 Gardening Mistakes That Are Killing Your Plants covers all of them — and what to do instead.
Methods of Propagating Orchids
1. Division (For Sympodial Orchids)
This is the most common method for sympodial orchids. This is because they naturally spread out horizontally and this messed it easier to split them into multiple plants.
Steps:
- Prepare Your Tools: Use a sharp knife, pruning shears or garden scissors. And don’t forget to sterilize the tools you’re using with either rubbing alcohol or a bleach solution (1 part bleach to 9 parts water). You don’t want to transmit diseases from plant to plant.
- Remove the Orchid from Its Pot: Gently tip the pot over and carefully slide the orchid out. Try not to pull it out by the stems or leaves as you could easily damage them. If your orchid is stuck and won’t budge then squeeze the sides of the pots and it should loosen it.
- Examine the Rhizome: Get rid of any excess potting medium and rise the roots with water so you can clearly see what you’re doing. The rhizome is the thick horizontal stem that grows along the surface of the soil. You should be looking for points where it naturally narrows or where it’s already started to separate.
- Cutting the Rhizome: Make a clean cut through the rhizome using whichever tool you’ve picked. Each division should have at least 3 pseudobulbs and a healthy root system. Pseudobulbs are the bulbous things that you can see above the soil. They store water and nutrients.
- Trim the Roots: Look at the roots of each division. Trim away any dead or rotting roots. Healthy roots are firm and white or light green in color.
- Repotting: Pick a pot that is just about big enough to hold the nee divisions roots. If you go for a pot that is too big it will hold on to too much moisture and potentially cause root rot. Fill the pot with a suitable orchid mix. Put the division in the pot, with the rhizome sitting just above the surface of the potting mix. Gently press the mix around the roots to secure it in place. Water the newly potted divisions lightly to settle the potting medium around the roots. This is a simple guide to repotting orchids.
- Aftercare: Like all orchids your newly potted one will want to be kept in a warm, humid environment with indirect sunlight. Don’t put it in direct sunlight as the plants recover from the shock of division. Water sparingly until you see signs of new growth as that will be a sign of the plant establishing itself.
Extra Tips:
- Dividing your orchids every 2 to 3 years can help keep them healthy as well as stopping the pot getting overcrowded.
- If your orchid is seemingly very stressed after division then you can use a root stimulant or seaweed extract which can help to encourage the new roots to grow.

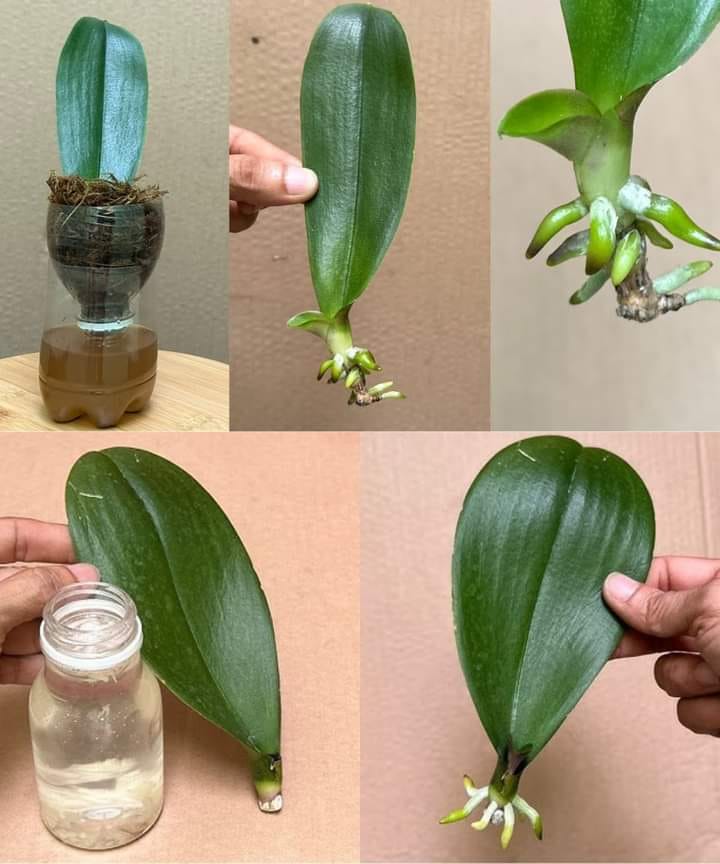
2. Keiki (For Monopodial Orchids)
Keiki is a Hawaiian term meaning “baby,”. When talking in terms of orchid propagation it refers to the small plantlets that sometimes grow on the stem or at the base of the mother plant.
Steps:
- Identify the Keiki: Keikis usually form on the nodes of the flower spike or stem. So you should be looking for small growths that look like the parent plant. They can a few months to form roots though, and that is the sign that the keiki is ready to be separated.
- Wait for Adequate Root Development: The keiki needs to have at least two or three roots that are 2 to 3 inches long before you separate it from the parent plant. If you go too early then there’s a good chance if won’t survive on it’s own.
- Prepare for Separation: Before separating the keiki, sterilize whatever tool you’re going to use to cut it. Then gently remove any dead or brown tissue from around the base of the keiki.
- Separation: With your sterilized tool make a clean cut between the keiki and the mother plant. Be extra careful not damage the roots as you do.
- Prepare the Pot: Choose a small pot, preferably one that just fits the roots of the keiki. Fill the pot with an orchid mix that drains well. Create a small hole in the center where the keiki is going to be planted.
- Potting the Keiki: Put the keiki in to the pot carefully, spreading the roots out. The base of the keiki needs to be level with the potting mix. Lightly press the mix around the roots to keep the plant steady.
- Post Potting Care: Like other orchids your new keiki will want to be in a humid spot with indirect sunlight. You can use a humidity dome or plastic bag to help with keeping the humidity high. Water lightly and let the potting mix to dry out between waterings. Find out how to, how often and when go water with this guide.
Extra Tips:
- Some gardeners use keiki paste (a cytokinin based product) to help with keiki formation. If you want to try that then put the paste on a node on the stem. You’ll have to be patient but you might see a new keiki develop.
- If your keiki isn’t forming roots you can try gently misting it with water or a diluted seaweed solution. This can encourage the roots to grow.
3. Back Bulb Propagation (For Sympodial Orchids)
Older pseudobulbs, known as back bulbs, can be used to propagate new plants. But this is a much a slower process.
Steps:
- Select the Back Bulb: The back bulb should be healthy, firm and have at least one workable node (that is a small bump where the new growth can emerge from).
- Prepare the Back Bulb: Carefully remove the black bulb from the main plant. Keep a bit of the rhizome attached to the back of the bulb if possible.
- Potting: Put the back bulb in a small pot filled with an orchid mix. The node should be at the surface or just below it. Press the mix around the bulb to hold it in place. Finally water the mix a little to settle it around the bulb.
- Environment: Put the pot in a warm, humid spot that gets indirect light. If you need to keep it humid try covering the pot with a clear plastic bag. Humidity is important for getting new growth.
- Monitoring Growth: New shoots can take a few weeks to months to appear. Keep checking the pot regularly during this time though to make sure it stays moist. If the moss or mix dries out mist it a little to keep it humid.
Extra Tips:
- Back bulb propagation is a slow process but if you’re patient it will pay off. Try not to get discouraged even if it’s taking a while.
- Once you do start seeing new growth you can begin to slowly acclimate the plant to the normal care you’d give an orchid. So more light and regular watering.
4. Stem Cuttings (For Dendrobium and Vining Orchids)
Some sympodial orchids, like Dendrobium, can be propagated via their stem cuttings, which isn’t possible with most other types of orchids.
Steps:
- Select a Mature Cane: Pick a cane that is mature and heathy. That would usually be one that has finished flowering. Younger cakes or ones that are still flowering probably won’t be successful.
- Cut the Cane: Using a sterilized knife or scissors cut the cane into sections. You want them to be about 4 to 6 inches long each, with at least one node per section.
- Prepare the Potting Medium: Fill a small pot or seedling tray with a mix of perlite and bark. It should be moist but not really wet.
- Planting the Cuttings: Lay out the cuttings horizontally on the surface of the moss. The node must be in contact with the medium. Press the cuttings into the medium gently. Finally mist them so they settle.
- Environment: Put the pot or trays somewhere humid and warm that gets indirect light. A plastic bag or humidity dome can be used to keep the humidity high.
- Monitoring Progress: Keep checking for any signs of nee shoots or rooting over the next few weeks. Make sure the medium stays moist but not wet. You can expect to see nee growth from the node within a few weeks to months.
Extra Tips:
- A rooting hormone will make the chances of success better. Just put some on the cut ends before you put them in the medium.
- Be wary of mold which can grow in high levels of humidity. If you spot any then improve the air flow or bring down the humidity a little.
Common Issues and How to Avoid Them
Even whe you think you’ve done everything right things can still go wrong. Here’s a table of common problems and their solutions:
| Problem | Cause | Solution |
|---|---|---|
| Rotting roots | Overwatering | Reduce watering and ensure proper drainage |
| Keiki not rooting | Cutting too early | Wait until roots are at least 2-3 inches long |
| Slow growth after division | Stress from cutting | Keep in a warm, humid environment until recovery |
| No growth from back bulbs | Dormant bulb | Be patient; some bulbs take over a year to sprout |
Post Propagation Care: Nurturing Your New Plants
Light
Orchids love light but not direct light. They can get burnt leaves. So you have to put them somewhere they get a lot of indirect light, maybe a windowsill.
Watering
Overwatering is the quickest way to kill an orchid. When they’re in the growing season then water them once a week and make sure then putting mix dries out between each watering.
Humidity and Air Circulation
Orchids do best in higher humidity. If your home is dry then you might want to use a humidity try or mist them. But don’t forget how important good air flow is as it will stop rotting or mold growing.
Read more: 9 Practical Tips to Save a Dying Orchid
Final Thoughts
Propagating orchids can seem daunting at the beginning but once you get the hang of it it’s not too difficult. And the result is more beautiful orchids!
As long as you follow the methods here and give your orchid the care it needs you’ll have a whole collection of amazing plants.
Worried you're killing your orchid?
Orchids fail for a small handful of specific reasons. My free guide 7 Gardening Mistakes That Are Killing Your Plants covers all of them — and what to do instead.