
A few years ago I took a baby off one of my spider plants and put it in an old jam jar of water. I was being a bit lazy and told myself I’d pot it up properly at the weekend.
I planned to but life got in the way and so the weekend came and went. Then a few more. And that little spiderette was left on the kitchen windowsill just growing roots.
Months later it was still there. Still in water and looking happy. And that showed me that you can grow a spider plant in water. And not just as a quick propagation trick before moving it to soil but over the long term.
So if you’ve ever wondered if you can skip the soil – the short answer is yes. Spider plants are one of the easiest houseplants to grow in water.
But there are a few things you need to get right or you’ll end up with some cloudy green water and a few yellow leaves.
Quick Answer
- Start With a Rooted Baby: Take a spiderette (one of the babies that hang off the mother plant) and put it in water. It roots fast and adapts to water better than a plant taken from the soil.
- Use the Right Water: Spider plants are sensitive to the fluoride in our tap water. Use filtered water, rainwater or tap water that’s sat out overnight so it doesn’t develop brown tips.
- Change the Water and Feed Lightly: Refresh the water every week or two and add a few drops of diluted hydroponic nutrients so the plant keeps growing instead of just surviving.
For the full rundown see our Spider Plant Care Guide: Tips to Get Thriving Plants.
Can You Really Grow a Spider Plant in Water?
Yes. And not just for a week or two. Spider plants will live in water indefinitely if you look after them properly.
Most people only ever put a spider plant in water to propagate it. They cut off a baby to root it in a glass then move it to a pot once it has a few roots.
That works and it’s a great way to get new plants. If that’s what you’re after our guide on how to propagate a spider plant step by step goes through that process (it’s really simple).
But growing a spider plant in water permanently is slightly different. You’re not just waiting for roots.
You have to keep the plant alive and growing with no soil at all. That means the water has to do everything the soil normally would which is where most people run into problems.
But spider plants are built for it. They have thick roots that store water and don’t mind the kind of neglect that would kill a more fussy plant. They’re one of the best houseplants for water growing alongside pothos.
If you want to see how the same idea works on a different plant our guide to growing pothos in water follows the exact same principles.
What You’ll Need
You don’t need much and you probably already have most of it lying around.
- A spider plant baby or an established plant. A rooted spiderette is the easiest starting point but you can also move a whole plant out of soil (more on that below).
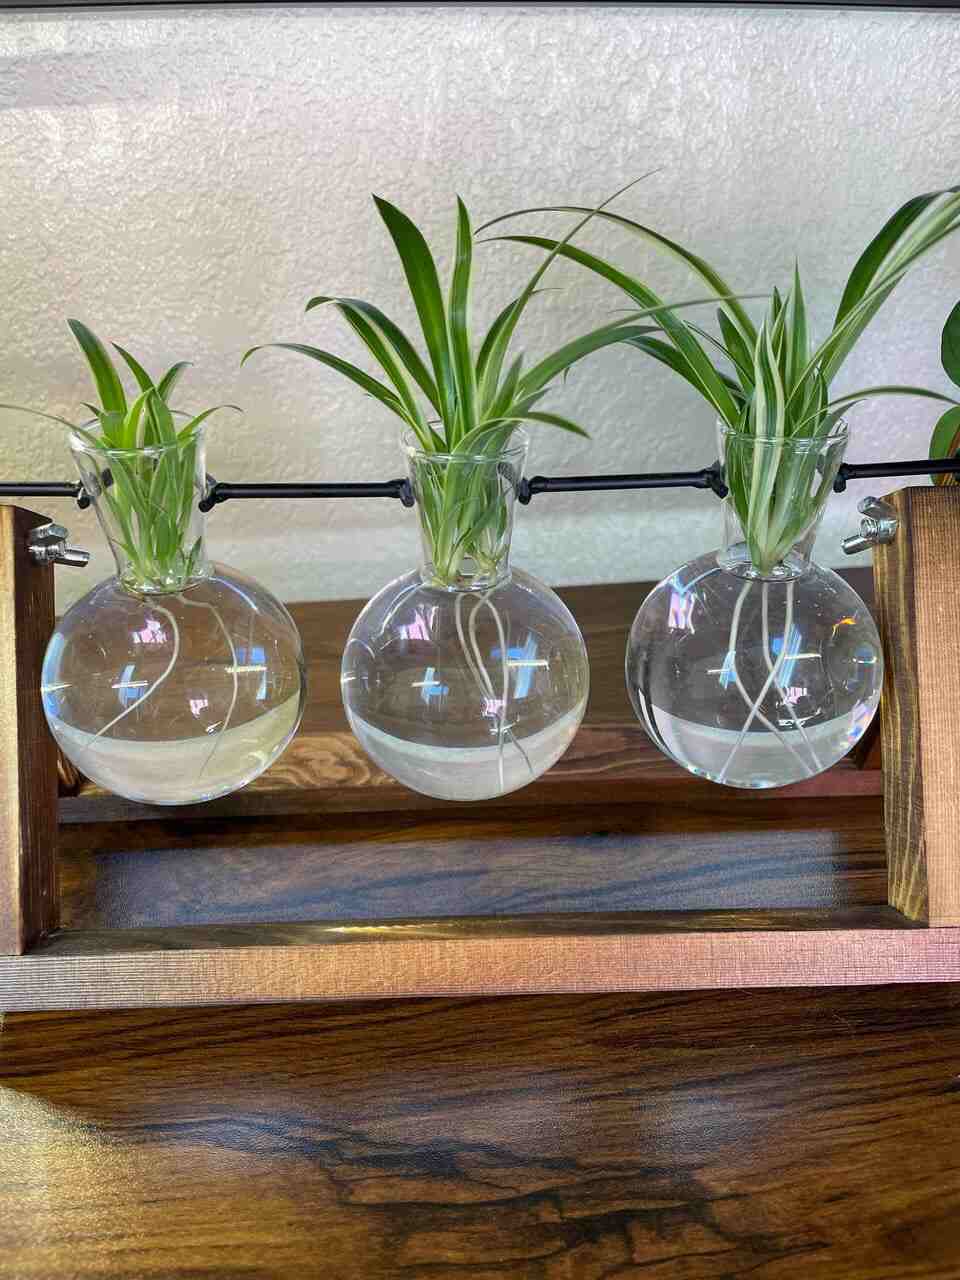
- A container. Any glass jar vase or bottle works. The neck just needs to be narrow enough to hold the plant up with the roots dangling in the water.
- The right water. Filtered rainwater or dechlorinated tap water. I’ll explain why in a little bit.
- Liquid hydroponic nutrients (optional but worth doing). Plain water keeps a spider plant alive but it won’t help to fuel much new growth over the long term. A cheap bottle of liquid hydroponic nutrients lasts ages because you only use a few drops at a time.
That’s all you need. No soil or pots or repotting. There should be no mess at all really.
How to Grow a Spider Plant in Water Step by Step
This should take about ten minutes to set up and then it mostly looks after itself.
Step 1: Start With a Baby
The easiest way to grow a spider plant in water is to start with a spiderette. These are the little baby plants that hang off the mother on long stems. They already want to grow roots so they take to water very quickly.
Snip a baby off close to the runner. Look for one that already has small root buds at the base because those will work the fastest.
Put it into your container so the base sits in the water but the leaves stay dry. Within a week or two you’ll see white roots growing.
If your plant isn’t producing any babies that’s usually an issue with either light or maturity and you’ll want to fix it first. We cover the reasons in our post on how to make your spider plant bushy since a fuller happier plant is the one that grows the most babies.
Step 2: Or Move an Established Plant to Water
You can also take a full grown spider plant out of its pot and switch it to water. I’ve done this with plants that had bad root rot in soil and the water gave them a fresh start.
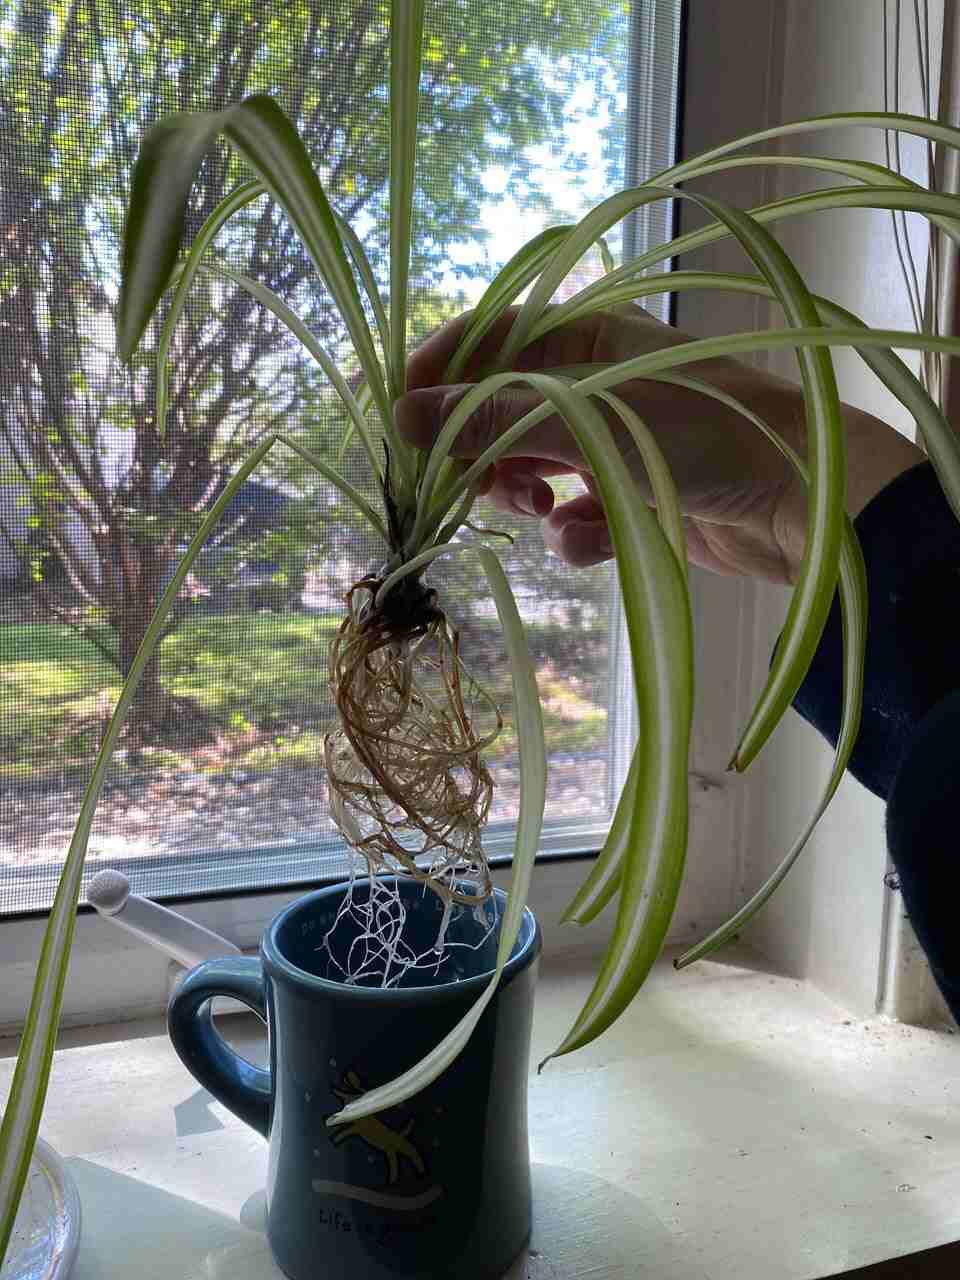
Take the plant out of its pot and shake off as much soil as you can. Then rinse the roots under a tap until they’re clean.
This part is important. Any soil left clinging to the roots will rot in the water and turn everything smelly. Be patient and get them fully clean.
Trim off any roots that are brown or slimy. Healthy spider plant roots are firm and white.
Once the roots are clean put the plant in your container with the roots submerged and the crown (where the leaves meet the roots) sitting just above the water line.
Step 3: Choose the Right Container
Almost anything holds water but a couple of things will make your life easier.
A narrow neck helps hold the plant upright so the leaves don’t flop into the water. A clear glass jar lets you keep an eye on the roots and the water level which is useful.
The downside of clear glass is that light hits the water and will encourage algae to grow. If you find yourself fighting green slime all the time then switch to a colored or opaque container. A recycled amber bottle or a ceramic vase both work well.
If you want something that looks nice on a shelf a simple glass propagation vase is a good option and looks a lot tidier than when I used a jam jar.
Step 4: Get Your Water Right
A lot of people skip this step and then wonder why their spider plant has brown tips.
Spider plants are unusually sensitive to fluoride. It builds up in the leaf tissue over time and shows up as brown tips creeping in from the ends of the leaves. Iowa State University Extension lists spider plants among the species most likely to get brown tips from chlorine and fluoride in tap water. University of Arkansas horticulture staff point to the same thing, noting the fluoride slowly bui in the tissue until it reaches toxic levels.
When your plant lives permanently in water this matters even more than usual. In soil the fluoride gets a bit diluted and buffered. In a jar the roots are sitting directly in whatever you pour in.
So use one of these:
- Filtered water. A basic jug filter removes a lot of the problem chemicals.
- Rainwater. Free and naturally soft. Collect it in a clean container.
- Tap water left out overnight. Letting tap water sit uncovered for 24 hours lets the chlorine dissipate. This doesn’t remove fluoride but it helps with the chlorine.
If you’re already dealing with brown ends our guide on the reasons your spider plant has brown tips will help you fix them.
Step 5: Find a Bright Spot
Spider plants get sold as low light plants which is only half true. They’ll survive in low light but they won’t grow as much as you’d like and the stripes fade.
For a plant in water put it somewhere with bright indirect light. An east facing windowsill is perfect since it gets morning sun. Keep it out of direct afternoon sun though because that burns the leaves and heats the water up faster than you’d like which speeds up algae.
Spider plant looking sad?
My free guide 7 Gardening Mistakes That Are Killing Your Plants covers the small habits that hold spider plants back from thriving — and how to turn yours around.
Keeping It Alive Long Term
Setting it up in water is the easy part. Keeping it thriving for months and years takes more upkeep.
Change the Water Regularly
Swap the water out every one to two weeks. Fresh water carries oxygen and the roots need oxygen just like they would in soil. Old stagnant water goes low on oxygen and starts to smell.
When you change it give the container a quick rinse to get rid of any algae or slimy film on the glass. If you notice the water getting cloudy or funky before you usually change it to then just do it early. Fresh water will never hurt.
Top up between changes too. Water evaporates and the roots need to stay covered. Just don’t let the water come up over the crown of the plant because it will rot.
Feed the Plant
Plain water has almost no nutrients in it. A spider plant will live on plain water for a surprisingly long time by living off its own reserves but eventually it will run out and then the growth slows down and the pretty much stops.
To keep it growing add some liquid hydroponic fertilizer to the water. But it has to be a small amount.
Use it at about a quarter of the strength on the label. Too much and you’ll burn the roots and cause (you guessed it) more brown tips. A few drops each time you change the water is enough.
Don’t feed much in the darker winter months when the plant isn’t doing a lot of growing anyway.
Keep an Eye on the Roots
One of the best things about a glass jar is you can watch the roots. Healthy spider plant roots in water are firm and white or pale green. That’s what you want to see.
If the roots start turning brown or become slimy you’ll know something is off. Usually it’s water that’s been left too long or a bit of leftover soil rotting in there.
Take the plant out, trim off the bad roots, rinse everything and start with fresh water. Spider plants bounce back from this really well.
It’s the same rot problem you get in pots and our guide on spider plant root rot goes over the warning signs if you need more help.
Problems With Spider Plants in Water
Brown Tips
Nearly always down to the water. Fluoride and chlorine are the main culprits so switch to filtered or rainwater. Over feeding causes it too so be careful with the nutrients too. The already brown bits won’t turn green again but you can cut them off and new growth should come in clean.
Yellow Leaves
A yellow leaf here and there is normal as old leaves die off. Lots of yellowing at once usually means the plant is short on nutrients or the water’s gone stagnant. Refresh the water and add a little feed. If it keeps happening our post on why spider plants turn yellow goes through the other causes.
Algae in the Water
Green water and slimy glass is algae and it’s caused by light hitting the water. It’s ugly but not really dangerous to the plant. Start using an opaque container or one further from the window and change the water more often.
Slow or No Growth
If your plant isn’t doing much it’s almost always down to two things. Not enough light or no nutrients. Move it somewhere brighter and add some hydroponic feed. Growth in water is always going to be a bit slower than in soil so don’t worry if it’s not happening that fast.
Water vs Soil: Which Is Better?
Growing a spider plant in water is easier and cleaner but it’s not definitely better.
Plants in water tend to grow a bit slower and don’t usually get as big or as bushy as the same plant in a good pot of soil. Soil holds nutrients and supports much bigger roots so if you want a giant spider plant soil is the way to go.
Where water wins is the simplicity and looks. There’s no repotting, no mess from the soil, no guessing if it’s overwatered.
And a spider plant with its roots on show in a nice glass jar just looks good on a shelf. For a lot of people, including me, the trade off is worth it.
You can also do both. Keep your main plant in soil and grow a few babies in water around the house. That way you get the best of both worlds and a backup plant or two if anything goes wrong.
Final Thoughts
It was me being lazy that got me growing a spider plant in water at first. But it’s now one of my favorite ways to keep them.
It’s forgiving, cheap and needs very little in the way of effort. Get the water right, keep it fresh, feed the plant a little and it’ll happily live in a jar for years.
Start with a single baby in an old jar like I did. If it works out (and it almost certainly will) you can move up to something prettier later on. Once you’ve got the hang of keeping a spider plant in water everything else about caring for them feels easy.
Spider plant looking sad?
My free guide 7 Gardening Mistakes That Are Killing Your Plants covers the small habits that hold spider plants back from thriving — and how to turn yours around.
