
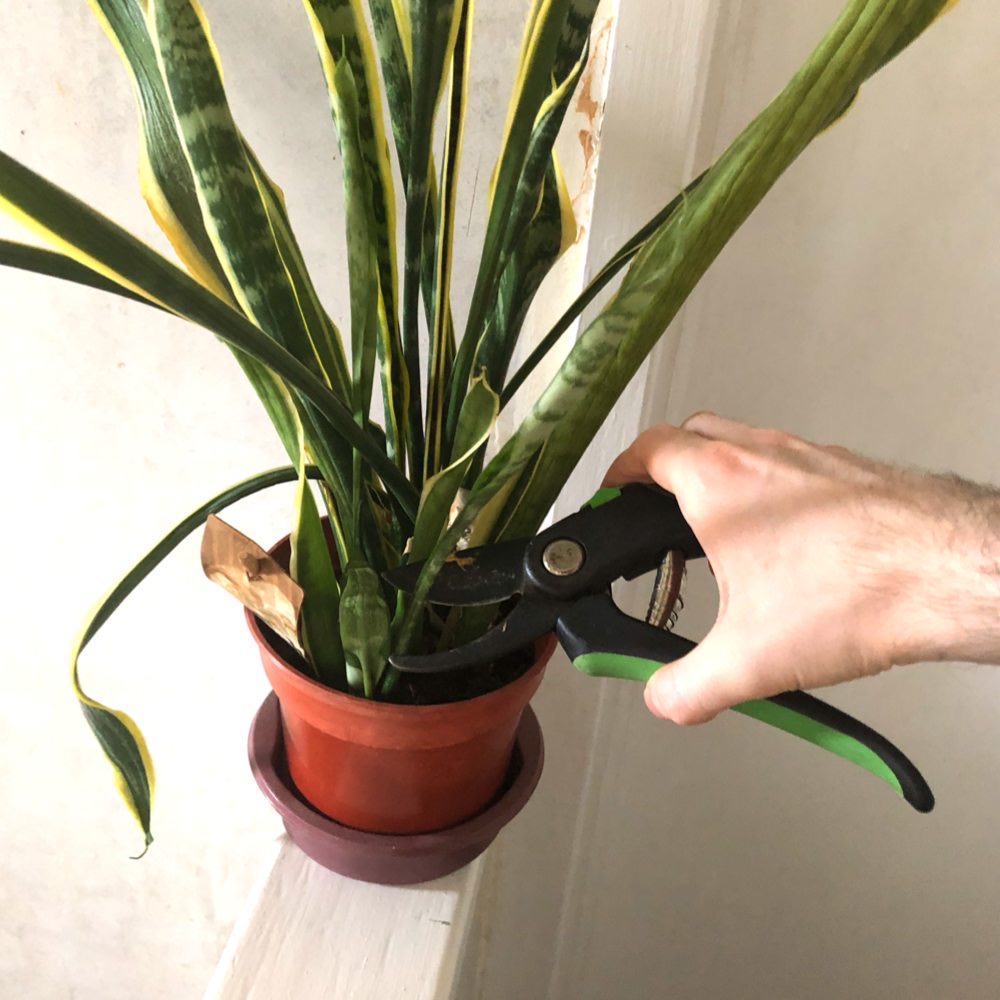
Snake plants are among the most hands off houseplants you can own. And it’s the fact they’re so easy to care for that means their pruning often gets ignored for longer than it should.
They’ll look fine and you tell yourself it does not need any attention until you notice one of the leaves has been brown at the tip for about two years, one is bending and the plant overall looks slightly tired when compared to when you first bought it.
Snake plant pruning is not complicated but there’s part of it that distinguish it from pruning a pothos or a spider plant. The most important one is this: a snake plant leaf that is cut partway along its length will never regrow from the cut point.
The cut edge stays at that height permanently and if it is not done well it looks artificial for the remaining life of that leaf. This means that when you do prune a snake plant you are making a permanent decision about each leaf you touch – which makes getting the technique right more important than with other more forgiving plants.
This guide covers all of it: why and when to prune, the tools and hygiene that matter, a clear step by step process, how to handle damaged and brown tipped leaves, how to approach height and size control, what to do with the cuttings for propagation and how to care for the plant afterward.
Why and When to Prune a Snake Plant
Snake plants grow slowly and their leaves last a long time – a single leaf can remain on the plant for several years. This slow turnover means that damage, bending or just looking bad stick around for a long time, which makes the decision to remove or trim a leaf more significant than it would be on a faster growing plant.
At the same time the slow growth means that unnecessary pruning has a cost – a leaf removed doesn’t get replaced quickly and a poorly executed trim is visible for years. Prune with purpose rather than habit.
To Remove Damaged or Dying Leaves
The most legitimate reason to prune a snake plant is to remove a leaf that has been damaged, is dying or has become beyond repair. A leaf that is brown, that has rotted at the base, that was damaged and has a permanent kink or break – these are all reasons to be removed. There’s no point keeping those leaves.
To Address Brown Tips
Brown leaf tips are the most common reason for trimming rather than removing the leaf. The tip of a snake plant leaf can be trimmed to remove the brown portion but the cut does not blend in the way it would on a spider plant leaf – the cut edge of a snake plant stays visible.
To Control Height or Size
Over time snake plants produce leaves that get to big. A snake plant in a room with a low ceiling or a plant that has grown taller than the shelf or window it’s on may need to be cut back so it’s not as high.
You can do this by removing all the tall leaves at the base rather than cutting them shorter – again, because a cut leaf stays at its cut height permanently and a cut leaf tip looks obviously wrong.
To Tidy the Plant and Improve its Appearance
Old leaves, leaves that have developed a permanent lean that stops the plant stayi by upright, leaves that are past their prime while newer ones in the centre are healthy – all of these benefit from removal.
When to Prune
Spring is the best time for snake plant pruning for the same reason it is best for most houseplants – the plant is heading into its active growing period and replaces what has been removed better than at any other time. Removing a damaged or diseased leaf should happen regardless of season – there is no benefit to waiting.
For cosmetic and size control spring or early summer gives the plant the most time to recover before conditions begin to change in autumn.

Sansevieria trifasciata (Dracaena trifasciata): The most common, with flat, upright, patterned leaves. Grows in clumps by producing new leaves from rhizomes. Pruning removes individual leaves from the clump. The variegated forms (Laurentii with yellow margins, Moonshine with silvery green) are slower-growing – each leaf removed takes longer to replace.
Sansevieria cylindrica: Round, cylindrical leaves that can grow very long. The same no-partial-cut principle applies – a cylindrica leaf cut partway displays a flat circular end that looks very wrong against the otherwise pointed natural tips. Remove whole leaves at the base rather than trimming their length.
Sansevieria whale fin (Masoniana): Large, paddle-shaped single leaves. Because each plant often has only one or two leaves, removing a damaged one is a significant decision that leaves the plant looking very sparse for a long time while new growth develops from the rhizome. Be particularly conservative with whale fin pruning.
Bird’s nest varieties (Hahnii and its variants): Compact rosette form. The same principles apply but the leaves are shorter and the pruning decisions are smaller in scale. Individual leaves within the rosette can be removed if damaged without significantly disrupting the plant’s appearance.
Sansevieria francisii: Compact, cylindrical leaves arranged in a rosette. Similar to cylindrica in the no-partial-trim principle for its round leaves.
Tools and Hygiene
Snake plant pruning only needs simple tools. You do need sharper blades and precise cutting than with pruning softer leaved plants because the quality of the cut is permanently visible on a snake plant leaf.
A ragged cut on a pothos vine disappears within weeks as new growth covers it. A ragged cut on a snake plant leaf is visible for years.
What You Need
- A sharp, clean knife or sharp scissors: For cutting individual leaves at the base either sharp scissors or a sharp knife work well. For trimming the tip of a leaf a sharp, fine bladed knife or very sharp scissors are better than standard household scissors. A dull blade tears the leaf leaving a rough edge that browns more than a clean cut would.
- Gloves: Thin gloves for sensitive skin. The sap is a mild irritant and handling large amount of leaves can cause skin irritation in susceptible people.
- 70% isopropyl alcohol: For sterilising the blade before beginning and between cuts, particularly when moving between plants or if any leaf shows signs of disease or rot. Snake plants are susceptible to fungal issues at cuts and sterilisation reduces the risk of pathogens getting in through any pruning wounds.
- Powdered cinnamon: For dusting onto cut surfaces after the removal of leaves at the base – the cut point on the rhizome or the stem stub is fleshy and benefits from the antifungal protection cinnamon provides while the wound calluses.
- A ruler or measuring tape (optional): Useful when trimming multiple leaves to a consistent height.
The Permanent Cut Principle: The Most Important Thing to Understand
Before making any cut on a snake plant leaf remember this: any cut made partway along a snake plant leaf is permanent and visible for the life of that leaf. The leaf does not continue to grow from the cut point.
The cut edge does not heal in a way that restores the original tip appearance. A snake plant leaf is a fixed length once it is mature and anything you do to its length is permanent.
This has an impact on your approach to trimming: every cut you make should either be at the base of the leaf (removing the whole leaf, which is the cleanest solution for most problems) or if you’re trimming a tip it should be done with enough care that the cut edge looks as close to natural as possible. There is no middle ground with snake plants.
Sterilising Between Cuts
Wipe the blade with isopropyl alcohol between every cut, especially when moving from one plant to another. Snake plant rot can spread easily.
Sterilised blades reduce the risk of introducing the fungi and bacteria that cause this. If any leaf you are removing shows soft, wet or discoloured tissue at its base then sterilise immediately after that cut before making any other cuts on the same or any other plant.
The Step by Step Pruning Guide
Pruning a snake plant is usually more methodical and slower than pruning a pothos or spider plant because each cut is more permanent. Working through the plant carefully, with a clear assessment before each cut, produces much better results than working quickly.
- Put on gloves. Sterilise your blade. Have cinnamon and a clean cloth to hand.
- Walk around the plant and look at every leaf individually. On a trifasciata clump with multiple leaves this means separating any leaves that are leaning against each other to see each one clearly. On a cylindrica or whale fin, assess each leaf or stem from base to tip.
- For each leaf ask yourself: is it damaged, dying or significantly brown? Does it have a permanent bend or lean that disrupts the plant’s shape? Is it one of the oldest, outermost leaves that looks tired compared to newer inner growth? Or is it healthy and should be left alone?
- Choose which you’re going to prune before making any cuts. For each leaf decide whether you are removing it entirely at the base or trimming only the brown tip. As a general rule: if more than a quarter of the leaf is affected remove it entirely. If only the tip is brown trimming may be appropriate.
- When in doubt about a leaf, leave it. You can always return to it next time. You cannot undo a cut.
- For each leaf being removed entirely cut as close to the base as possible – within 1 to 2cm of where the leaf emerges from the soil or the rhizome. Use a single, clean cut rather than sawing. On a trifasciata this means cutting through the base of the leaf where it connects to the rhizome. On a cylindrica cut the round stem at the base.
- Apply powdered cinnamon to the cut stub immediately after removal – the small section of leaf base remaining attached to the rhizome is the vulnerable point and the antifungal will protect it while the wound closes.
- Sterilise the blade before the next cut.
- Set the removed leaves if you might want to propagate them. Snake plant leaf cuttings can be propagated and even a leaf removed because it’s damaged or diseased can sometimes give you a useable section for cuttings.
- For leaves where only the tip is brown and the rest of the leaf is healthy decide whether to trim the tip or leave it. A trimmed snake plant tip always looks slightly artificial compared to the natural pointed tip the plant produces. If the brown portion is small and the plant is in a position where no one looks closely at it then leaving it may look better than a trim mark. If the brown section is significant and makes the plant look bad then trimming is the right call.
- If trimming: cut at a point clearly within the green tissue – 1 to 2cm below the lowest point of browning. Do not cut right at the boundary between brown and green as it often results in the cut edge getting more brown as it heals. Cutting into clearly healthy tissue gives a cleaner result.
- Shape the cut like the natural leaf tip. Snake plant leaves taper to a pointed tip – the trimming cut should recreate this as closely as possible. This means cutting at an angle or in a slight V shape rather than straight across. The goal is a cut that, from a normal viewing distance, look like a leaf tip rather than a cut edge. This takes more care than the clean base removal cuts but the result is much better than a flat horizontal cut.
- Smooth any rough edges at the cut point with a sharp blade if needed. A single clean cut is better than multiple passes but if the cut edge is ragged a second careful pass to smooth it produces a better appearance.
- Allow cut surfaces to air dry for 24 to 48 hours. Do not water the plant right after pruning – the cut stubs at the base of removed leaves need time to form a callus before moisture reaches them.
- Sort removed leaves: set aside any sections that could be suitable for propagation, get rid of diseased or damaged material into the bin rather than the compost.
- Check the overall plant appearance. Remove any remaining loose dead material at the base of the plant that you could get to once leaves were removed.
- Clean and sterilise tools before storing.
Pruning Damaged, Brown Tipped and Bent Leaves in Detail
This section goes further into the three most common leaf problems and how to handle each one correctly.
Brown Tips: When to Trim and When to Leave
You get brown tips on a snake plant for a few reasons: fluoride sensitivity from tap water (the same sensitivity that affects spider plants and peace lilies), low humidity along with dry air from central heating, fertiliser building up as salt, root damage from overwatering or physical damage to the leaf tip. Trimming the brown portion is the cosmetic fix; identifying and addressing the cause stops the brown from coming back on new leaves.
The decision of whether to trim or remove the leaf depends on the extent of the browning and what you want to achieve. A leaf where only the top centimetre is brown then trimming is probably the right choice – removing 2cm of a 60cm leaf is a small intervention that restores the leaf’s appearance.
A leaf where the top 20cm is brown is better removed – trimming would reduce it to a shortened leaf with an artificial tip in the middle of an otherwise full height clump, which often looks worse than the browning did.
When trimming take slightly more than the brown – cut 1 to 2cm into healthy green tissue rather than right at the brown green boundary.
The Tip Shaping Technique in Practice
The technique for shaping a trimmed snake plant tip to look natural needs you to understand what a natural snake plant leaf tip actually looks like. On a Sansevieria trifasciata the leaf tip is a gradual taper ending in a sharp point – not a blunt end, not a rounded end, but a sharp point. Recreating this with scissors means you have to make two angled cuts that come to a point rather than a single flat cut.
The approach: hold the leaf steady with your non cutting hand. Make the first angled cut from one side of the leaf, cutting at roughly 45 degrees inward and upward, removing the brown tip and ending in the healthy green tissue.
Make the second angled cut from the other side, also cutting inward and upward, meeting the first cut at a central point. The result is a rough V or chevron shape at the tip that is similar to the natural pointed form. Smooth any rough tissue at the tip point.
This will never look exactly like a natural tip – the texture of a cut edge is slightly different from the smooth taper of a grown tip and it will brown slightly at the very cut edge within a few days. But done carefully it looks like a leaf tip rather than as a trimming mark, which is the best you can hope to get.
Bent or Kinked Leaves
Snake plant leaves that have been bent, or kinked – usually from being knocked, moved, or growing in a position that forced them against a wall – do not straighten once the bend is set. A minor bend in a young leaf that is still growing may correct somewhat as the leaf continues to develop but a mature leaf with a kink will stay kinked.
For a bent leaf the decision is the same as for any other damaged leaf: is the bend severe enough to remove it or is it acceptable? A slight curve may not bother you.
A leaf that is bending significantly outward or that has a sharp kink halfway up that creates an obvious angle usually looks better removed. Remove at the base with a clean cut; the clump will look tidier and the gap will fill in over time as new leaves grow from the rhizome.
Rot at the Leaf Base
A snake plant leaf that has rotted at its base – more often than not caused by overwatering or water sitting in the crown of the plant – should be removed quickly. The rot is usually soft, wet, dark tissue at the base of the leaf, often with a nasty smell. Remove the affected leaf cutting well below the rotted portion into firm healthy tissue.
After removing a rotted leaf look at the adjacent leaves and the rhizome carefully. Rot in a snake plant base can spread to neighbouring leaves and into the rhizome.
If the rot has reached the rhizome the plant may need to be fully unpotted, the rotted rhizome section removed and the healthy sections repotted after they’ve dried out. This is more involved than standard pruning but catching rot at an early stage – before it has spread through the rhizome – is usually salvageable.

Pruning for Height and Size Control
Height and size control in a snake plant is different from height control in a pothos or spider plant because of the permanent cut principle. You cannot shorten a snake plant leaf and have it look natural.
How to Reduce the Height of a Trifasciata Clump
In a clump of Sansevieria trifasciata with leaves of varying heights, the tallest leaves are usually the oldest ones. To reduce the maximum height of the clump remove the tallest leaves at the base.
The remaining leaves – shorter because they are newer – become the main thing you see and the clump’s apparent height decreases to their level.
This works well when the tallest leaves are also the oldest. It works less well when the tallest leaves are also the most vibrant and healthy ones because removing healthy leaves purely for height control means accepting a loss of the plant’s best material.
How many to remove in one session? As with ZZ plants, the conservative approach is removing no more than a third of the total leaf count in one pruning. Snake plants are slow to replace individual leaves – a leaf removed might take six months to a year to be replaced by new growth. Removing too many leaves at once leaves the plant looking very sparse for a long time.
What to Do With Cuttings: Propagation
Snake plant propagation from leaf cuttings is one of the most satisfying parts of pruning because even a leaf that was removed for damage reasons can often give you some cuttings and the process – while slow – is reliable. The most important thing to know going in is the timeline: snake plant propagation from leaf cuttings takes months, not weeks.
You need to be realistic so as to stop the frustration that comes from expecting fast results from one of the slowest propagators of all houseplants.

The Polarity Principle: This Cannot Be Stressed Enough
Before covering the propagation methods you have to understand this because ignoring it ends up with cuttings that will never root regardless of how long you wait. Snake plant cuttings have polarity – they know which way is up and which is down and they can only produce new growth from the bottom end (the end that was closest to the soil when the leaf was on the plant).
A snake plant cutting placed upside down in water or compost will sit forever without producing any roots or new growth.
Mark which end is the base of each cutting immediately when you make the cut before moving the cutting anywhere. A small notch cut into the bottom edge, or a mark with a marker pen will be enough.
It sounds obvious until you have a collection of similar looking leaf sections and can’t remember which end was which.
What Makes a Good Snake Plant Cutting
Any section of healthy snake plant leaf at least 5cm (2 inches) long can be propagated. In practice longer sections (10 to 15cm) produce results more reliably and more quickly because they have more stored energy to fuel the development of roots and new growth.
For a leaf being removed entirely cut it into 10 to 15cm sections keeping track of the right way up. For a partially damaged leaf use only the healthy portions for cuttings and throw away the damaged sections.
Water Propagation
Put the cutting base end down in a jar of room temperature water with the bottom 2 to 3cm submerged and the rest of the cutting above the water. Place it in bright indirect light. Change the water every five to seven days to keep it fresh and stop stagnant conditions.
Small roots usually begin to appear from the base of the cutting within four to eight weeks. Once roots are 2 to 3cm long a tiny new snake plant rosette may begin to develop at the base of the cutting – this is the new plant forming, growing from the bottom of the cutting rather than from the top.
Once the new rosette has a few small leaves the cutting can be potted into a well draining compost mix. The new plant will be solid green regardless of the variety of the parent – the variegation of Laurentii and other variegated types is not preserved through leaf cutting propagation.
Compost Propagation
Insert the cutting base end down into moist, well draining compost – a mix of houseplant compost with 30 to 40% perlite is ideal. Bury the bottom 2 to 3cm and leave the rest of the cutting upright above the compost surface.
Water lightly and place it in bright indirect light. The compost should be kept barely moist – snake plant cuttings rot easily in consistently wet compost.
New growth from the base of the cutting – a tiny new snake plant emerging from below the compost surface – is the sign of successful propagation and usually appears within three to six months. Until then the cutting may look completely unchanged which can be worrying if you are expecting it to happen faster. The process is happening underground.
Division: The Fastest Propagation Method and the Only One That Preserves Variegation
For growers who want more plants quickly or who want to keep the variegation of a Laurentii or other variegated snake plant, dividing the rhizome at repotting time is both faster and more reliable than leaf cuttings. The rhizome of a mature trifasciata is a horizontal underground stem with multiple growing points, each of which can produce new leaves.
Separating the rhizome into sections – each with at least one or two healthy leaves attached – and repotting each section separately gets multiple plants straightaway.
Division is done at repotting time when the plant is out of its pot and the rhizome is easy to get to. Use a clean knife to separate the sections.
Each section should have healthy rhizome tissue and at least one leaf. Dust cut surfaces with cinnamon, let it air dry for an hour or two and pot each section into fresh, well draining compost. Recovery is much faster than leaf cutting propagation – a matter of weeks rather than months – and the variegation is preserved in the divided sections.
Aftercare Following Pruning
A few specific adjustments in the days and weeks after pruning will make a difference to how well the cuts heal and whether the plant continues in good health.
The Drying Period
Allow 24 to 48 hours after pruning before watering the plant. The cut stubs at the base of removed leaves – the short sections of leaf base still attached to the rhizome – are fleshy and moist at the cut point and watering before they have had time to begin callusing increases the risk of rot. This drying period is important in any conditions that are on the cool or humid side where the combination of fresh cuts and persistent moisture creates ideal conditions for fungus.
During the drying period make sure the plant is in a spot with lots of airflow rather than a somewhere still and enclosed. The air speeds up the callusing process and reduces the humidity around the cut surfaces.
Reduced Watering for Several Weeks
Snake plants already prefer to dry out between waterings. After pruning extend this to an even greater degree.
With fewer leaves the plant’s need for water is less and the combination of reduced demand and fresh cut surfaces means that watering frequency should decrease rather than stay the same.
Let the top half of the compost dry between waterings in the first four to six weeks after pruning rather than just the top two inches as might be your normal practice.
No Fertilising for Six Weeks
Snake plants are light feeders even in peak growing conditions. After pruning don’t fertilize for at least six weeks.
The plant is not in active growth mode right after pruning and can’t use nutrients effectively. Fertilizer applied during this period builds up as salts in the growing medium without being taken up.
Resume feeding in spring if you pruned in spring, or at the start of the following growing season if pruning happened in autumn or winter.
Monitor Cut Surfaces Carefully
Check the cut stubs at the base of removed leaves every two to three days for the first two weeks. A healthy healing stub looks like the cut surface gradually drying to a slightly shrunken, pale nub.
An unhealthy progression looks like the tissue at and around the cut becoming wet looking or discoloured or a dark staining beginning to spread downward from the cut point into the leaf base still attached to the rhizome.
If you see signs of rot beginning at a cut surface act fast. Cut the stub further down – as close to the rhizome as possible – with a sterilized blade, dust with cinnamon and make sure the plant has good airflow and is not being overwatered.
Rot caught within the first week is almost always containable. Left for two weeks it can reach the rhizome and spread to healthy leaf bases which is a much more serious problem to address.
When to Expect New Growth
New snake plant leaves come from the growing points on the rhizome and are not triggered or made quicker by pruning. The plant produces new leaves on its own schedule – driven by light levels, temperature, the rhizome’s stored resources and the growing season – not in response to what you have removed.
In good conditions in spring or summer a new leaf may emerge within a few months of pruning. In lower light or in winter new growth may not appear until conditions improve.
A snake plant that looks sparse after pruning is not a plant that has been harmed. It is a plant that is growing on at its own rate and the new growth that eventually fills the gaps will be the freshest, most vigorous leaves the plant has produced.
The patience that snake plant ownership requires in general is the same for its post pruning recovery period.
