So you’ve fallen for the Monstera plant. Frankly, who hasn’t? You’ve probably seen it’s awesome split leaves cropping up on your Instagram feed years now.
So why wouldn’t you want one? It’s not a surprise it’s so popular when it looks as good as it does.
But how do you care for one? Is it easy? Are they forgiving or do they need a ridiculous amount of love and attention?
Well this guide is for anyone who’s been eyeing that Monstera at the garden center but isn’t sure if they can keep it alive.
Maybe you’re a complete newbie who’s killed every plant you’ve ever touched. Or you’ve got a growing collection but haven’t had a go at growing Monstera yet. It may even be that you’ve had one for years but it’s not doing very well and you want to improve it.
Whatever it is this guide and tips will help you care for a Monstera the right way. And the best part is you don’t need much to get started. A decent pot, the right soil mix, a sunny spot in your home and a little patience will get a long way to growing a healthy Monstera.
Monstera Basics
Let’s start by properly understanding Monstera. The Monstera deliciosa goes by many names – Swiss cheese plant (for obvious reasons), split-leaf philodendron (though it’s not actually a philodendron at all), and sometimes just “that plant with the holes.”
It’s originally from the tropical rainforests of southern Mexico and Panama. And Monsteras grow quite differently in the wild than they do in our living rooms.
In their natural habitat they’re actually climbers – starting life on the forest floor before climbing up trees toward the light. If you’ve ever noticed it’s aerial roots poking out – well they aren’t just for show; they’re how the plant attaches itself to trees as well as absorbing nutrients and moisture from the air.
In our homes Monsteras still want to climb but we usually give them support through moss poles or trellises. Without that support they have a tendency to sprawl outward rather than upward.
Indoors you can expect your Monstera to potentially reach 6-8 feet tall with proper care. Although I’ve seen some particularly happy specimens touching ceilings! The spread can be considerable too – about 3-5 feet if you don’t prune them.

As for the splits and holes they’re so well known for? They develop as the plant matures usually starting to appear when a plant has 5-7 leaves.
They have an evolutionary purpose too and aren’t simply there to look good. They let wind to pass through in stormy tropical weather and maximize light exposure for lower leaves. Which I think we can all agree is a pretty clever adaptation.

Light Requirements
If you take one thing from this guide it should be this – Monstera does not negotiable when it comes to light. Especially if you’re looking to get those split leaves.
My first Monstera spent two years in a dim corner of my apartment. It managed to stay alive there but it looked nothing like the lush ones you see online. Once I moved it to a brighter spot though it almost instantly transformed – new leaves emerged bigger and with more splits every month.
So Monsteras thrive best in bright, indirect light. You only need to think of their natural habitat. They grow under the canopy of larger trees in tropical forests, so they’re used to dappled sunlight filtering through the leaves above.
The Right Spot
In your home this means finding a spot near a window where sunlight enters the room. But you need to make sure it doesn’t directly shine on the plant’s leaves for too long either.
Too little light and it will likely survive, sure, but at what cost? Growth slows massively and new leaves emerge smaller. You’ll also find fewer splits develop.
So often people wonder why their Monstera doesn’t have the holes they hoped for and it’s almost always down to not enough light.
But too much direct sunlight isn’t the answer either. Give it more than it wants and the leaves will turn yellow and develop brown patches where the sun has burned the foliage.
Monsteras can adapt to some direct light (morning sun is gentler than afternoon sun), but anything more than 2-3 hours can cause damage.
For most homes an east or north facing window will be about right. My personal Monstera superstar lives about 4 feet from an east facing window. It gets bright morning light but is protected from intense afternoon rays.
If you only have south or west facing windows available then put it a few feet back from the window or filter the light with a sheer curtain.
For even more help see our monstera lighting guide.
Watering
The biggest mistake I’ve made when looking after a Monstera was when I nearly loved one to death by overwatering. When I first got it I was so worried about it drying out that I watered it every few days. The leaves started yellowing and I panicked, making the stupid error of thinking it needed MORE water. Turned out I was drowning the poor thing.
So here’s what you need to known – Monstera are a lot more tolerant of underwatering than overwatering. In fact in their native tropical habitat they have to go through long periods of drought between rainfall. So your watering schedule should try to copy that pattern.
How Often
For most indoor environments watering every 1-2 weeks is good enough. The exact timing will depend on your conditions. Things like your home’s humidity, temperature, pot size, the season etc. During active growing months (spring and summer) your Monstera will drink more water than during the dormant winter months.
I still believe the finger test method is best for checking if it’s time to water. If you don’t know it it’s super simple: simply stick your finger about 1-2 inches into the soil and if it feels dry at that depth, it’s time to water. If it’s still moist then check back in a few days. After a while you get a feel for your plant’s particular rhythm.
How Much
When you do water, do it thoroughly. I place my Monstera in the shower (yes, my plants get spa treatments) and give it a slow, gentle soaking until water runs from the drainage holes.
This makes sure the entire root ball gets watered, not just the top layer. Then I let it drain completely before putting it back in its spot. Standing water is almost guaranteed to result in root rot.
For a more in depth look at this check out our guide to how much water a monstera needs.
Signs of Overwatering
Signs your Monstera is getting too much water include yellowing leaves (especially older ones), black spots on leaves, mushy stems near the soil line and a general droopy appearance even though the soil is wet. Underwatering thought shows up as curling leaves, brown crispy edges and a generally limp appearance that perks up after watering.
I once forgot to water my Monstera for nearly three weeks. While it was definitely droopy when I returned I was lucky in that a good soak brought it back to life within 24 hours. Surprisingly there was no permanent damage done.
But the same can’t be said for an overwatered plant. Instead you’ll likely be fighting root rot for months. So when in doubt always err on the side of underwatering.
Our monstera watering guide goes into even more detail.
Humidity and Temperature
As mentioned earlier Monsteras come from humid rainforests where the air is practically dripping with moisture. And they’ve adapted really well to our dry homes. But humidity can be the difference between a good looking Monstera and a real head turner.

The Right Humidity
Monsteras like humidity levels between 60-80%. But the average home is around 30-40% humidity. When I noticed my Monsteras leaf edged turning brown even though I’d been watering it properly I was confused. But a quick check with a humidity gauge (worth the $10 investment) showed my home was dry as a desert at 35%. And I had my answer.
So, what can you do about that if you’re in the same position? Well there are a few ways to boost humidity around your Monstera.
The simplest is grouping plants together. They end up creating their own little microclimate. I’ve got a “tropical corner” where my the plants that love humidity all huddle together. It works too – they do much better for it.
Pebble trays work well too. Just place a tray of water and pebbles under your plant’s pot (make sure the pot sits on the pebbles, not in the water). As the water evaporates it increases humidity around the plant. I usually use this method only for smaller plants because I’ve found it’s not enough for the larger ones.
What About Misting?
Misting can be a bit controversial. It does temporarily increases humidity but the effect doesn’t last long.
I misted religiously for months before realizing it wasn’t making much difference. If you go this route then mist in the morning so the leaves can dry before the cooler evening temperatures set in.
Get a Humidifier
The most effective solution though? A humidifier. I finally invested in one last winter when my heating system turned my apartment into the Sahara.
The difference was amazing. It wasnt just the new growth but also the existing leaves became more vibrant and developed a healthy shine. For larger Monsteras using a humidifier is the best solution, hands down.
Temperature
When it comes to temperature Monsteras are comfortable in the same range we are – between 65-85°F (18-29°C). They’ll survive brief drops to around 55°F (13°C) but too long at temperatures below 60°F (15°C) will stress them and slow growth.
What they absolutely hate though is sudden temperature changes and drafts. Keep them away from exterior doors, drafty windows and AC vents.
Soil and Potting
Trying to get the right soil mix for a Monstera can be annoyingly tough. But once you understand what they actually need it becomes a lot more straightforward.
In the wild Monsteras grow in loose, nutrient rich soil that drains quickly but retains some moisture. So that should be your goal for them too.
Standard potting mix from the garden center works in a pinch but it’s usually too dense and water retentive for Monsteras in the long run. One of my early Monsteras developed root rot despite me being extra careful with watering. It was just that the soil was staying wet for too long.
My go-to mixture now is roughly:
- 60% quality potting soil
- 20% orchid bark or chunky coconut husk
- 10% perlite
- 10% horticultural charcoal (optional, but helps keep the soil fresh)
This mix is the perfect balance – enough organic material to hold nutrients, plenty of chunky material for drainage and aeration and space for the roots to grow. The bark pieces create air pockets that stop the soil from compacting over time which is a must for proper root health.
Pot Choice
Drainage holes are absolutely the most important thing to have in your Monstera pot. I don’t care how cute a ceramic pot is – if it doesn’t have drainage, your Monstera shouldn’t live in it permanently.
I’ve lost plants to cute pots before and it’s just not worth it. If you have to use a decorative pot without holes then please use it as a cache pot (an outer decorative pot that holds a plain nursery pot with drainage).
Size matters too. Monsteras like to be slightly root bound, although not too much. But that means you don’t want to rush to put them in massive pots.

When repotting go up only 1-2 inches in diameter. I made the mistake of putting a small Monstera in a huge pot thinking it would grow into it. What actually happened though was the excess soil stayed wet, leading to – you guessed it – root rot.
Speaking of repotting, most Monsteras benefit from fresh soil every 1-2 years.
Signs your Monstera needs repotting include:
- Roots circling the pot or coming out of drainage holes
- Water running straight through the pot without being absorbed
- Significantly slower growth despite good conditions
- Plant becoming top-heavy or unstable
The best time to repot is during the growing season (spring through early summer). When I’ve repotted in early spring my Monstera often gives me new leaves over the next few months. So it’s worth it.
Fertilizing
Fertilizing is where I think a lot of plant owners either overdo it or completely forget about it. I admit to being in the “completely forget about it” camp until I realized my Monstera’s growth had plateaued.
Monsteras aren’t heavy feeders but they do appreciate regular, light fertilization during their growing season. You can of fertilizer as a bit like a multivitamin for your plants – not a miracle growth solution. It doesn’t amount how much ferilizer you use, it won’t fix poor light or watering.
I recommend using a balanced liquid houseplant fertilizer with an NPK ratio around 5-5-5 or 10-10-10. “Balanced” just means it has equal parts nitrogen (N), phosphorus (P) and potassium (K) – the three main nutrients plants need.
Nitrogen supports leaf growth, phosphorus helps with root development and energy transfer and potassium aids overall plant health and being resistant to diseases.
When to Fertilize
During the growing season (spring through early fall), fertilize once a month at half the recommended strength on the package. Yes, half – it’s much better to under’fertilize than over do it. I mark “Monstera feeding day” on my calendar so I don’t forget or double dose.
In the fall and winter plants naturally slow in growth as the daylight lessens. This is when you should stop fertilizing entirely (roughly October through February in the Northern Hemisphere). Monsters doesn’t need that extra feed at this time as it’s semi dormant.
Signs of Too Much Fertilizing
In the past I made the mistake of continuing to fertilize my Monstera through December. What happened was the fertilizer salts built up in the soil and caused brown leaf edges and stunted growth. I had to flush the soil thoroughly with clean water to save it.
The main signs of over fertilization are:
- White crust on soil surface (fertilizer salt buildup)
- Brown or burnt leaf edges
- Wilting despite adequate water
- Unusually slow growth
If you notice any of these symptoms then flush your pot with clean water several times and hold off on fertilizing it for at least 2-3 months.
But if you under feed your Monstera it might have smaller new leaves, pale green colorationnor generally lackluster growth despite good light and watering. When I finally started regular fertilizing I was amazed at how much more vibrant and larger the new leaves grew.
Pruning and Maintenance
Monstera isn’t the most restrained plant. It can be a bit wild if given the chance, spreading in whatever direction it feels like.
My first Monstera sprawled across half my living room before I realized I could (and should) be directing its growth.
That’s where pruning comes in. Pruning is useful for a few reasons: it controls the size and shape of your Monstera, removes damaged or dying foliage and in some cases encourages branching and fuller growth.
So don’t be afraid to cut your Monstera. If you do it the right way they’ll respond well.
What You Need
The tools you’ll need are simple: a pair of clean, sharp scissors or pruning shears. I always clean my tools with rubbing alcohol before making any cuts so to avoid introducing bacteria or fungi to the fresh wounds.
A clean cut is also important. Ragged cuts heal more slowly and can lead to infection.
How to Prune
When pruning always cut just above a node (those little bumps along the stem where leaves emerge). This will encourage new growth from that point.
You can also remove entire leaves by cutting the petiole (leaf stem) close to the main stem. Or you can prune back a lengthy main stem to encourage branching.
I tend to do my major pruning in early spring as the growing season begins. This gives the plant plenty of time to recover and put out new growth. That said, you can remove damaged or dying leaves any time of year. They’re not doing anything other than draining energy from the plant.
Other Maintenance
Beyond pruning regular maintenance shouod be about cleaning your Monsteras leaves. Dust accumulates on broad Monstera foliage and that can reduce the plant’s ability to photosynthesize properly.
So every few weeks I wipe both sides of each leaf with a damp cloth. For larger plants a shower works (I talked about that earlier). Make sure the water isn’t too cold or hot though.
For more help follow this guide to cleaning monstera leaves.
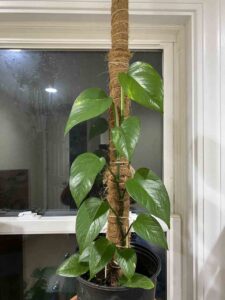
Support
As your Monstera grows you’ll need to give it some support for its climbing habit. It had aerial roots which aren’t there just to look good, they’re looking for something to grab onto.
A moss pole is a great option as it mimics the trees they climb in nature. The aerial roots can actually grow into the moss, absorbing moisture and nutrients.
My largest Monstera was a new plant after getting a proper moss pole! All its nee leaves grew bigger and with more dramatic splits. It also became a lot more upright and generally looked better. Without the right support Monsteras often grow outward rather than upward and take up a lot of space horizontally.
For the aerial roots that don’t reach the pole or soil you still have options. Some people trim them but I prefer to direct them back into the soil when possible. If not that then I just let them be – they’re part of the plant’s natural growth.
I’ve even seen creative Monstera owners attach small water containers to their plant stands where lengthy aerial roots can reach the water.
For more ideas see our guide to monstera support.
Propagation
There’s something oddly satisfying when you make new plants from your existing ones. Its like getting free plants!
And Monstera propagation is surprisingly straightforward. That’s how I’ve given so many of my friends their own Swiss cheese plants without it costing me a fortune.
The easiest and most reliable method is stem cuttings. But when cutting you must include at least one node (node being the bumpy joints along the stem where the leaves and aerial roots are).
Without a node your cutting won’t develop roots no matter how long you wait or how much rooting hormone you try.
The ideal cutting should have:
- One healthy leaf (two max)
- At least one node
- Preferably an aerial root, though this is a bonus
Using clean, sharp scissors or pruning shears make your cut about a half-inch below a node. You can propagate in either water or soil. Both have a decent rate of success.
Water Propagation
Water propagation is slightly different. Start by placing your cutting in a container of clean water. Make sure the node is submerged but the leaf remains above water.
Change the water every 3-5 days so you don’t get any bacterial growth. Within 2-4 weeks you should see tiny white roots emerging from the node. I like using clear glass containers so I can keep an eye on any root development without disturbing the cutting.
Soil Propagation
Soil propagation skips the water phase and plants the cutting directly into a light, well draining potting mix. Keep the soil consistently moist (but not soggy) for the first month.
You can’t see the roots developing with soil propagation but you’ll know they’ve formed when the cutting stays firmly anchored and you notice new growth.
A middle of the road approach I’ve had a lot of success with is letting roots develop in water until they’re 2-3 inches long then transferring to soil. This gives you the satisfaction of watching roots form while avoiding the potential shock some plants get when being moved from water to soil.
The timeline from cutting to established plant varies, but generally:
- 2-6 weeks for initial root development
- 1-2 months until the first new leaf appears
- 6+ months to develop into a full-fledged plant with multiple leaves
Temperature is really important for successful propagation. Warm conditions (70-80°F) dramatically speed up the process. My summer propagations root nearly twice as fast as winter attempts.
One more propagation tip: humidity helps! I cover my water propagations with clear plastic bags with a few holes poked in them for the first couple of weeks. Doing this will create a sort of greenhouse effect that a lot of tropical cuttings like.

Common Problems and Fixes
Even if you do everything right with you Monstera they can still have problems. Here’s how to diagnose and solve the most common issues I’ve encountered:
Yellowing Leaves
This is probably the most common complaint I hear from fellow Monstera owners. The trickiest part is that yellowing can have multiple causes. If older, lower leaves are yellowing and the rest of the plant seems healthy that’s often just natural aging and nothing to worry about.
But if multiple leaves are yellowing all at once, especially the newer ones, there’s a very good chance you’re overwatering. Check the soil moisture level immediately – if it feels wet and it’s been more than a few days since you last watered you might have to unpot the plant and look for root rot. I’ve saved quite a few plants by trimming away black, mushy roots and repotting in fresh, dry soil.
Another common reason for yellowing is light issues. Too much direct sun can scorch leaves and too little causes them to yellow and drop. Track how much light your Monstera is being exposed to for a few days to see if it you should change it at all.
Brown Tips and Edges
Crispy brown edges are usually a humidity issue. Indoor air, especially in winter, is much drier than the tropical conditions Monsteras prefer. Putting a humidor near to your Monstera works very well.
Brown tips can also be a sign of buildup of minerals or fertilizer salts. If you suspect this could be what’s going on then flush the soil by running clean water through it for several minutes and allow it to drain completely.
No Splits or Holes in Leaves
This one’s simple but disappointing for most new Monstera owners. Young plants don’t develop fenestrations (splits and holes) until they mature. My Monstera didn’t produce its first split leaf until it had about seven leaves in total.
That said, mature plants producing unsplit leaves usually need more light. When my plant was in a darker corner it’s new leaves didn’t have any splits even though it was mature. After moving it to a brighter spot the very next leaf had the fenestrations I was hoping for.
Pests
Spider mites love Monsteras, unfortunately. They’re barely visible to the eye but they leave telltale fine webbing on the undersides of leaves and where the leaves meet the stems. You might also notice a stippled appearance on leaves as they suck out plant juices.
How I deal with them:
- Isolating the affected plant immediately
- Showering the entire plant thoroughly to wash away as many mites as possible
- Treating with insecticidal soap or neem oil, making sure to get the undersides of all leaves
- Repeating treatment weekly for at least three weeks
Mealybugs are another common pest. They look like tiny white cotton balls that group together where leaves meet stems. They’re easier to spot than spider mites but just as damaging.
You can dab them directly with a cotton swab dipped in rubbing alcohol before using the same treatment as for spider mites.
Prevention is always easier than treatment. I try to inspect my plants on a regular basis. And I will occasionally give them preventative neem oil treatments, especially during winter when indoor heating creates the sort of conditions pests love.

Pet Safety
This is really important information that I wish I’d known before bringing home my first Monstera as a cat owner. Monstera plants contain calcium oxalate crystals that are toxic to pets if they ingest them. The crystals cause immediate irritation to the mouth, excessive drooling, vomiting and difficulty swallowing.
So if you have any pets, especially curious cats or dogs that love to chew on your plants, your options are:
- Put your Monstera in rooms pets don’t have access to
- Use elevated plant stands or hanging planters out of reach
- Try bitter apple spray on lower leaves as a deterrent (test on a small leaf area first)
- Consider pet-friendly alternatives like Boston ferns, spider plants, or parlor palms
If your pet does eat part of a Monstera plant you should rinse their mouth with water if possible and contact your veterinarian as soon as possible. Watch for symptoms like difficulty breathing or severe swelling. If there’s a thing like that then they will need emergency care.
As a compromise I keep my Monstera in a room with a door that stays closed when I’m not home. I’ve also trained my cats to avoid it with gentle deterrents. It’s extra work but worth it for my pets safety.
FAQ
Why are my Monstera’s leaves not splitting?
This is usually down to not enough light. Monsteras need bright, indirect light to develop the splits they’re known for. Young plants also won’t show splits until they mature (usually after the 5th-7th leaf).
How quickly do Monsteras grow?
If they have the best conditions you can expect 1-2 new leaves per month during growing season. In winter growth will slow down significantly. My largest Monstera produces about 8-10 new leaves annually.
Can I put my Monstera outside in summer?
Yes, but do so with caution! Introduce the plant gradually to outdoor conditions (a process called hardening off). Keep it in a sheltered spot with bright, indirect light. Bring it in when temperatures drop below 55°F (13°C) or if nasty weather threatens it.
Why are my Monstera’s leaves drooping?
Drooping is often because of watering issues. If the soil is dry your Monstera needs water. If the soil is wet you might be overwatering and that has caused root problems. Check the roots if drooping continues even after proper watering.
Do I need to mist my Monstera?
Misting will give some very temporary humidity but it isn’t very effective long-term. A humidifier or pebble tray is much better for more consistent humidity. That said, misting occasionally to clean leaves doesn’t hurt.
Can I grow a Monstera from a leaf cutting?
No, unfortunately. A Monstera cutting must include at least one node to successfully propagate. A leaf alone, even with a petiole (stem), won’t develop roots.
My Monstera is getting too big. Can I cut it back drastically?
Absolutely. Monsteras respond well to pruning. You can cut it back significantly and propagate the cuttings if you want. The plant will branch out from below the cut points, quite often becoming fuller.
Final Thoughts
Monstera are one of the most enjoyable plants to grow. They look incredible and are very forgiving. While no plant is truly “impossible to kill,” Monsteras come pretty close if you get the basics right.
I began by killing anything more complicated than a pothos and I’ve got Monsteras flourishing in more than one room now. If I can do it then anyone can!
Monstera want to grow. They’re begging for you to get it right. All you have to do is create the conditions that allow them to thrive. And if you mess up? Well, most mistakes are fixable, and propagation means you can always start fresh if needed.