A few years ago I nearly threw out a perfectly good orchid. The leaves had gone all wrinkled so I assumed it needing more water and so kept watering it. Unfortunately the leaves got worse.
When I finally tipped it out of the pot the roots were brown and mushy. The plant hadn’t needed more water like I’d thought. In fact it had been drowning and the rotted roots couldn’t take up any water.
It’s easy to make a mistake like this when it comes to wrinkled orchid leaves. They look just like a plant that needs water, so you understandably think to give it more water.
And sometimes that’s right. But a lot of the time it makes things worse.
Wrinkled and shriveled orchid leaves nearly always come down to one thing: the leaves aren’t getting enough water, which usually means the roots can’t take it up.
You just have to work out why. And before you choose to water it the best thing you can do is check the roots.
So I’m going to go through the main causes for wrinkled orchid leaves and what to do about each one.
Quick Answer
- Check the Roots First: Take the plant out of its pot. Firm, green or silver colored roots mean it needs water. Brown or hollow roots mean rot watering more will make it worse.
- Water Properly, Not More: If the roots are healthy and the bark is dry, give it a good watering. Bottom watering for 15 to 20 minutes works the best.
- Fix the Environment: Most orchids wrinkle in dry, hot air. Try to get the humidity at 50 to 70% and keep them out of direct sun and away from radiators.
Need the full picture? See these tips for caring for an orchid indoors.
1. Underwatering and Dehydration
The Problem:
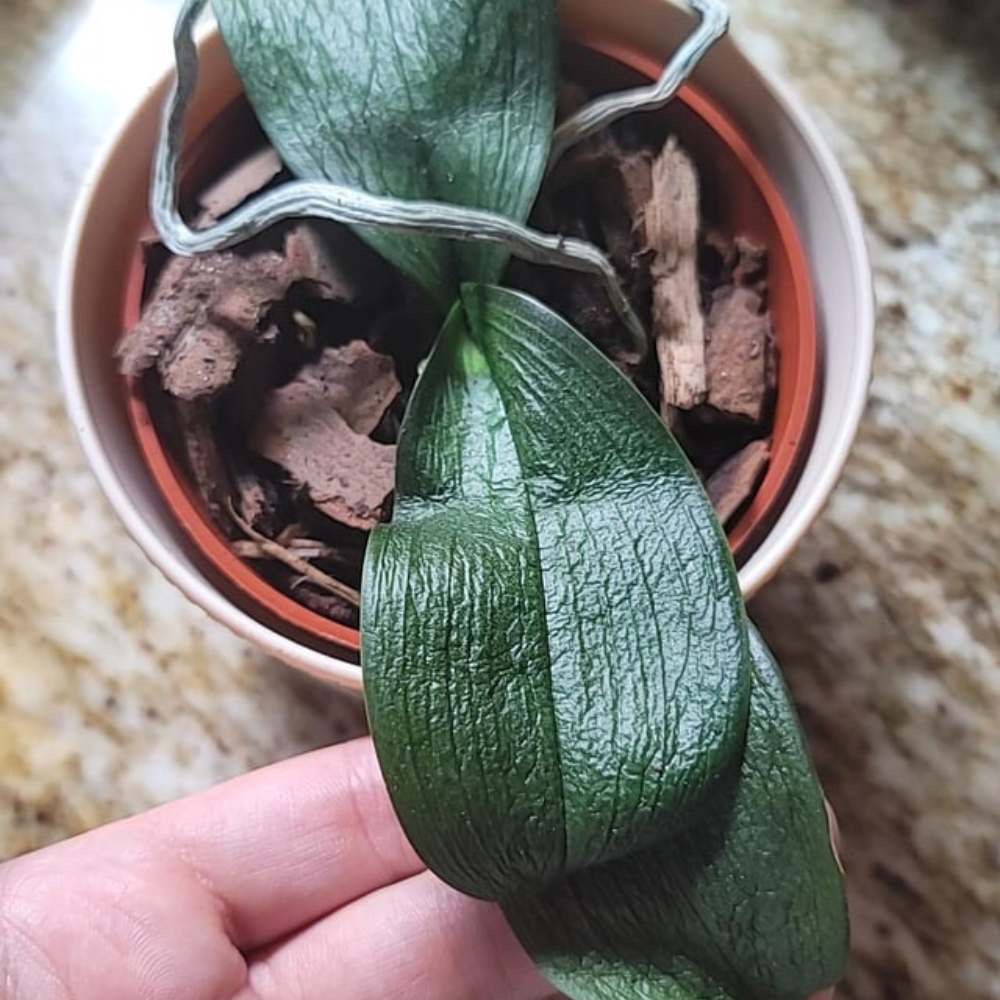
This is the obvious one and sometimes it really is just this. Orchids store some water in their leaves so when the roots aren’t getting enough the plant takes some of that water out of the leaves to survive. The leaves react to the loss of water by going soft, floppy and wrinkled.
Phalaenopsis orchids, the ones you can get from grocery stores and that most of us own, don’t like to dry out completely for long. A week or two of very dry bark is enough to start the leaves wrinkling.
Signs of Underwatering:
- The potting bark is completely dry and light when you lift up the pot.
- Roots look silver or grey rather than green and feel sort of papery.
- Leaves are wrinkled but still feel quite firm, not mushy.
The Fix:
- Water thoroughly: Run lukewarm water through the bark for a good 30 seconds. Or put the pot in a bowl of water for 15 to 20 minutes so the roots can take a lot of it up.
- Let it drain: Never leave the pot sitting in water afterwards. Get rid of anything that has accumulated in the saucer or pot.
- Build a routine: Most orchids need watering every 7 to 10 days. Check the roots to decide when to water instead of sticking to a certain date. Green roots mean you should wait, silver roots mean you need to water. This guide to watering an orchid covers when, how and how often.
2. Overwatering and Root Rot
The Problem:
This is the cause that everyone gets wrong and the main reason this article exists. Wrinkled leaves can mean too much water, not too little.
When the roots are left to sit in wet bark they can’t get oxygen. They rot, turn to mush and stop working.
The plant then has enough water around it but the roots can’t absorb any of it. So the leaves become dehydrated and wrinkle, just like an underwatered plant.
This is why so many people kill their orchid – they try to water a problem that more water can never fix.
Signs of Root Rot:
- The bark stays wet for days and may smell awful.
- Roots are brown, black, mushy or hollow when you squeeze them.
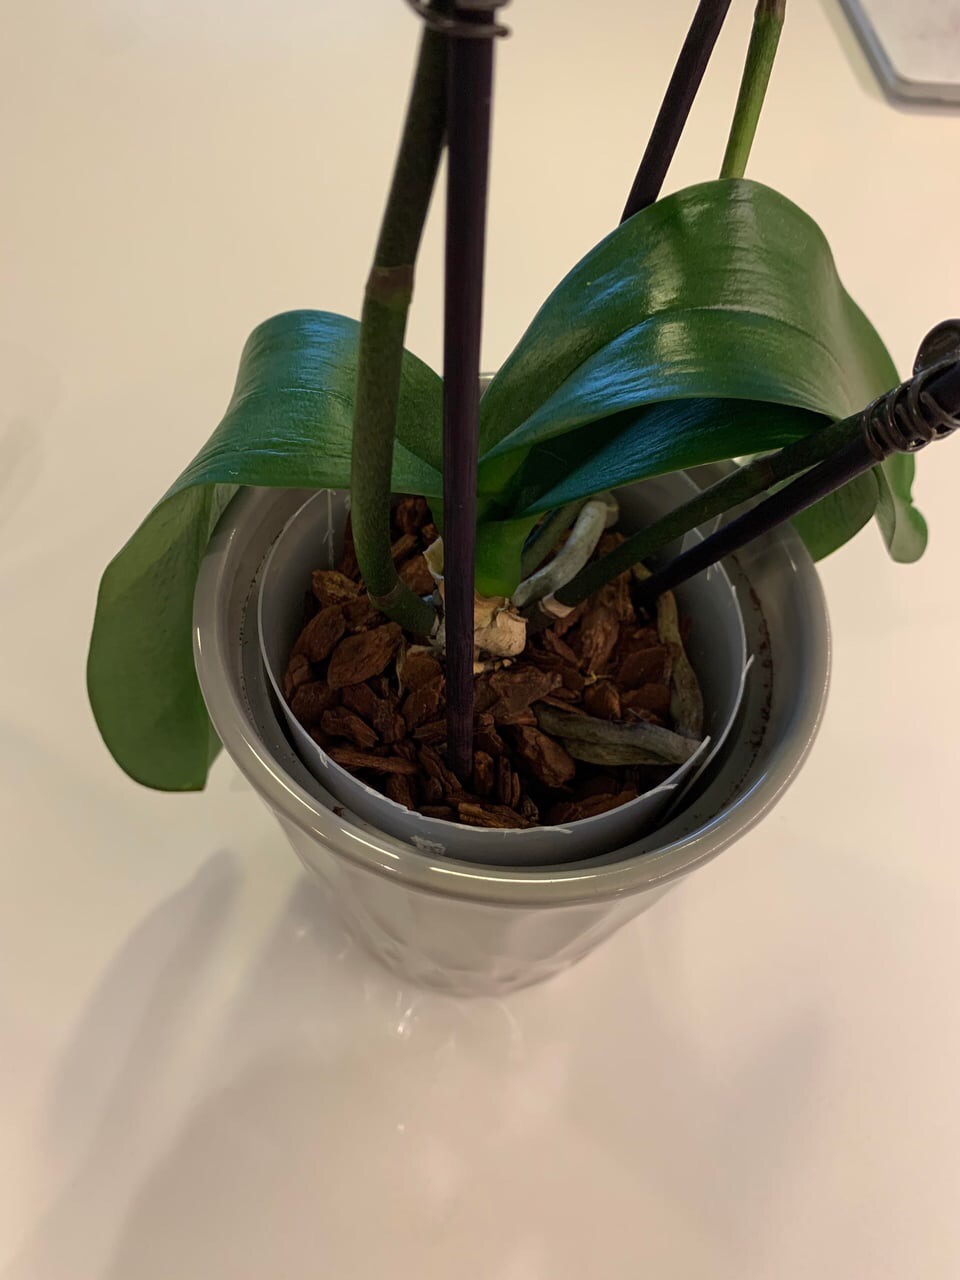
- Leaves wrinkle even though the plant is very wet.
The Fix:
- Unpot and inspect: Take the orchid out and rinse the roots so you can see them clearly.
- Trim the dead roots: Cut anything brown or hollow. Don’t touch the firm, green roots.
- Repot in fresh bark: Use a chunky orchid bark mix in a pot that has good drainage. Then water much less while it recovers. If it’s badly affected then our guide on takes you through the recovery.
Not sure if your orchid is too wet or too dry? Use the checker below. Answer a few questions and it’ll point you to the most likely cause.
What's Wrong With My Plant?
Answer a few questions and we'll help diagnose the problem.
3. Dead or Dehydrated Roots
The Problem:
Sometimes the roots aren’t rotted but they’re still not working. Orchid roots have layer called velamen that takes up the water and humidity.
Once a root dies from either chronic underwatering, old, wet bark or just age that velamen dries out and the root turns become hollow and can’t absorb anything.
You can have an orchid with a pot that’s full of roots but at the same time barely any of them will be alive. The leaves wrinkle because, from a functional perspective, the plant has hardly any roots at all.
Signs of Dead Roots:
- Roots feel hollow, flat or brittle and can be snapped or squashed easily.
- A healthy root is firm and green and feels plump when it’s wet and silver when dry.
- Very few firm roots left when you check the root ball.
The Fix:
- Assess honestly: Squeeze each root carefully. If it’s firm you keep it, if it’s hollow get rid of it.
- Trim and repot: Remove the dead roots and repot it into fresh bark so the living ones have room.
- Encourage new roots: Increase the humidity and keep the plant warm. New root tips, which are bright green, are the sign it’s recovering. It helps to know how to tell a new orchid root from a new spike so you know what you’re looking at.

4. Old, Broken Down Potting Bark
The Problem:
Orchid bark doesn’t last forever. Over a year or two it breaks down and starts holding water instead of letting it drain away.
That means the roots sit in wet and dont get enough air. And you go right back to the root rot problem from cause number two.
Old medium is one of the most overlooked reasons for wrinkled leaves because the plant can look fine on the top while the roots aren’t getting enough oxygen beneath the soil.
Signs of Spent Bark:
- The bark looks dark and is broken into small bits rather than chunkier pieces.
- The mix stays wet for much longer than it used to.
- It’s been more than 18 months to 2 years since you last repotted it.
The Fix:
- Repot in fresh mix: Use a coarse orchid bark that drains well. Don’t use regular houseplant compost as it holds far too much water.
- Stick to a schedule: Repot every 1 to 2 years, ideally just after flowering. Our simple guide to repotting an orchid takes you through it step by step.
- Check drainage: Make sure the pot has enough holes. Clear pots are useful because you can watch the roots.

5. Low Humidity
The Problem:
Orchids are tropical plants and so most of them like the humidity around 50 to 70%. The average home, especially in the winter when we turn our heating on, can drop to 30% or lower.
When the air is that dry the leaves lose water faster than the roots can replace it and as a result they start to wrinkle.
This can happen without you realizing over the colder months and catches people off guard because nothing about how their watering has changed.
Signs of Low Humidity:
- Leaves wrinkle in winter even though the roots are healthy.
- The problem is worse when the plant is near radiators or anything that gives odd hot air.
- The tips of the leaves can also go brown.
The Fix:
- Add a humidity tray: Put the pot on a tray of pebbles with a little water in the bottom. You keep the pot above the water line.
- Group your plants: Having houseplants close to each other increases the humidity around them.
- Use a humidifier: In a really dry room a small humidifier is the best way to help. You’re looking for 50% or above.
6. Too Much Heat or Direct Sun
The Problem:
I keep one of my orchids on a bright south facing windowsill and every February when I have the radiator on and the sun is coming through the window the leaves start to wrinkle. Heat and direct sun speed up how fast the leaves lose water and once that is happening quicker than the roots can replace it the leaves shrivel. Strong direct sun can also burn them.
Signs of Heat Stress:
- Leaves wrinkle and may feel warm or look a bit bleached.
- The plant is in direct sun or right above something like a radiator that gives off heat.
- Yellow or red patches where the sun hits the strongest.
The Fix:
- Move to bright indirect light: An east facing window is perfect. A sheer curtain over a window with lots of sun works too.
- Mind the heat sources: Keep the plant away from radiators, hot windowsills etc.
- Watch the leaves: Healthy orchid leaves are a sort grassy green. Very dark green means too little light, yellow green means too much.
Worried you're killing your orchid?
Orchids fail for a small handful of specific reasons. My free guide 7 Gardening Mistakes That Are Killing Your Plants covers all of them — and what to do instead.
7. Cold Drafts and Temperature Shock
The Problem:
The other side of heat is cold. Orchids like being between roughly 65 and 80F during the day.
Sudden cold, a windowsill that’s chilly at night or cold air from an air conditioner can shock the plant and damage the roots, which then can’t take up water properly. The result is again wrinkled leaves.
Signs of Cold Stress:
- The plant sits near a cold window, a door that lets in cold or an air conditioning vent.
- Leaves wrinkle after a cold spell or a sudden change in the temperature.
- The leaves may also feel limp or get dark patches.
The Fix:
- Find a stable spot: Keep your orchid somewhere with steady temperatures and no cold drafts.
- Move it off cold glass: In the winter the air right against a window can be much colder than the room.
- Avoid swings: Try not to let the temperature move up and down a lot between day and night.
8. Salt and Fertilizer Buildup
The Problem:
Orchids have delicate roots and they don’t need much feeding. Too much fertilizer, or watering with hard tap water, can leave a build up of salts in the bark. Those salts then burn the roots, and burnt roots can’t absorb water, so the leaves wrinkle.
Signs of Salt Buildup:
- A white film on the bark, the pot rim or the roots.
- Tips of the roots that look burnt or shriveled.
- It’s been getting fertilized often or watered only with hard tap water.
The Fix:
- Flush the bark: Once a month send a lot of water through the pot to rinse the salts out.
- Feed weakly: Use an orchid fertilizer at quarter to half strength and only during active growth.
- Mind your water: If your tap water is hard switch to rainwater you’ve collected yourself or use filtered or distilled water.

9. The Orchid Is Root Bound
The Problem:
Orchids like being tight in their pot but they do have a limit. When the roots completely fill the pot and start growing in circles, are pushing the plant out of the bark or there’s barely any of the medium left to hold on to water it will cause the roots to dry out fast and the leaves to wrinkle.
Signs of a Root Bound Orchid:
- The roots are too tightly packed in and circling round in the pot or are growing out and over the edge.
- The bark has mostly broken down or fallen away.
- The pot dries out very quickly after watering.
The Fix:
- Repot up a size: Move it into a pot just one size bigger with fresh bark. Don’t go too big or the extra medium will stay wet.
- Untangle gently: Loosen any circling roots before you repot.
- Time it right: The best time is just after flowering when the new roots are starting to grow.
10. Repotting or Transplant Shock
The Problem:
If you’ve just repotted your orchid and the leaves are wrinkling – don’t panic and start over. It’s common for an orchid to look a little rough for a few weeks after being repotted as the roots need fine to settle into the new bark and start working properly again. It should be temporary though.
Signs of Transplant Shock:
- The wrinkling started within a few weeks of repotting.
- The roots looked healthy when you potted it.
- There’s no rotting, you can’t see any pests and the environment it’s in is fine.
The Fix:
- Be patient: Give it time. The roots need a few weeks to reestablish.
- Keep humidity up: Higher humidity takes means there’s less pressure while the roots recover.
- Hold the fertilizer: Don’t feed for 2 to 3 weeks after repotting and don’t go overboard with water either or the fresh bark will suffer.
11. Natural Aging
The Problem:
Sometimes it’s nothing to worry about. The oldest leaf at the very bottom of an orchid will eventually turn yellow and wrinkle and then drop off as the plant puts its energy into new growth. This is completely normal and happens to every healthy orchid.
Which leaf is important though. If it’s only the lowest, oldest leaf and the rest of the plant looks good then it’s just nature taking its course.
Signs of Natural Aging:
- Only the bottom, oldest leaf is affected.
- It turns yellows first, then wrinkles and dries.
- New leaves and roots are firm and healthy as they grow.
The Fix:
- Leave it be: You can let the old leaf drop off on its own.
- Or tidy it up: Once it’s turned mostly yellow or brown remove it.
- Don’t overreact: Don’t change your whole routine over one old leaf.
Quick Diagnosis and Fixes
| Cause | Fix |
|---|---|
| Underwatering | Soak the bark thoroughly then water when roots become silver colored. |
| Overwatering and root rot | Unpot, trim the mushy roots, repot it in fresh bark, water less. |
| Dead roots | Trim the hollow roots and increase the humidity to grow new ones. |
| Old, broken down bark | Repot in fresh orchid bark every 1 to 2 years. |
| Low humidity | Use a humidity tray and group plants or run a humidifier. |
| Heat or direct sun | Move to bright indirect light away from heat sources. |
| Cold or drafts | Keep between 65 and 80F, away from cold glass and vents. |
| Salt buildup | Flush with water every month, use fertilizer at quarter strength, use soft water. |
| Root bound | Repot one pot size up with fresh bark. |
| Repotting shock | Be patient, keep the humidity up, don’t fertilize yet. |
| Natural aging | Remove the old bottom leaf, no action needed. |
Will Wrinkled Orchid Leaves Go Back to Normal?
For the most part – no. A leaf that has already wrinkled rarely goes back to being full and plump like it was before even after you fix the problem. What you should be trying to get is healthy new growth that comes in firm. So don’t judge any recovery by the old damaged leaves, judge it by the new roots and leaves.
Should I Cut Off Wrinkled Orchid Leaves?
Only if a leaf is completely yellow, brown or dead. A wrinkled leaf that’s still green is still feeding the plant, so leave it on. Removing healthy leaves takes energy away from an orchid that’s already struggling. Cut only what’s definitely dying/dead.
How Long Will My Orchid Take to Recover?
Orchids are slow so it’ll be weeks or months rather than days. Roots regrowing in particular takes time. The first good sign is a new green tip to a root or a fresh leaf starting to come out. Once you see that you know the fix is working. If the whole plant is struggling this guide on reasons your orchid is wilting and our breakdown of reasons your orchid leaves are drooping cover the related symptoms worth ruling out.
Final Thoughts
Wrinkled and shriveled orchid leaves look bad but they’re mainly just the plant telling you it can’t get enough water to its leaves. Most times the answer is in the roots, not from watering. So check those first every time.
Going back to the orchid I nearly threw out – I trimmed the rotted roots, repotted it in fresh bark and then left it alone. It’s rebloomed twice now and I’m glad I didn’t get rid of it.
If you can catch the cause early and fix the right thing most orchids will bounce back. They’re tougher than they look.
If yellow leaves are part of the what’s going on too then our guide to reasons your orchid leaves are turning yellow is worth taking a look at next.
Worried you're killing your orchid?
Orchids fail for a small handful of specific reasons. My free guide 7 Gardening Mistakes That Are Killing Your Plants covers all of them — and what to do instead.