Peace lilies for the most part are easy to care for. It’s one of the reason they’re so popular.
But you still have to prune them to keep them doing well. And you need to do it right.
if you’re not confident about pruning your peace lily correctly then things can go wrong. And while a mistake might not seem like a big deal it can actually cause some damage that is permanent.
So this guide will give you everything you need to prune a peace lily. Follow it and you shouldn’t have any problems pruning and keeping your peace lily looking great and growing healthily.
Quick Answer: How to Prune a Peace Lily
Quick Answer
- Remove Damaged Leaves (Most Common): Cut yellow, brown or black leaves at the base as it will help the plant to grow more healthy leaves.
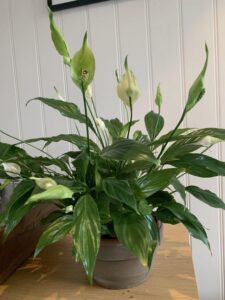
- Trim Spent Flowers: Once the blooms fade cut the flower stalk down at the soil line to keep the plant looking tidy.
- Use Clean Tools: Always sterilize your shears before pruning so you don’t spread any diseases.
For more help see Peace Lily Care Guide: Tips to Get Thriving Plants.
Why Pruning is Essential for Peace Lilies
Pruning is more than simply making your plant look good. Its health is affected by how it’s pruned (or how it isn’t).
When you remove old, damaged or unnecessary parts of your peace lily what you’re doing is letting it stop wasting energy on growing or trying to revive those parts. Instead it can focus that energy into new growth and flowers.
If that isn’t enough to convince you these are the main reasons to prune your peace lily:
- Encourage new growth: Spent flowers and dead leaves use up resources and energy the plant needs. When you remove them it helps your plant to grow better and be healthier.
- Improve air circulation: When your peace lily is overcrowded it can result in more pests and diseases.
- Maintain a tidy appearance: Its less important but when you prune your peace lily it stays fresh and looks good.
Stop accidentally killing your peace lily.
My free guide 7 Gardening Mistakes That Are Killing Your Plants covers the most common reasons peace lilies fail — and the simple fixes that bring them back.
What You’ll Need
The Basics
Before you get started you’ll need some tools:
- Sharp scissors or shears: if your tools are dull then they can tear the plant when you cut and cause damage.
- Disinfectant: Something like rubbing alcohol or bleach is important. All you have to do is wipe the plant and it will
stop the spread of diseases to any of your other plants. - Gloves: Peace lily sap can irritate the skin so use gloves.
Optional
- A spray bottle can be used to clean the plant before pruning.
- A cloth to wipe the leaves.
- A small brush or tweezers will help to remove any of the dirt or cuttings.
When Should You Prune a Peace Lily?
You can prune your peace lily at any time of the year. However there are some times when it’s better to do it:
- After the blooms have faded: Spent flowers are something you are obviously going to want to get rid of.
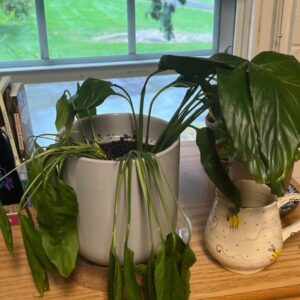
- As leaves yellow or brown: Yellow or brown leaves are a clear sign of either stress or aging and will want to be removed.
- During a regular care routine: when you water or dust your peace lily it’s a good time to check for any damaged leaves or flowers.
Step-by-Step Guide to Pruning a Peace Lily
1. Inspect the Plant
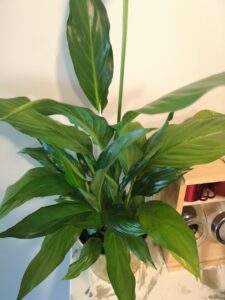
You should begin by looking at your peace lily closely and checking for:
- Wilted or brown flowers.
- Yellow or drooping leaves.
- Healthy leaves that have brown tips.
- Damaged stems or too overcrowded leaves.
Take your time. You don’t want to rush it and miss anything or get it wrong. Think of it like giving your plant a full health check up.
2. Clean Your Tools
Disinfect your scissors or shears before and after you use. You don’t have to do anything special, just quickly wipe them with rubbing alcohol. This is important to stop any bacteria or fungi from getting spread to your peace Lily.
3. Remove Spent Blooms
The flowers on your peace lily will fade and look green or brown (maybe a mix
If the two) as they get older. If you want to remove them:
- Follow the flower stalk (not the leaf!) down to its base.
- Use your scissors or shears to cut as close to the soil as possible.
- Try not to disturb the leaves close to where you’re cutting.
4. Trim Damaged or Yellow Leaves
Yellow leaves should be expected on a peace lily. They are all part of its normal life cycle.
But people often want to remove them as they don’t look as good. So if you want to:
- Entire leaf yellow: Cut it off at the base near the soil.
- Only the tip has turned brown: Trim just the brown part. Follow the curve of e leaf.
5. Address Overcrowding
If your peace lily is starting to looking a bit too dense then you might want to thin it out. Do so by removing the smaller, weaker stems as it will help the air to flow properly around the plant and make pests less likely.
Pruning Checklist
| Task | Frequency | Tools Needed |
|---|---|---|
| Remove spent flowers | As needed | Scissors or shears |
| Trim yellow leaves | Monthly | Scissors |
| Tidy overcrowded stems | Every 6 months | Scissors or shears |
| Disinfect tools | Every time you prune | Rubbing alcohol or bleach |
Post-Pruning Care Tips
Clean Up Debris
When you’ve finished your pruning collect all the bits that you’ve cut off. If you leave it in the pot of your peace lily it can attract pests and make mold more likely to grow.
Water Carefully
Pruning can slightly stress your peace lily. To help it recover give it a small water after you’re finished pruning.
Don’t over water it though. For the most part peace lilies like to dry out a little in between each watering.
For more help see our peace lily watering guide.
Fertilize (Optional)
If it’s the growing season (spring or summer), you can help your plant out by giving it some houseplant fertilizer. Don’t forget to dilute it first though.
See our guide to the best fertilizers for peace lilies.
Common Pruning Mistakes (and How to Avoid Them)
- Overpruning: Don’t remove more than 25% of your peace lilies leaves at once. If you do you risk shocking your plant.
- Ignoring tool hygiene: Dirty tools may not seem like a big deal but they can easily lead to diseases spreading.
- Trimming healthy leaves: Only remove leaves or stems that are definitely damaged or aging.
Extra Tips for Pruning
1. Shape Your Peace Lily
Want your plant to grow a certain way? If so then work on remove the stems that are getting in the way of the shape you’re aiming for.
For example:
- If your plant is lopsided trim the side where the growth is denser.
- If it’s too tall then remove the stems that are tallest and it will help your peace lily to grow bushier.
2. Propagation Potential
If you’re thinning your plant then you could propagate some of the cuttings. Peace lilies especially grow well from root divisions.
When you’re pruning a peace lily that is overcrowded separate a section that has roots and plant it in fresh soil.
How Often Should You Prune a Peace Lily?
There’s no definitive answer for this and you can do it whenever you want pruning regularly will keep your peace lily looking it best. A quick trim every month or two will also stop any smaller issues from turning into big issues.
Troubleshooting: Is My Peace Lily Healthy?
When you’ve finished your pruning keep an eye on how your plant reacts.
- New growth appears: then you’ve done it right and have nothing to worry about.
- Leaves droop slightly: Don’t worry just yet. Droopy leaves can be a normal reaction after pruning. But keep a close eye on the water levels.
- Brown tips increase: Look at how you’re watering. Too much or not enough can cause brown tips.
Final Thoughts
Pruning is about more than just how it looks. Pruning is actually part of your care routines.
When you remove spent flowers, trim away damaged leaves and keep its shape tidy you’re helping your peace lily to stay healthy. And when you treat it right and give it what it needs your peace lily will be happier and more likely to bloom and grow successfully.
Recommended for peace lily care
As an Amazon Associate I earn from qualifying purchases.

XLUX Long Probe Deep Use Soil Moisture Meter, Water Monitor Indicator Sensor, Hygrometer for Outdoor Indoor Large Pot Plants, Flower, Gardening, Farming
Catches overwatering before it leads to root rot — the most common cause of peace lily decline.

Miracle-Gro Indoor Potting Mix for All Plants, 6 qt., 2-Pack
Well-draining mix formulated for tropical houseplants that prefer consistent moisture.

Fielda 8/10/12 Inch Self Watering Pots for Indoor/Outdoor Plants - Large Plastic Planter with Drainage Holes, Water Level Indicator & Deep Reservoir, Modern Decorative Flower Pots (White)
Reservoir design helps maintain the steady moisture peace lilies need without waterlogging.

Miracle-Gro Indoor Plant Food for All Plants, 8 fl. oz. (2-Pack)
Gentle liquid feed suitable for the light feeding peace lilies require.
Stop accidentally killing your peace lily.
My free guide 7 Gardening Mistakes That Are Killing Your Plants covers the most common reasons peace lilies fail — and the simple fixes that bring them back.
I have a Peace Lily I bought on clearance in a 12” pot. It’s huge. I’ve had it 3 years and believe it needs repotting. Idk how to begin, it is huge. The flowers are mostly green, this and the 3 years makes me think it needs divided and repotted. I do not want a 14” pot to take care of, though it sounds lovely. I live in an apartment and think maybe I should do this in the bathtub? HELP!
Her name is Clara and she filters the air next to my bed. She’s the happiest plant I care for, and I love her well. Thank you for reading this rambling comment, and thanks for any help you have time to give us.
I think you’re probably right about it needing to be repotted and divided. There’s a good chance it’ll be root bound by now. That could well be the cause of the green flowers too.
I’d you’re going to repot and divide you can absolutely do it in the bathtub too!
As a very quick overview of what to do:
Water your peace lily (Clara) a few hours before you begin
Take the plant out of the pot
Pull it apart/separate it where it naturally divides
Trim the roots
Repot each divided section into separate pots
Water them all
That’s a very quick guide without much detail but hopefully it’ll get you started.