The first flower bed I ever planted was a disaster. Not the kind of disaster where things gradually go wrong – it was clearly wrong almost the moment everything went in the ground.
The tall dahlias I’d planted at the front completely blocked the shorter plants behind them. Half the bed got maybe two hours of sun because I hadn’t paid attention to how the shadow from the fence moved across the garden throughout the day. And I’d put in a mix of plants that looked great at the garden centre but bloomed at completely different times, which meant the bed looked spectacular for about three weeks in June and then just sat there looking tired for the rest of the season.
I tell that story not to be discouraging but because almost every gardener has a version of it.
Planning a flower bed might feel straightforward at first. But that all goes out the window when you’re standing in front of plants at the nursery trying to remember whether your bed gets morning or sun in the afternoon and you’re not sure if you wanted the pink ones or the purple ones.
The difference between a flower bed that looks good for years and one that disappoints you by August is almost entirely down to the planning.
So to help with that part this guide takes you through every stage of that process – choosing the right spot, designing the layout, selecting plants that work in your conditions, preparing the soil properly and keeping the whole thing going once it’s planted.
Work through it in order and you’ll avoid most of the mistakes that catch first time gardeners out.
Quick Answer
- Choose the Right Spot: Pick a spot with the right amount of sun for your plants and good drainage.
- Prep the Soil First: Remove weeds, loosen the soil and mix in the compost before planting anything.
- Plan Spacing and Layers: Place taller plants in the back, medium in the middle and shorter ones in front, leaving room for mature growth.
For more ideas see the 10 Easiest Flowers for Beginners to Grow.
Step One: Choosing the Right Location for Your Flower Bed
Location is the single most important decision you’ll make when planning a flower bed. But it’s the one most people spend the least time thinking about.
It’s tempting to put the bed wherever you think it will look best – along the fence, around the patio, in that awkward corner you’ve never known what to do with etc. But if the conditions in that spot don’t match what your plants need you’re going to be struggling from the get go.
Judge Your Sun Levels Honestly
Most flowering plants want sun – real sun, not the filtered kind you get near a large tree or in the shadow of a wall. Before you commit to a location spend a day watching how the sunlight moves across your garden.
Check at 8am, at noon and at 4pm. Note where the shadows fall and how they move.
The standard categories work like this:
- Full sun: Six or more hours of direct sunlight every day. Most cottage garden flowers like roses, lavender, echinacea and rudbeckia all need this to do well.
- Partial sun / partial shade: Three to six hours of direct sun. A bigger range of plants works here including the likes of astilbe, heuchera, salvia and quite a few geraniums.
- Full shade: Fewer than three hours of direct sun. Options are more limited with this. Hostas, ferns, foxgloves and hellebores are among your best choices.
Be honest with yourself about this. A spot that gets good sun in the morning but has a lot of shade from midday onward is partial shade, not full sun – no matter how bright it looks.
Planting full sun lovers in partial shade is one of the most common reasons flower beds don’t do very well.

Check Your Soil and Drainage
The second thing to think about before you dig anything is what your soil is like.
Grab a handful of it and squeeze. If it holds its shape and feels slick thats clay heavy soil – which is slow to drain, compacts easily but quite rich in nutrients once you improve it.
If it falls apart immediately and feels gritty, you’ve got sandy soil. This drains fast, warms up quickly in the spring but needs regular feeding because the nutrients wash through it.
Loamy soil – dark, crumbly, holds its shape briefly then breaks apart – is the best and most of us have something somewhere in between.
Drainage matters a lot. To test it quickly dig a hole about 30cm (12 inches) deep, fill it with water and come back an hour later. If the water is still sitting there your drainage is poor and quite a few flowering plants will struggle – their roots will end up sitting in waterlogged soil.
You can fix drainage problems with raised beds or by working in a lot of organic matter. But it’s worth knowing what you’re dealing with before you start.
Think About Proximity to Trees and Large Shrubs
Roots from trees that you’ve had for a while spread much further than most people expect – often well beyond the drip line of the canopy. If the flower bed you’re planning is near a large tree then those roots will compete with your plants for water and nutrients.
The soil in that zone is also often very dry because the tree canopy stops rainfall before it hits the ground. It’s not impossible to garden under trees but it means you’re going to have to make specific plant choices and there will be a lot more maintenance.
If you’re a beginner then pick a location away from large trees while you’re getting started. It’ll be simpler in the long run.
Step Two: Designing the Layout
Once you’ve settled on a location that has the right light and reasonable soil you can start thinking about what the bed will actually look like. This is the fun part – and also the part where it’s easiest to get carried away and end up with a bed that looks busy and unplanned.
Decide on the Shape and Size
Start by deciding how big the bed will be and what shape it’ll take. Island beds – beds you can walk around on all sides – work well in the middle of a lawn.
Border beds run along a wall, fence or hedge and are usually viewed from one direction. The shape can be formal (straight edges, geometric) or informal (curved, naturalistic) and neither is better than the other – it depends on the style of your garden and what you like.
One practical rule on size: make your bed no wider than you can easily reach into from either side without stepping on the soil. Compacting the soil by walking on it is bad for the plants roots and undoes a lot of the work you’ll put into improving it.
For a border bed against a wall or fence, 1.2 to 1.5 metres (4 to 5 feet) is usually the maximum width. Island beds can be wider since you can access from all sides.
Plan for Height: Tall at the Back, Short at the Front
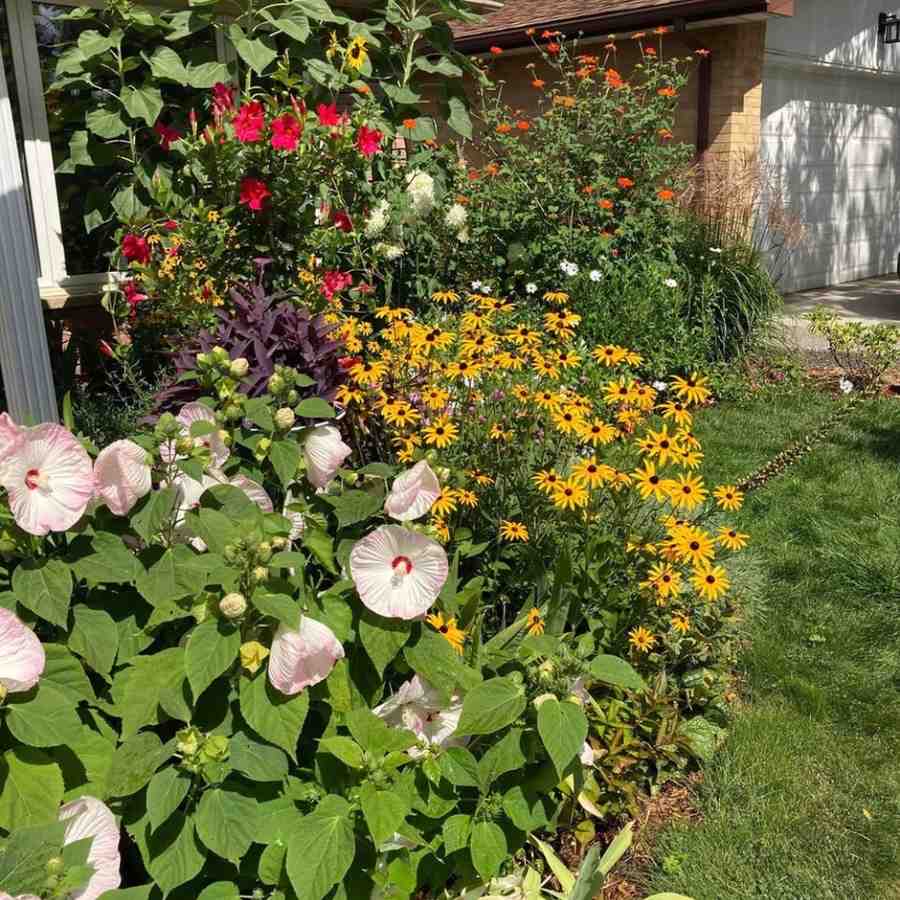
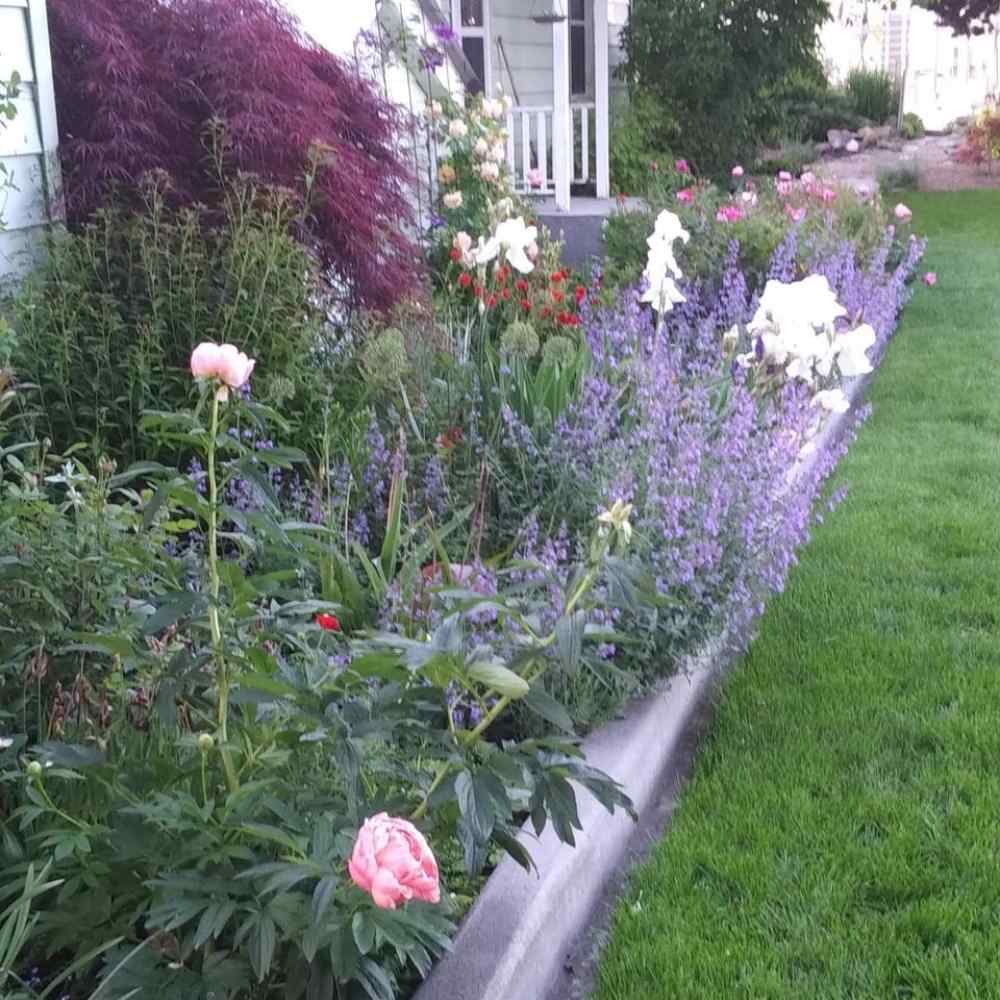
This is the principle I ignored with my first flower bed, much to its detriment. For a border bed viewed from one direction, tall plants go at the back, medium plants in the middle and low-growing plants at the front edge. For an island bed viewed from all sides tall plants go in the centre with heights graduating outward.
As a rough guide:
- Back of the border (tall, 90cm+): Delphiniums, dahlias, rudbeckia, verbena bonariensis, ornamental grasses, echinops.
- Middle of the border (medium, 45-90cm): Echinacea, salvia, peonies, astrantia, geraniums, lupins, kniphofia.
- Front of the border (low, under 45cm): Lavender, catmint, alchemilla, dianthus, aubrieta, heuchera, low sedums.
These are starting points. They’re not rules you have to stick to.
A bed with everything at exactly the same height looks flat and dull. A few taller plants that push through the middle zone, or some low sprawling plants that soften the front edge will add some character.
But if you’re unsure start with the basic principle and go from there.

Think About Color
Whole books have been written on color theory in garden design. But the practical version is simpler than you’d think.
A few approaches that you can count on to work:
- Harmonious palettes: colors close to each other on the color wheel – blues, purples and pinks together, or oranges, yellows and reds together. These make something that feels restful and just work perfectly. It’s hard to get any of these wrong.
- Contrast planting: colors opposite each other on the wheel – purple with yellow, orange with blue. Used well these combinations are striking. Used carelessly they can feel jarring and look too much.
- Single color themes: An all white bed or an all yellow bed. These take more discipline but look incredibly clean when done well.
Don’t forget foliage. Leaf color, texture and shape do as much work in a flower bed as the flowers themselves, especially in the weeks when nothing much is blooming.
Silver leaved plants like artemisia and stachys lighten a border. Dark leaved heucheras adds a little drama. Feathery fennel or grasses add movement.
A bed that relies only on flowers for interest looks sparse and disappointing for more of the year than you’d like.
Plan for Succession – Something Blooming from Spring to Fall
This is the thing my first bed got wrong. If you fill your bed with plants that bloom at the same time you’ll have a spectacular few weeks followed by months of just green foliage.
What you really want though is to have something coming into bloom as something else finishes, so there’s always interest in the bed.
A simple guide:
- Spring: Bulbs (tulips, alliums, narcissus), wallflowers, forget me nots, hellebores, pulmonaria.
- Early summer: Peonies, lupins, geraniums, aquilegia, salvia nemorosa, alliums.
- Midsummer: Echinacea, rudbeckia, dahlias, lavender, astrantia, roses.
- Late summer and fall: Asters, sedums, heleniums, late dahlias, verbena bonariensis, ornamental grasses coming into their own.
Try to have at least two or three things blooming in each of those periods and your bed will look great from March through to October or November.

Step Three: Picking Plants for Your Climate and Conditions
This is where planning meets reality. The most beautiful plant combination in the world is worthless if the plants aren’t suited to your climate, your soil or that spot in the garden. Getting plant selection right is the difference between a bed that does well and one that limps along.
Know Your Hardiness Zone
In the US, the USDA Plant Hardiness Zone Map divides the country into zones based on average annual minimum winter temperatures. In the UK, the Royal Horticultural Society uses its own hardiness ratings.
Whatever system applies to you it’s worth knowing your zone or rating before you buy anything – it tells you which plants can survive your winters outdoors without protection.
You can use our Garden Zone Finder Tool to help you find out what zone your garden is.
A plant rated as hardy to zone 7 will survive in temperatures down to about -18 to -12 degrees Celsius (0 to 10 degrees Fahrenheit). Plant it in a zone 5 garden and it may die back in a cold winter.
This doesn’t mean you can never grow tender plants in cooler climates – you can treat them as annuals, dig them up and overwinter them indoors, or give them extra protection – but it’s worth knowing what you’re dealing with.
Match Plants to Your Soil
Soil pH affects which plants can access the nutrients they need. Most flowering perennials and shrubs do well in slightly acidic to neutral soil (pH 6.0 to 7.0).
Some plants have certain preferences – rhododendrons, azaleas and camellias are famously known for loving acidic soil and struggle in alkaline soil. Lavender and many Mediterranean herbs like well drained alkaline soil.
You can test your soil pH with a cheap kit from any garden centre. If your soil is very alkaline and you want to grow acid loving plants it’s much easier to grow them in raised beds or containers with ericaceous compost than to fight your natural soil chemistry.
 Rapitest Soil Test Kit for Gardens, Vegetables, Flowers and Lawns
Choose Perennials as Your Foundation, Fill with Annuals
Perennials, which are plants that come back year after year, are the backbone of a good flower bed. They take a season or two to really establish and fill out but once they do they need a lot less work than starting from scratch each year.
Good perennials for a mixed flower bed include echinacea, salvia, rudbeckia, astrantia, geraniums (the hardy kind, not the tender pelargoniums), heuchera and ornamental grasses.
Annuals, plants that complete their life cycle in one season, are useful for filling gaps while the perennials establish, adding some color in their first year and experimenting with combinations before committing. Cosmos, zinnias, nigella and sweet peas are all easy to grow from seed and put on a a wonderful display for a low cost.
A good rule of thumb for a new border: aim for roughly 70% perennials and 30% annuals or biennials. The perennials build structure and become permanent; the annuals give you flexibility and some impact right away while you’re waiting for everything else to mature.
Don’t Underestimate Spacing
Plants on a label look tiny. Plants in a bed look tiny. And then three years later they’ve filled every inch of space and are spilling onto the lawn.
Always check the mature spread of a plant before you buy it and then space accordingly. It feels counterintuitive to leave large gaps when you’re planting as it looks sparse and a bit sad but filling those gaps with annuals while the perennials establish is a much better idea than cramming plants together and then having to spend years dividing and editing.
Step Four: Preparing the Soil and Building the Bed
You can choose a perfect location, design a beautiful layout and pick exactly the right plants.. and then undermine all of it by ignoring the soil preparation. Good soil is the foundation everything else depends on. Spending an extra day on this stage will save you years of frustration.
Clear the Area Properly
Before you do anything else clear the area of current grass, weeds and any other vegetation. This matters more than most people think.
Perennial weeds – things like bindweed, couch grass, dandelions with established tap roots and ground elder – will come back hard if you don’t deal with them before planting. Once your plants are in the ground removing those weeds without disturbing the roots becomes very difficult.
For a new bed cut from lawn you have a few options. You can skim off the turf with a spade and remove it. That’s a lot of physical work but works well.
You can use the no dig method, laying cardboard directly over the grass and covering it with a deep layer of compost (more on this below). Or, for beds with serious perennial weed problems, a covering of black plastic for a full growing season before planting can clear the ground effectively without chemicals.
The No Dig Method: Worth Knowing About
No dig gardening, which was popularised by grower Charles Dowding, involves layering organic matter directly on top of the existing ground rather than digging it in. You lay cardboard (plain, no glossy coatings, staples take out first) directly over the cleared or grassed area, overlap the edges so there are no gaps, wet it thoroughly and then cover with a minimum of 15cm (6 inches) of good compost or well rotted manure.
The cardboard stops weeds and breaks down over the following months, the compost feeds the soil and worms and other soil life do the work of incorporating it. It sounds too simple but it really works – and it avoids the problem of bringing buried weed seeds to the surface that digging creates.
I converted most of my borders to no dig over three seasons and the improvement in soil quality and weed pressure has been very obvious to see every year since.
Improve What You’ve Got
Regardless of whether you choose to dig or not, most soils benefit from adding some organic matter. Garden compost, well rotted manure and leaf mould all improve the structure of the soil. They open up clay soils to improve drainage and they add water holding capacity to sandy soils. Organic matter also feeds the soil ecosystem which in turn feeds your plants.
For a new border being dug conventionally, work in a layer of compost or manure – 5 to 8cm (2 to 3 inches) across the whole surface, incorporated to a spade’s depth. For no dig beds pile compost on top and let the soil biology do the rest over the following months.
Add Grit for Poor Drainage
If your drainage test showed water sitting in the hole after an hour then work in horticultural grit alongside your organic matter. This is coarse grit – not builder’s sand, which will make clay soil worse by creating a concrete sort of mix.
Horticultural grit improves the physical structure of the soil and makes more air spaces for water to drain through. For heavily clay soils you might need a 50/50 mix of soil and grit in the worst areas.

Step Five: Planting and Maintenance
With a good location, a well thought out design, you’ve picked out the right plants and properly prepared soil the planting is the straightforward part. But what you do – and don’t do – in the weeks and months after planting will determine how well your bed establishes and how much work it will need going forward.
When to Plant
Spring and fall are the best times to plant for most perennials. Fall planting gives plants a chance to establish roots before winter so they hit the ground running in spring.
Spring planting works well too but means more watering during the establishment period if your spring is dry. Avoid planting in the height of summer if you can as the combination of heat, water stress and a new planting is a tough start for any plant.
Bulbs go in at different times depending on the type. Spring flowering bulbs like tulips and alliums are planted in the fall. Summer flowering bulbs like dahlias and gladioli go in after the last risk of frost has passed in the late spring.
Water In Well and Keep Watering Through the First Season
Newly planted perennials need consistent moisture while their roots are getting established. Water right away after planting – really soak the roots – and then water regularly throughout the first growing season, especially when it gets dry. Don’t rely on rainfall on it’s own during a new planting’s first summer.
By the second season most established perennials are much more drought tolerant and will manage fine on rainfall alone in most climates. The first year is the critical one.
Mulch Generously
Applying a 5 to 8cm (2 to 3 inch) layer of mulch – that is compost, well rotted manure, wood chip or bark – over the soil after planting does several important things at once. It stops weeds, keeps the soil moist, moderates soil temperature and breaks down over time to feed the soil. It’s one of the best maintenance tasks in gardening and most people don’t do it often enough or deeply enough.
Put some mulch around the plants rather than directly onto the stems or crowns – a gap of a few centimetres around each plant prevents rot. Top up your mulch layer each fall or spring as it breaks down.
Deadheading to Extend the Season
Removing spent flowers (deadheading) encourages many plants to produce more flowers rather than putting energy into seeds. For plants like roses, salvias, cosmos and echinacea regular deadheading can make a big difference to how long their the flowering season lasts.
It takes five minutes of wandering around the bed every few days and will play a v part in how long your bed looks its best.
Not all plants benefit equally though. Some, like rudbeckia and many ornamental grasses, are worth leaving through winter for their value to wildlife – their seed heads are food for birds and they look beautiful covered in frost. Learn which plants in your bed are worth deadheading and which are better left alone.
Dividing Perennials Every Few Years
Most perennials benefit from being lifted and divided every three to five years. As groups get larger the centre often becomes woody with the most growth happening at the outer edges.
Dividing – digging up the clump, splitting it into sections with a spade or two garden forks back to back and replanting the vigorous outer sections – reinvigorates the plant and gives you extra plants to fill gaps elsewhere or share with other gardeners.
The best time to divide most perennials is fall (for spring flowering types) or early spring (for summer and fall flowering types) when the plant is not in active growth. It’s harsh in the moment but plants recover very fast.
Keep Ahead of the Weeds
Weeding is the task most people dread and it’s also the one where timing matters most. A weed pulled when it’s young and small takes seconds.
The same weed left for three weeks has roots that take real effort to remove and may have already set seed. The old saying “one year’s seeding, seven years weeding” is only a slight exaggeration.
The best approach: do a quick pass through the bed every week or two pulling anything that’s appeared before it gets established. It’s much less work than having to do an occasional huge weeding sessions. A good mulch layer helps also by stopping many weed seeds from germinating in the first place.
Final Thoughts
Planning a flower bed from scratch is one of the most satisfying things you can do in a garden. But the satisfaction is going to be even better when you work through the stages properly rather than buying a trolley full of plants and hoping for the best.
Start with the site assessment. Find o about your sun levels, understand your soil and pick a spot that works with the conditions you have rather than against them.
Design on paper before you buy anything – height, color, succession – so you have a something to work with at the garden centre. Choose plants that suit your climate and conditions, build your bed on properly prepared soil and give newly planted perennials the water and care they need to establish in their first season.
After that it mostly looks after itself. A well planned border with the right plants in the right soil in the right location is very low maintenance once it matures. A poorly planned one is going to be a lot of work, disappointment and replanting.
The flower bed I planted after that first disaster is still going many years later. Some of the original plants have been divided and moved around. A few things didn’t work and got replaced.
But the bones of it – the structure, the succession planting, the soil preparation – have all held up. Getting the planning right at the start made everything that came after it easier. That’s still the best gardening advice I can give.