A few months ago I noticed a friends amazing monstera was looking awful. It had been the envy of many of our group for years and now it had yellow, drooping leaves and a nasty smell in the air around it.
When I lifted the pot it also felt suspiciously light for something that should have been heavy because of the roots and soil. I quickly suspected root rot.
She was upset and thought she’d killed it. And she didn’t understand why because she’d been watering it the same way for months but it still looked terrible no matter what she did.
Does that sound familiar to you? If you’re reading this then the chances are your monstera is showing some signs that something isn’t right too.
Thankfully if it is root rot then it isn’t a death sentence. I’ve seen loads of plants bounce back from it when they looked like they were goners.
So I’m going to take you through exactly how to diagnose, treat and stop root rot in your monstera. After helping my friend bring hers back to life, and dealing with my own plants getting root rot over the years, I’m confident about what works and what doesn’t.
Quick Answer
- Remove and Inspect Roots: Take the plant out of its pot and rinse the roots so you can see if there’s any damage.
- Trim Rotting Roots: Trim any soft, dark or mushy roots so only firm and healthy roots are left.
- Repot in Fresh Soil: Place the plant in new, well draining mix and reduce watering while it recovers.
Understanding Root Rot
Let’s take a quick look at what’s happening in the soil first. Root rot isn’t just overwatering – although that’s usually how it starts. It’s a fungal infection that will grow from waterlogged soil. And once it takes hold it spreads fast.
Root rot affects a lot of houseplants at some point in their lives. Monsteras seem to be particularly susceptible due to the fact they like the soil to be moist most of the time (but not soggy).
Where it gets tricky is that by the time you see symptoms above ground the damage below has often been happening for weeks. Yellow leaves and a slightly soft bottom of the stem are strong signs somethings up.
The Warning Signs You Can’t Ignore
When one of my early monsteras developed root rot many years ago I became much more familiar with the signs and symptoms of it. What you want to watch out for is:
- Yellow leaves that begin at the bottom and then spread up
- A nasty sort of smell coming from the soil
- Soil that stays wet for days even after you’ve watered it
- Black or brown roots that feel and look mushy (you’ll need to check by removing some soil)
- Leaves that feel soft or have dark spots on them
- Wilting leaves
The smell is usually the giveaway. Healthy soil has a sort of earthy smell to it. Infected soil smells like something died, because it sort of did.

Step 1: Look at the Damage (And Don’t Panic)
First things first – take a deep breath. I know it’s stressful seeing your plant struggling but panicking will only result in bad decisions that often make things worse.
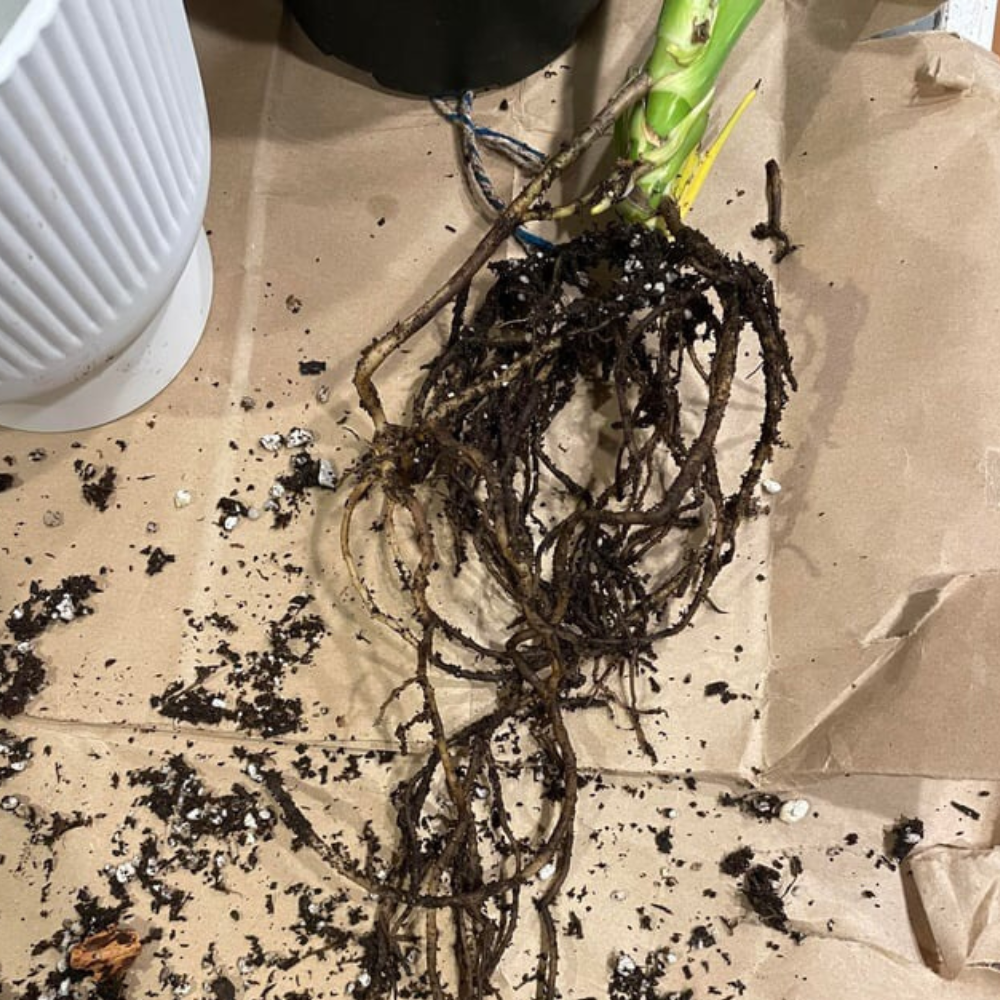
So, when you’re calm you’ll want to remove your monstera from its pot. I know that will probably feel scary but you need to see what you’re dealing with.
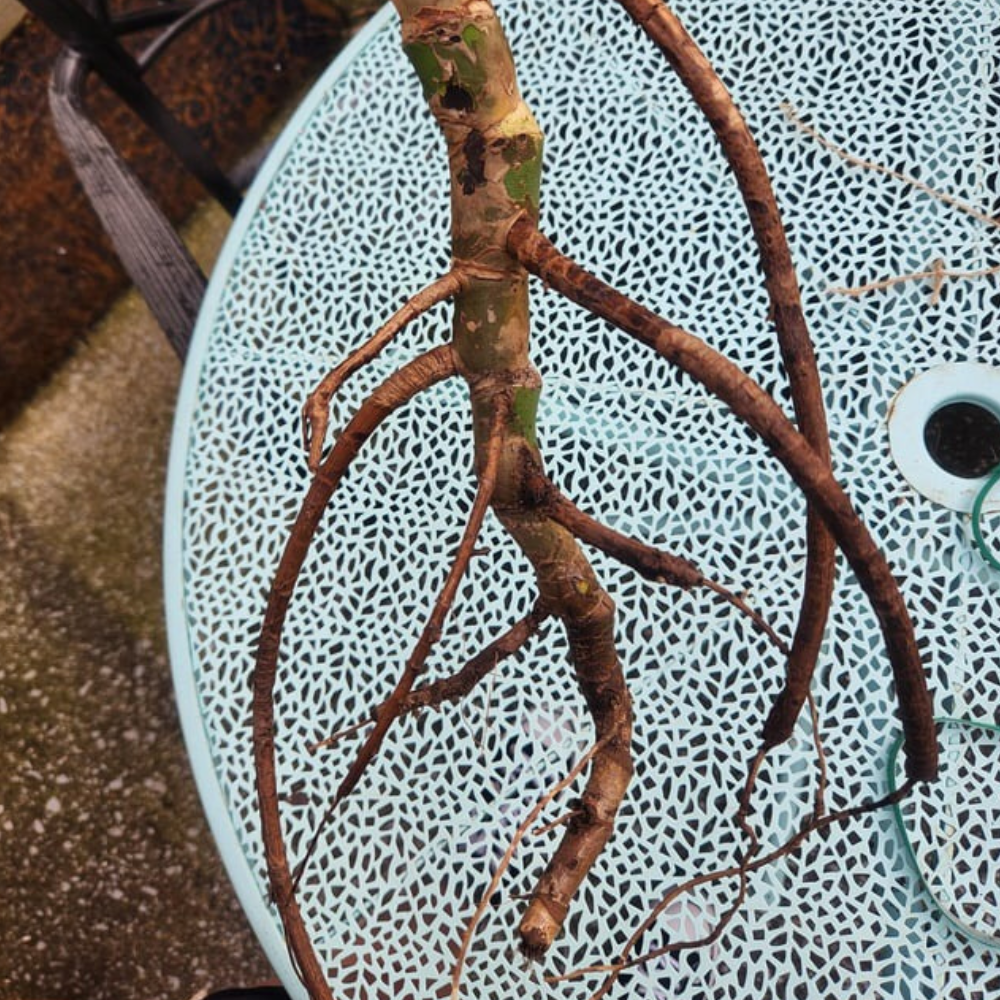
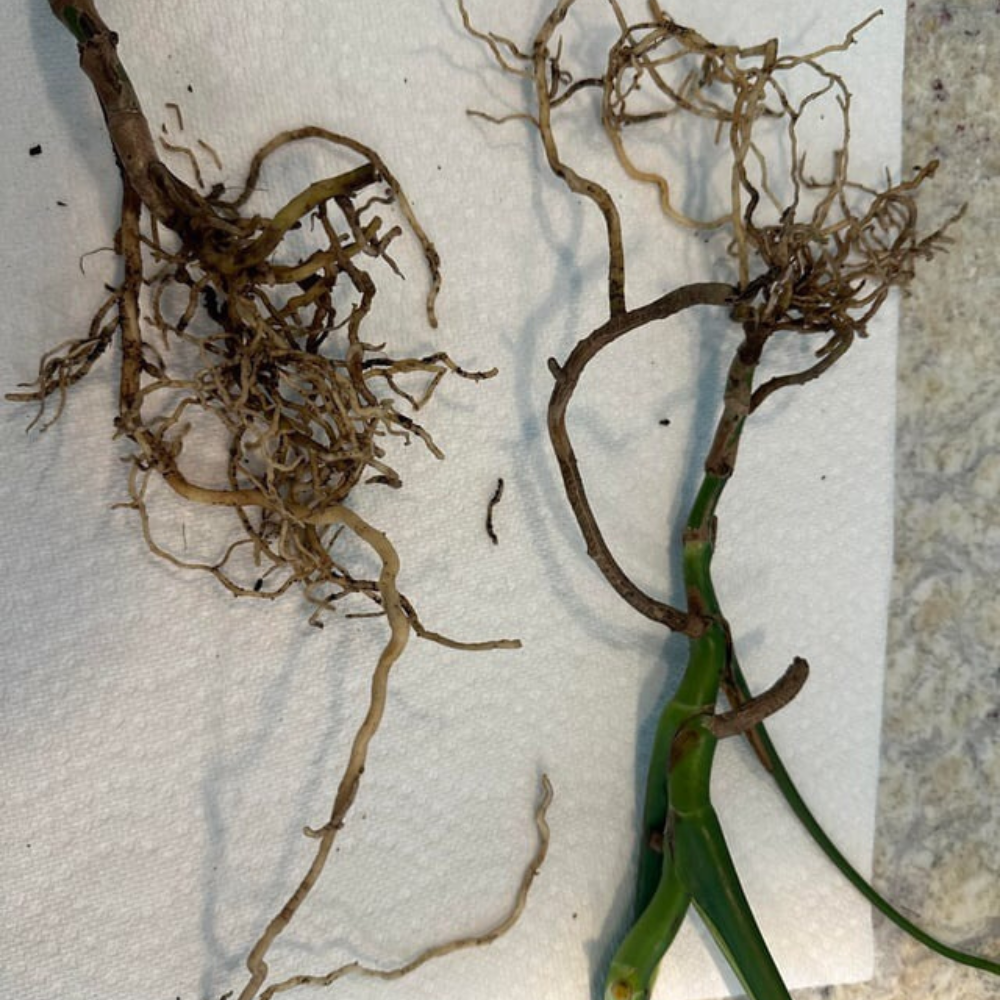
Healthy roots should be white or a light tan color and feel firm when you touch them. Root rot makes then black, brown or gray and they will feel mushy and may even fall apart in your hands.
Take photos if it helps you. Sometimes seeing the extent of the problem in a photo really drives home how bad the damage is. Or it can reassure you that it’s not as bad as you first thought.
Damage Assessment Checklist
- What percentage of roots look healthy vs. rotted?
- How do the roots smell?
- Are there any white roots left?
- How does the base of the stem look?
- What are the remaining leaves like?
If at least 30% of the roots are still healthy and the bottom of the stem feels firm you should be all set for your monstera to recover. If there’s less than that then it’s going to be tougher, but not impossible.
Step 2: Surgery – Removing the Rot
This is where things get a bit intense. You’re going to need to cut away all the damaged roots. It might seem harsh but leaving even small bits of infected root gives the fungus a chance to come back and spread again.
You’ll want to use either scissors or shears. They should be clean and sharp enough to do the cutting.
I keep a separate pair for emergencies like this. Clean them with rubbing alcohol before you start as fungal spores can spread on tools.
Cut back to healthy, white root tissue. If you’re not sure whether a root can be saved its best to err on the side of caution and remove it. Your monstera can regrow roots much easier than it can fight off an infection.
What You’ll Need for Root Surgery
- Scissors or pruning shears
- Rubbing alcohol for sterilizing the tools
- Hydrogen peroxide (not necessary but definitely helpful)
- Somewhere clean to work with good lighting
- Paper towels or a clean cloth
Don’t be surprised if you end up removing 50 to 70% of the roots. I’ve seen plants bounce back from having just a few healthy roots left. Monsteras are tougher than you would think if you give them a chance.
Step 3: Clean and Treat the Remaining Roots
Once you’ve removed all the obviously bad roots you’ll then want to move on to the remaining ones. Rinse all the roots with water to remove any soil and debris that’s left.
This is where I like to use a diluted hydrogen peroxide solution – about 1 part hydrogen peroxide to 3 parts water. Let the roots soak in it for about 10 minutes. This helps to kill any fungus that’s left behind.
Some gardeners swear by fungicide treatments at this stage, and if you’ve already got some then go for it. But the hydrogen peroxide has worked well for me without needing anything else.
Treating the Roots
- Rinse the roots under running water
- Get the solution of diluted hydrogen peroxide ready
- Soak the roots for about 10 minutes
- Rinse again with clean water
- Pat the roots dry with paper towels
- Let them dry in the air for 30 minutes before you repot the plant
The drying in the air step is important. It gives you a chance to see any areas you might have missed and helps to stop any moisture from coming back.
Step 4: Choose the Right Soil and Pot
This is where a lot of people go wrong. They treat the roots then stick the plant right back into the same conditions that caused the problem in the first place.
And all that means is you’re going to get root rot again in the near future. You’re just doing exactly what caused it in the first place.
What your monstera needs is good draining soil. I mix my own using equal parts regular potting mix, perlite and bark chips. You want the soil to hold on to some moisture but never stay soggy.
As for the pot – this might be a good time to go for one that isn’t as big. A plant with smaller roots doesn’t need as much soil and too much of it will just hold on to more water than your recovering plant can use.
Soil Mix Recipe
- 1 part good potting mix
- 1 part perlite
- 1 part orchid bark or wood chips
- Optional: a handful of activated charcoal for extra protection against fungus
Make sure your pot has drainage holes too. I know this sounds obvious but I’ve seen a lot of pots that looked beautiful but didn’t have then proper drainage. And that has lead to the plants struggling or dying.
If you love a particular pot that doesn’t have holes you can use it as an outer pot with a plastic inner pot that does drain properly.
For more help see our monstera soil mix guide.
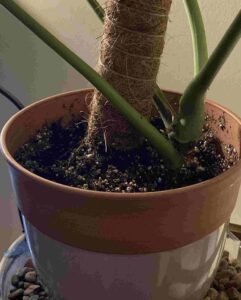
Step 5: Repot
Now you’ve got to get your treated monstera into its new pot. Put a layer of your soil mix in the bottom of the pot then get your plant so the root crown (that’s where the stem meets the roots) sits at about the same level it was before.
Fill in around the roots carefully but don’t pack the soil down hard. Plants recovering from root rot need loose soil that the air can move through while they regrow and rebuild the roots. Give the pot a few taps to settle the soil.
Water it a little, just enough to make it slightly moist but not soak it. This is probably the hardest part for most people because we think plants need lots of water. But your monstera has far fewer roots now and can’t handle normal watering yet.
Repotting Best Practices
- Use a pot that’s slightly smaller than before
- Put the plant at the same depth as previously
- Fill the pot with loose, well draining soil mix
- Water very lightly after repotting
- Don’t fertilize for at least 4 to 6 weeks

Step 6: Make Recovery Conditions
Your newly repotted monstera now needs stable conditions that support it while it regrows its roots. So that’s bright, indirect light, not somewhere with very little light where it was struggling, but not harsh direct sun either.
I like to put recovering plants about 3 to 4 feet from a south facing window!or closer to an east or west window. You should be aiming to give it consistent light that encourages growth without causing any extra stress.
Humidity helps too but don’t go crazy with it. A humidity level around 50 to 60% is perfect. You can get this with a humidifier, use pebble tray or even just putting your plants near each other.
Best Recovery Environment
- Bright, indirect light
- Consistent temperatures between 65 to 75°F
- Humidity around 50 to 60%
- Good air floe (but no drafts)
- Protected from any extreme temperatures
Keep it away from vents that let out lots of hot air, air conditioning units and windows with drafts. Stress will ruin any recovery and the temperature fluctuating is stressful for plants trying to regrow their roots.
Step 7: Recovery Watering Schedule
This is where my friend I mentioned earlier almost messed up her monstera’s recovery. After all the root surgery and repotting she went right back to her old watering routine. Within a week I could smell the root rot starting up again.
Plants recovering from root rot need completely different watering. Instead of watering on a schedule you should be giving your plant the water it needs.
That means sticking your finger in the soil about 2 inches and seeing how it feels. If it’s dry then you should be watering. If it’s still moist wait another day or two.
When you do water do it thoroughly but less often. Pour the water until it runs through and out of the drainage holes then let it drain completely. Never let your recovering monstera sit in standing water.
See this guide for more help with watering your monstera.
Recovery Watering Guidelines
- Check how moist the soil is by putting your finger in about 2 inches
- Water only when the soil is dry at that point
- Water thoroughly until the water runs out of the drainage holes
- Let the excess water drain away completely
- Wait for the soil to dry out partially before you water again
For the first month or two this might mean watering every 7 to 10 days instead of every 3 to 4 days. Have faith in this process though. Your plant will tell you what it needs if you pay attention.
What to Expect During Recovery
The first few weeks after treatment can be nerve wracking. Your monstera might lose a few more leaves as it gets used to its new roots. This is normal and not a sign that your treatment hasn’t worked.
My friends monstera took about 6 weeks before we saw the first new leaves. But once it started growing again it took off like nobody’s business. Within four months it looked better than it had before the root rot.
Signs of Successful Recovery
- New growth from the crown
- Existing leaves keeping their color
- Soil drying out at a reasonable rate
- No more nasty odors from the soil
- Plant more stable in its pot
Stopping Root Rot
Once you’ve got your Monstera back to health the last thing you want is to go through this whole process again. So you need to understand what caused the problem in the first place and make sure you don’t let your plane get in to the same state again.
Most root rot come down to watering issues – either too much water, watering too often or poor drainage. But sometimes it’s the environment with things like poor air flow or big temperature swings that stress the plant and make it more susceptible to fungal problems.
Long Term Prevention
- Stick to dry down watering
- Make sure the pot has good enough drainage
- Use well draining soil mix
- Give it consistent conditions
- Keep an eye on your plants and look regularly for any early warning signs
- Don’t fertilize stressed or recovering plants
I also recommend doing a monthly root check if you’re paranoid like me. Just lift the plant and take a look at the drainage holes. Healthy roots should look white or light tan, never black or mushy.
When to Call It Quits
I hate to end on a downer but sometimes despite our best efforts a plant is too far gone to save. If you’ve followed these steps and your monstera is still struggling and getting worse or if you found the bottom of the stem was rotted during your assessment it might be time to take cuttings and start fresh.
Even a dying monstera can give you healthy stem cuttings that will root in water or soil. It’s not what you would have hoped for but it’s still a way to keep the genetics of your plant.
Final Thoughts
Root rot feels like a disaster when you first discover it. But it’s one of the more treatable plant problems once you know what you’re doing. You just have to act quickly, be thorough in your treatment and then give it the right conditions to recover.
Most monsteras recover very well from root rot treatment, often growing better than before once their roots have regrown.
My friends monstera is now the happily growing well in her living room again, with massive leaves and strong roots. Every time I see it I’m reminded that a lot of our plant problems can be solved. You just need to know what you’re doing and have some patience.