Propagating a ZZ plant can feel like a very slow process. But don’t let that put you off.
ZZ plants are pretty much indestructible so even if you feel like you’re guessing with your propagation then the chances are you’ll still succeed.
But if you need some help then this guide covers every aspect of ZZ propagation including division, stem cuttings and leaf cuttings. It will take you through detailed instructions, some unique tricks and helpful tips that you won’t find elsewhere.
Quick Answer
- Leaf Cuttings (Most Common): Cut a healthy leaf, let it dry for a few hoursnthen put it in soil or water until roots and a rhizome grow.
- Stem Cuttings: Cut a healthy stem, leave the cut end to dry and then put it in water or soil and wait for new growth.
- Division: When repotting separate the rhizomes and plant each section in its own pot.
For more help see this guide to propagating ZZ plants in water.
Why Propagate a ZZ Plant?
Before we get to the guide let’s quickly talk about why propagating is a good idea and worth doing.
- Cost: Why buy more plants when you can use the one you’ve got to create new ones?
- Gift Worthy: ZZ plants make great gifts. They’re tough and beautiful and make a wonderful gift for family or friends.
- Therapeutic: Propagating plants is satisfying. It brings you closer to nature.
ZZ Plant Anatomy: What Makes It Special
How ZZ plants survive are a big part of how it’s propagated:
| Feature | Purpose |
|---|---|
| Rhizomes | These weird, bulb looking things store water and nutrients so your ZZ plane can survive a drought. Rhizomes are also where the new growth starts. So they’re very important for division propagation. |
| Slow Growth | While slow to grow ZZ plants make up for it by being low maintenance and last a long time. So be prepared to for propagation to take a few months before you see results. |
| Glossy Leaves | The leaves of ZZ plants are tough and able to withstand pests and diseases, which make them great for running propagation experiments. |
Propagation Methods Explained
There are three main methods to propagate ZZ plants: division, stem cuttings and leaf cuttings. They all have their pros and cons so choose which one is for you based on how healthy your plant is, the tools you have and how patient you are.
1. Division: Fast and Reliable
Division is the easiest and fastest method but it needs a mature plant that has multiple stems.
What You’ll Need:
- Gloves (not strictly necessary but the sap from the plant can irritate the skin)
- A sharp knife or pruning shears
- Pots with drainage holes
- Potting mix that drains well
Step by Step Instructions:
- Prepare the Workspace: Lay down newspaper or work outdoors so you don’t get messy. Moisten the soil a little as it will make it easier to remove the plant.
- Remove the Plant: Gently tip the plant out of its pot. If you can’t get it out then press the sides of the pot and it should help. Alternatively use a knife around the edges to loosen it.
- Identify Rhizomes: You want to find sections of the roots that can be separated. Each of those needs to have its own stem and leaves.
- Cut Cleanly: Cut through the rhizomes. Make sure the cuts are clean so you don’t stress your plant.
- Repot Immediately: Put each division in its own pot with fresh soil. The rhizome should be below the surface of the soil.
- Water Sparingly: Water a little, just enough to settle the soil. And then don’t water it too much as newly divided plants are susceptible to rotting.
Pro Tip: If your plant doesn’t seem ready for division then don’t force it. If you handle it too much you could upset it as they like things to stable and are sensitive to being stressed.

2. Stem Cuttings
Stems cuttings are a good way to propagate because you don’t upset the parent plant. Plus it works well in both soil and water.
What You’ll Need:
- Scissors or a sharp knife
- Rooting hormone (optional)
- Glass jar (for water propagation) or a pot with soil
Step by Step Instructions:
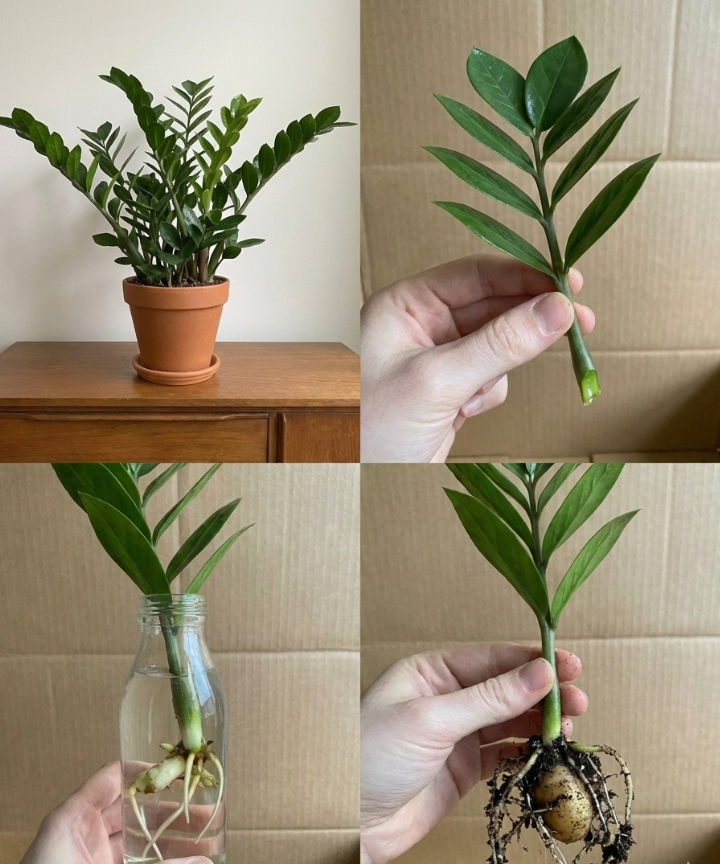
- Choose the Right Stem: Pick a mature and healthy stem. It will need to be at least 6 inches long and have at least a few leaves.
- Make a Clean Cut: Cut the stem at an angle just above the line of the soil. If you’re propagating more than one cutting then sterilize your tools between each time you cut so you don’t spread any diseases.
- Optional – Use Rooting Hormone: Dip the end you’ve cut into the rotting hormone. It can help to stimulate it to grow quicker.
- Root the Cutting:
- Water Method: Put the stem in a glass jar with enough water to so the bottom few inches are fully submerged. Don’t forget to change the water every week so it stays fresh.
- Soil Method: Push the stem about 1 to 2 inches deep into moist soil.
- Wait for Roots: It can take around 2 to 3 months for the roots to develop. In that time keep the cutting in a warm, bright spot and out of direct light.
Pro Tip: If you’re propagating in water then use a clear jar so you can watch and keep an eye on the roots as they develop. Once the roots are an inch long, transfer the cutting to soil.
3. Leaf Cuttings
This is the slowest way of propagating but if you want to propagate more than one plant without sacrificing the stems this is the way to go.
What You’ll Need:
- Healthy and mature leaves
- Rooting hormone (optional)
- A Shallow tray with soil that drains well
Step by Step Instructions:
- Harvest Leaves: Gently pull or cut the leaves from the stem. Be careful though as you don’t want to damage or lose the petiole (that’s the small stalk which connects the leaf to the stem).
- Dip in Rooting Hormone: This step is optional but can speed up how quickly the roots form.
- Plant the Leaves: Put the petiole into the soil at a slight angle. Bury it about an inch deep.
- Maintain Humidity: Cover the tray with either a plastic wrap or a plastic dome. This will create a greenhouse effect.
- Be Patient: The roots can take 6 to 12 months to form. Throughout this time be careful not to overwater it.
Pro Tip: If you’re propagating more than one leaf I would recommend labelling each of them with the date you started so you can keep track of their progress.
Extra Tips for ZZ Plant Propagation
- Temperature Control: Propagation works best when the temperature is between 70 to 85°F (21-29°C). Try to stop it from being subjected to sudden changes in the temperature and cold drafts.
- Light Levels: Bright, indirect light is very important. Too much direct sun can burn the leaves but at the same time not enough light will mean slow growth.
- Soil Choice: The soil makes a big difference. You want a potting mix that is made up of sand and perlite as it will help with the drainage.
- Keep Pests at Bay: ZZ plants are tough but can still be affected by things like fungus gnats, especially if the soil is too damp. So let the soil dry out a little between every time you water.

Common Mistakes to Avoid
Even if you’re experienced when it comes to gardening and looking after plants you can still make mistakes. Watch out for:
- Overwatering: ZZ plants are able to withstand a lack of water but don’t do well with too much. The rhizomes can rot if you give them too much.
- Forcing Propagation: If your plant isn’t ready (e.g., it doesn’t have any rhizomes you can see), give it some time to mature.
- Skipping Sterilization: Dirty tools can introduce bacteria and fungi to your cuttings.
Final Thoughts
Propagating a ZZ plant can be a slow process but it’s absolutely worth it. Whichever method you decide to go with you have to patient. Otherwise you’ll end up disappointed.
Other than that you just need to give your cuttings the right conditions and don’t make some of the mistakes we’ve gone through and you’ll have some lovely new ZZ plants you can enjoy very soon.