Propagating orchids can seem daunting at first. Especially if you’ve never done it before.
But if you do a little prep beforehand it’s pretty straightforward and very rewarding. Regardless of whether you’re a beginner or someone with more experience.
As long as you’re patient and take your time you can successfully propagate an orchid. With that in mind I’ll take you through the steps to get it right as well as some tips that have helped me to get my orchids thriving.
Types of Orchid Propagation Methods
There are a few different ways in which you can propagate an orchid and each of them are suited to different types of orchids. Which one you should go with will depend on the orchid you’re propagating and how much experience you have with propagating plants.
- Division: This method involves splitting an older orchid into smaller parts and making sure each new section has at least three pseudobulbs. Division is best for sympodial orchids like Cattleyas and Dendrobiums.
- Keiki: Some orchids produce keikis, or baby plants, from the mother plant’s stem or base. You can help this process to happen by using keiki paste on the node of your choice. This works well on Phalaenopsis orchids especially.
- Back Bulbs: Orchids like the Cymbidium, which have dormant back bulbs, can be used to grow new plants after the flowering has stopped.
- Stem Cuttings: arguably the easiest method, you simply cut sections or the stem and treat them so they are encouraged to develop roots. Most common for monopodial orchids like Vandas.
- Flask Method: this way is done in a laboratory and sows the orchids in a perfect environment until they become seedlings. It’s the best way for species that produce tiny, dust like seeds.
Choosing the Right Orchid for Propagation
Picking an appropriate mother plant is a big factor in how successful your propagation will be.
- Healthy and Mature: The plant must be healthy have has a strong, mature structure. The stronger the plant the better it will adapt to be propagated and then produce good offspring.
- No Signs of Stress: You want a plant that isn’t showing any signs of stress, pests or diseases. If the roots and leaves are healthy this is a good sign your orchid is in good condition.
- Proven Bloomer: If you can then pick an orchid that has a history of good blooming. It shows it has the ability to reproduce and support any new growth.
Materials Needed for Orchid Propagation
Propagation Tools
- Sharp Scissors or Pruning Shears: Check they are clean and sterilized so you aren’t going to spread any diseases.
- Sterilizing Agent: Use rubbing alcohol or a 10% bleach solution to sterilize your tools before and after you’ve used them.
- Labels and a Permanent Marker: Label each orchid and the date you propagated it so you can keep track of the progress.
- Gloves: For protecting your hands and to keep the everything hygienic.
Growing Medium and Container
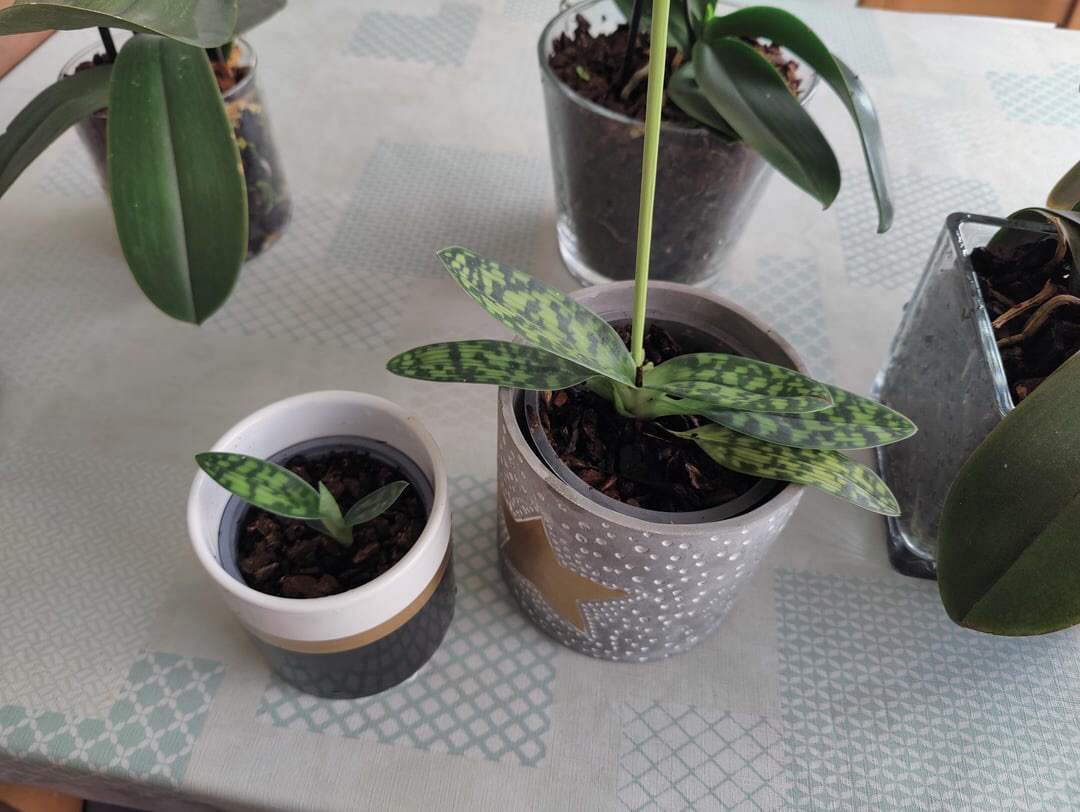
- Growing Medium: You can use a mix specific for orchids. Coconut husk chips, sphagnum miss and fir bark are good choices as they will give the right drainage and airflow. The different types of orchids will order different mediums so decide based on which one you’re propagating.
- Containers: Clear pots are best because they let the light get to the roots, which they need, and you can see how they’re growing. You can also keep an eye on the moisture of the soil. Make sure your pot has good drainage holes too as you don’t want your orchid to get waterlogged.
Preparing for Propagation
Disinfecting Tools and Equipment
It might seem like an unnecessary hassle but it’s a good idea to make sure your tools are sterile before beginning. So sterilize the scissors, knives and anything else you will be using.
You can use rubbing alcohol or a solution of nine parts water to one part bleach.
Leave the tools in the solution for at least five minutes. Let them dry afterwards. You don’t need to rub them or anything, just let the air do it.
Why this is important is if you don’t do it you could introduce bacteria or other diseases to the cuts in your orchid. If so they’ll either be severely affected or even in some cases die completely.
Preparing the Growing Medium
As mentioned earlier choose a growing medium that will fit with whatever type of orchid you are propagating. A loose and well draining one is going to be best for most orchids.
The likes of fir bark, sphagnum moss or a blend designed for orchids are the most common. Before you use whichever you choose rinse it thoroughly first so you’ve removed any dust.
A clean growing medium is going to give you orchid support as it develops new roots and grows.
Propagation Techniques
Division Method
- Identify the Clumps: Each segment should have at least three pseudobulbs so it can survive on its own.
- Use Sterilized Tools: Cut between these segments. Make sure you’re using scissors or a knife that is sterilized so it protects your orchids health.
- Repot Each Division: Plant each new division in a good pot filled with the appropriate growing medium. You want the medium to support the roots.
- Positioning: Put the divisions somewhere where they will get enough indirect light.
Keiki (Baby Orchid) Propagation
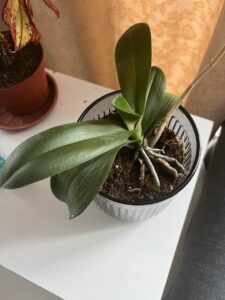
- Wait for Root Development: Before removing a Keiki you have to let the roots grow to at least 3 inches long. This shows that its ready to grow on its own.
- Prepare Your Tools: Always use sterilized scissors or a knife. You don’t want to spread any diseases between the mother plant and the Keiki.
- Remove the Keiki: Carefully cut the stem below the Keiki, including a small section of the mother plant’s spike that will support the Keiki.
- Pot the Keiki: Plant the Keiki in a small pot filled with your orchid medium.
- Best Growing Conditions: Put your new Keiki in somewhere that has indirect sunlight and the right humidity. Mist it regularly and keep it’s temperature as consistent as possible, which would be between 70 to 80°F during the day.
Stem Cuttings
Stem cuttings also works very well for propagating orchids. It works especially well for orchids that have pseudo bulbs like Dendrobiums and Oncidiums.
How to Take Stem Cuttings
You have to start by finding a healthy stem. Pick one with several nodes. Each node has the possibility of growing new orchid shoots.
Using a sterilized knife or scissors cut the stem into segments. Make sure each segment has at least 2 to 3 nodes. This makes it more likely each cutting will develop into a new plant.
After preparing your cuttings treat the ends with a fungicide to stop any fungal infections. Then label the top and bottom of each stem cutting so you plant them in the correct orientation.
Rooting Stem Cuttings
Rooting your stem cuttings properly gets them ready for successful new growth.
Start by preparing a potting mix suitable for orchid cuttings. Then insert the bottom end of the stem cutting into the potting mix and make sure it’s upright and stable.
Next put the pot in a warm and humid spot that gets indirect sunlight. I find that keeping humidity around 70% and temperatures between 70 to 80°F is best for rooting.
Water the cuttings sparingly. You want the medium to stay a little moist but definitely not soggy. Keep track of the cuttings over the next few weeks for any signs of growth. Roots usually begin to form within 1 to 3 months.

Caring for Newly Propagated Orchids
Ideal Environmental Conditions
The best conditions will give your propagated orchids the best chance of growing. Orchids like an environment that is as close to their natural habitat as possible. That would be:
- Temperature: Aim to keep temperatures between 65°F and 75°F during the day and between 60°F and 65°F at night. Keeping it around these will reduce stress on your orchids and let them adapt to their new home.
- Humidity: Orchids like 40% to 60% humidity. You could use a humidity tray or a room humidifier if the air indoors is too dry. This is especially the case during the winter when heating systems can really lower the humidity indoors by a lot.
- Light: Provide bright, indirect light. Windowsills facing east or west are perfect spots. Direct sunlight can burn the leaves of the orchids so use something like a sheer curtain or blinds to diffuse the light.
- Air Circulation: Good air movement will stop disease as it reduces the moisture on the surface of your orchid. You want gentle air circulation with a fan but dont put your orchids in the way of any strong drafts.
Watering and Feeding Your New Orchids
Newly propagated orchids need to be get and watered well so they can become established.
- Watering: Water your orchids early in the morning so any excess moisture can evaporate throughout the day. How often you should water will depends on what sort of environment your orchid is in. But generally you want to let the potting medium dry slightly between each watering. This should means watering every 5 to 7 days but check the top inch of the soil before committing. If it’s dry, it’s time to water.
- Feeding: Feed your orchids with a balanced orchid fertilizer every other week. Half the recommended strength is better as it won’t do any damage when diluted down a bit. Too much fertilizer can damage the new roots. During the winter bring how often you feed your orchid to once a month as they grow more slowly in the cooler weather and darker days.
Troubleshooting
Common Issues in Orchid Propagation
You might hit some snags while you’re propagating.
- Poor Root Development: If the temperature and humidity aren’t controlled then orchids can struggle to develop strong roots.
- Fungal Infections: Too much moisture in the air or the rooting medium will cause this.
- Slow Growth: Not enough light or nutrients will slow down the growth of new roots or shoots.
- Leaf Yellowing: Usually a sign of overwatering or that the pot your orchid is in isnt draining well.
Solutions for Failed Propagation
- Adjust Environmental Conditions: Make sure the temperature ranges between 65 to 75°F and the humidity is consistently around 60 to 70%. A humidifier in the room where your orchid is or a humidity tray can help to sort out the levels.
- Improve Drainage and Medium: Use a potting mix that allows better air flow.
- Proper Light and Feeding: East facing windows are best for orchids. So move yours there if possible. And use a balanced fertilizer.
- Regular Monitoring: Keep a close eye on the how much water your orchid needs and the general health of it. You may have to change how often you water based on how dry the potting medium is.

Frequently Asked Questions
How do I care for newly propagated orchids?
Get the temperature, humidity and light right. Water consistently and feed on a regular basis. Follow whatever the specific type of orchid you’ve propagated needs.
How often should I water my newly propagated orchids?
It will depend on a few things like the type of orchid, the stage of development it’s at and the conditions it’s growing in. But generally watering should be done when the top inch of the soil feels dry. Then you may need to change what you’re doing based on how your orchid responds to the watering.
What do I do if my orchid propagation fails?
If orchid propagation fails then look at things like the environment its growing in, the temperature and humidity, is it draining well in the potting medium, and making sure the orchid is getting enough light.
Final Thoughts
Propagating orchids can be intimidating if you’re new to it. But as long as you pay attention to what you’re doing and are patient there’s no reason you can’t be successful.
And it’s very rewarding. Bringing new life to your garden or home is always a good thing!
With the right approach you can enjoy the blossoming of new orchid plants that you’ve cultivated yourself.