
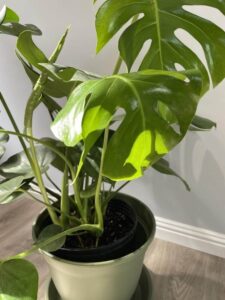
Monsteras can be generous – sometimes too generous. If you give a monstera deliciosa what it wants, that is good light, consistent watering and regular feeding, it will end up filling whatever space it’s in.. and then try to find more.
The leaves get bigger, the stems get longer and the aerial roots start to explore everything near to them! And your once lovely and easy to manage plant becomes something huge and unwieldy. At that point pruning stops being an option and becomes necessary.
But pruning a monstera is also a lot more gratifying than you would think. The cuttings you take from it can become a new plant, and if you do things right you can end up with a better looking original plant and then quite a few cuttings that you can choose to propagate, sell or give to friends or family.
So if you want to get started pruning your monstera this guide covers everything: why and when to prune, the tools and right hygiene, a clear step by step process, how to approach size and shape control against bushiness, what to do with the cuttings and how to care for the plant afterward.
Quick Answer
- Cut Above a Node: Cut just above a node (where the leaves or aerial roots grow from) so the plant can put out new growth.
- Remove Unhealthy Growth: Trim away yellow, brown or damaged leaves at the base as it will keep the plant strong and looking tidy.
- Use Clean Tools: Make sure you sterilize your scissors or secateurs before you prune so you don’t spread any diseases.
Why and When to Prune a Monstera
There are quite a few reasons you might want or need to prune your monstera. Knowing them will help you to decide the right moment and approach you take for your plant.
Pruning a monstera, or any plant for that matter, isn’t a single task with a single purpose – the reason vary and so does the technique you use.
Controlling Size
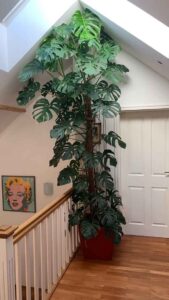
The most common reason to prune a monstera is because it’s grown too large for the space it’s in. Monstera deliciosa climbs when growing in the wild and keeps that habit when it grows indoors.
Individual leaves on a mature plant can reach 60 to 90cm across and the overall plant can easily reach 2 to 3 metres high with a similar spread if you don’t prune it. It’s a normal part of owning a monstera to have to prune it to keep it manageable.
Shape and Look
Even if they stay at a size that you can manage easily enough monsteras can still become leggy or uneven. If you’ve got a plant that’s mostly getting its light from one direction it will naturally lean towards it.
And then it grows unevenly. The older stems will grow longer and become bare at the base as the lower leaves die.
Pruning to reshape the plant – removing unbalanced stems, cutting leggy growth back to a more appropriate length – is as valid a reason to prune as size control.
Health Maintenance
Removing dead, damaged or diseased leaves and stems is basic plant maintenance that applies to all monsteras regardless of their size. Dead leaves are at best a waste of resources and at worst can be somewhere that leads to fungal or bacterial infection.
A leaf severely damaged by physical trauma, pest damage or disease should be removed rather than let it deteriorate.
Bushiness and Fuller Growth
Monsteras grow from a single main growing tip and that becomes a stem that gets progressively longer. Pruning the growing tip will make any dormant buds lower on the stem become active and make new shoots, which over time creates a plant with multiple stems and a fuller and more bushy look. But you need to understand where to cut to get the result you want.
When to Prune
Spring is the best time for a lot of your monstera pruning as the plant is beginning to move into the active growing season and will recover from the stress of pruning more quickly than at any other time of year. Minor pruning – so things like removing a dead leaf or trimming a damaged stem – can be done at any time of year.
Don’t do too much pruning in winter when its growing at its slowest and the recovery will take longer.
Monstera deliciosa: The classic with the big leaves. It grows the most, does well with regular pruning to control its size and shape.
Monstera adansonii: Smaller leaves with holes and trails more. Pruning follows the same principles but it should need to be done less often.
Monstera thai constellation and albo variegata: Variegated forms that are a lot slower growing and more valuable. You have to think more about pruning because recovery is slower – plan the cuts carefully and be more conservative than you would with a standard deliciosa.
Monstera peru and karstenianum: Compact, grows fast and has textured leaves. Can be pruned more aggressively than deliciosa as they recover quickly.
Tools and Hygiene
You don’t need a lot tools or equipment for pruning. However, the quality of the tools you use and the hygiene with which you use them makes a real difference to how well the plant recovers and if cuts turn into places where diseases can take hold.
What You Need
- Sharp and clean pruning scissors or secateurs: Sharp blades are very important. A blunt blade tears plant tissue rather than cutting through it cleanly. It will leave a ragged cut that is a lot more vulnerable to infection. Bypass secateurs are better than anvil types for monstera stems, especially if the plant has thicker main stems.
- Gloves: Protect your hands from the sap. Thin nitrile gloves will give you enough protection without it being difficult to move or be dexterous.
- A clean cloth or paper towels: For wiping sap from cuts and tools between each cut.
- 70% isopropyl (rubbing) alcohol: For sterilizing blades before beginning and between the cuts.
- Newspaper or an old sheet: Monstera sap stains surfaces. Protect your floor and furniture before you begin.
- Powdered cinnamon (optional): A natural antifungal that can be dusted onto cut surfaces to reduce the risk of infection on any bigger cuts.
Sterilizing Your Tools
Wipe or dip the blade in isopropyl alcohol before you begin and again between cuts on different plants. If you’re doing multiple cuts on the same plant then it’s a good idea to wipe the blade between cuts to remove the sap that would otherwise be transferred.
This matters because monstera can get quite a few fungal and bacterial issues that can spread on contaminated tools. If any part of the plant you are cutting looks diseased make sure you sterilize the blade after that cut before continuing.
The Step by Step Pruning Guide
Read through the full process before beginning so you have a good picture of each stage before you start.
- Put on gloves. Lay down newspaper or an old sheet under and around the plant to catch any sap and leaves.
- Sterilize your cutting tool with isopropyl alcohol. Have the cloth, spare gloves and cinnamon within easy reach.
- Walk around the plant and look at it before you make any cuts. Find the stems you want to remove, the stems you want to shorten and the overall shape you are aiming for. Making a plan before the first cut will stop you from making decisions that you later regret.
- Identify the nodes on any stems you plan to cut. A node is a slightly raised, bumpy joint on the stem where a leaf attaches or has attached – it looks like a thickened ring around the stem. Every cut should be made just above or just below a node, never through the middle. Nodes are where new growth comes out, so their position relative to your cut determines what the plant does next.
- Start with dead and damaged material first. Remove any fully dead or dying leaves by cutting close to the main stem – leave about 2cm of petiole (that’s the bit that connects the lead to the stem) rather than cutting right against the stem. Remove any diseased or damaged sections of the stem cutting into healthy tissue above the problem area.
- Remove or shorten the stems you identified in your plan. For a stem you want to remove completely cut it as close to the main stem or base as possible – within 2 to 3cm. For a stem you want to make shorter cut just above a node at your new length. The node just below your cut is the point from which the new growth will happen.
- Work from the outside and bottom in. Remove outer and lower stems first as it will let you see the overall effect before you commit to more cuts further in. This will help to avoid over pruning in one session.
- Step back frequently. After every two or three cuts take a step back and look at the plant from a normal viewing distance. It is much easier to add more cuts than to undo cuts you’ve already made.
- Cut at a slight angle rather than straight across. An angled cut will get rid of water better than a flat cut, and that in turn will reduce the moisture that sits on the cut which can encourage fungal growth.
- Wipe the blade between cuts. Remove the sap from the blade with the cloth before the next cut. If any cut looked diseased quickly sterilize it with alcohol before you carry on.
- Dust significant cuts with cinnamon if you want to. For larger cuts on thick stems a light dusting of powdered cinnamon can offer some antifungal protection while the wound begins to callus.
- Let cut surfaces on the plants to dry in the air for a few hours before you water. Do not mist the plant immediately after pruning.
- Collect all the material you’ve prunes and decide what to keep for propagation and what to throw away. Put propagation ready cuttings aside in a clean container. Chuck the diseased material directly into the bin – do not compost it.
- Clean the area, removing fallen leaves and any sap from surfaces. Clean your tools thoroughly with soap and water then sterilize again before you store them.
- Move the plant to wherever it usually lives and resume normal care, maybe adjust the watering slightly so that you’re doing a little less for the first two to three weeks.
Pruning for Size and Shape Control
Controlling the size and shape needs a slightly different approach to general pruning. You don’t want to just make the plant smaller but one that has a clear shape and proportional relationship between its remaining stems and leaves.
Understanding How Monsteras Grow
A monstera grows from its main growing tip, extending up or out. As the plant gets older the lower leaves age and drop, leaving a bare stem .
Aerial roots emerge along the stem and reach toward the ground or a support. The overall structure, if it isn’t pruned, is a single long vine with the majority of leaves concentrated at the growing end and increasingly bare stem below.
This means that controlling its size and shape is mostly about managing how long the stems are and the where the active growth is rather than how many leaves it has. Cutting a stem back to a node closer to the base sends the energy to that point and gets you a more compact plant. The stem below the cut does not regrow from the cut point – new growth emerges from the node just below or just above where you cut.
How to Control Overall Size
For a plant that has grown too tall or too wide find the stems that is most to blmsne for the size problem and cut each back to a node at your target height or width. Choose nodes that have existing leaves attached where possible – a stem that keeps some foliage after its been cut looks better and recovers faster than a completely bare stub.
For a very large plant needing a big reduction in it’s size try to avoid removing more than about a third of the total plant in a single pruning session. Removing too much at once stresses the plant and makes it less able to photosynthesize when it needs to for a full recovery.
If the plant needs to be reduced in size by a lot then spread out the pruning across two sessions – one in early spring and a second in early summer – rather than doing everything all at once.
Managing Leggy Stems
Leggy stems happen when a plant has been growing towards not enough light. The fix is done in two parts: address the light issue that caused the legginess and prune the leggy stems back.
Pruning leggy stems without improving the light will just give you new leggy growth from when you’ve pruned. Improving the light without pruning leaves the leggy stem in place. Both together will give you the the plant you want.

Directing Growth
Where you cut will decide where the plant grows next. If you cut a stem just above a node that faces in a certain direction the new growth that emerges will go in that direction at first.
This gives you some influence over the shape of the developing plant – useful for redirecting a stem growing somewhere you don’t want it to or for balancing a plant that’s heavier on one side. For a Monstera deliciosa that’s trained up a moss pole cutting the stems growing away from the support sends energy to the stems climbing the pole, which will result in a more upright plant.
Pruning to Encourage Bushier Growth
A standard monstera grown without intervention produces a single dominant growing tip. Many people like a fuller, more bushy plant with multiple stems. To prune the right way to encourage this is about knowing where to make the cut to release it.
What Apical Dominance Means for Monsteras
The growing tip of a monstera stem produces hormones (auxins) that suppress the dormant buds lower on the same stem. The tip dominates, keeping the lower buds inactive while it extends the stem up.
When the growing tip is removed by cutting the auxin signal is interrupted and the dormant buds below the cut are released to produce new shoots. The result over the next few weeks is new growth coming from nodes below the cut.
You’ll see multiple new shoots rather than a single extending tip. And that’s how you create a bushier monstera.
Where to Cut for Maximum Bushiness
To get your monstera to be bushier cut the main growing tip just above a node. The height at which you make this cut will decide how much of the existing stem remains.
For a plant you want to keep compact, cut it lower. For a plant where you want to keep it’s height but increase the fullness of it then cut higher – just below the highest growing tip is enough to release the dormant buds below without making the plant smaller.
The two or three nodes right below the cut are the most likely to activate first. A single tip cut on a healthy, well grown monstera can eventually produce three to five new growing points. This will turn the plant from a single stem vine to multi stemmed.
Patience Is Essential
After the tip cut the plant will look like it’s not doing anything for a few weeks. This is normal – the hormonal change is happening before you see any growth.
The first sign is usually a small furled new leaf emerging from a node below the cut. The full bushiness will take one to two growing seasons to develop properly. Cutting again too soon if you’re frustrated at it taking too long or nothing happening will only compound the problem – give it at least three months before you reasses.
What to Do With Cuttings: Propagation
One of the best things about pruning a healthy monstera is the what you get from it. Each stem cutting with a node is a potential new plant and a single pruning session on a mature monstera can get you three, five or even more cuttings ready to be propagated.
What Makes a Good Monstera Cutting
A monstera cutting that’s ready to be propagated needs two things: a node and at least one leaf. The node is where new roots will grow from – without a node a cutting cannot produce roots.
A leaf provides the ability to photosynthesize that the cutting needs to sustain itself and grow roots. The ideal cutting is a single stem section with one node, one healthy leaf and is possible a short aerial root already attached – aerial roots that are already developed root into water or compost more quickly than nodes that have not begun to produce roots.
Rooting in Water
Put the cutting in a clean container of room temperature water with the node submerged but the leaf above the water. Make sure it’s in bright indirect light.
Change the water every five to seven days. Roots will usually develop within two to four weeks and can take six to eight weeks to reach a length suitable for potting (3 to 5cm root length). Once the roots have reached that length pot it into a well draining houseplant mix – it is normal for the cutting to look slightly stressed for the first week or two after being moved from water to compost.
Rooting Directly in Compost
Direct compost rooting will give you roots adapted to soil conditions from the start, which means less transplant stress. Fill a small pot (10 to 12cm) with a some houseplant compost and perlite (roughly 50:50).
Pur the cutting so the node is buried just below the surface of the soil with the leaf above. Water it lightly and cover with a clear plastic bag or propagation dome to keep humidity stable. New leaf growth – the clearest sign of successful rooting – usually happens within four to eight weeks.
Air Layering: The Most Reliable Method for Larger Stems
Air layering propagates monstera stems while still attached to the parent plant – the cutting only separates once it has already developed its own root system.
Find a node on the stem, wrap it and several centimetres of stem in a generous ball of moist sphagnum moss and secure it with plastic wrap tied above and below. Within four to eight weeks the roots will grow into the moss ball – you’ll be able to see them through the clear plastic.
Once the roots are obviously established and several centimetres long you can cut the stem just below the moss ball, remove the plastic and pot the moss ball and roots into compost without disturbing the roots.
Air layering is especially useful for variegated monstera cuttings where the slower growth makes it worth the extra effort to be sure the roots develop before separated.
Cuttings With No Leaf
If a cutting has a node but no leaf it can still be propagated but is a lot slower and less reliable. Without a leaf the cutting has no way to photosynthesize and is completely dependent on stored energy reserves to fuel the growth of roots.
So put it in moist compost or water, keep in moderate indirect light and then be patient. A new leaf may eventually grow from the node, at which point the cutting has the resources it needs to develop properly. This can take several months and the chances of success are a lot lower than with leafed cuttings.
Aftercare Following Pruning
The weeks right after pruning are when good aftercare makes the difference between a plant that recovers quickly and one that takes a full season to get back to its best.
The First 24 to 48 Hours: Let the Cuts Seal
Do not water the plant for at least 24 hours after pruning – longer if the plant had a lot of cuts. Do not mist the foliage.
Put the plant in its normal growing spot with good amounts of air circulating around it. This dry period lets the surfaces of the cuts begin forming a protective barrier before any moisture gets to them them, which will reduce the risk of fungal or bacterial infection getting in through the wounds.
Reduce Watering for the First Few Weeks
As a pruned monstera has fewer leaves than before it was pruned, that means it loses less moisture through the leaves and uses water more slowly. If you keep watering at the same rate you’ll probably end up with the growing medium being too moist.
So let the top two inches of compost dry out between watering for the first three to four weeks after you’ve done a lot of pruning. Then you can gradually return to your normal watering schedule as new growth appears.
Hold Off on Fertilising
Do not fertilise for four to six weeks after pruning. The plant is in recovery mode instead of actively growing and any fertiliser applied during this time is more likely to build up as salts in the growing medium than to be taken up usefully. When you do resume feeding, start at half strength and return to your normal routine only once you see new growth is established.
For more help see our guide to fertilizing monsteras.
Maintain Good Light Without Direct Sun
Keep the plant in its normal bright indirect light spot. Don’t move it to a darker spot to “rest” it – monsteras need light to help with the new growth that is part of the recovery.
But at the same time don’t move a recently pruned plant into direct sun as it will increases how much water it needs and you risk any freshly exposed leaves getting burnt.
Watch for Signs of Infection at Cut Sites
For the first week after pruning check the cuts every day or two. Healthy healing looks like the cut surface gradually drying and forming a slightly hardened callus.
Signs of infection are the tissue right around the cut becoming soft, wet or darker, or discolouration moving down the stem from the cut point. If you see these signs then cut further back into healthy tissue, dust with cinnamon and make sure the plant has good air flowing around it.
When to Expect New Growth
New growth after a tip cut usually appears within four to eight weeks in good spring or summer conditions. The first sign you’ll see is a new leaf coming from a node below the cut.
After more significant pruning that removed a large proportion of the plant recovery can take eight to twelve weeks before you see new growth and quite a few months before the plant looks as full as it did before. The best thing you can do during this time is keep the conditions stable and leave the plant alone to do its thing.
The first monstera I pruned was a large deliciosa that had outgrown the corner I kept it in and needed to come back by about a third. It did nothing for about six weeks after.
Then a new leaf appeared from one of the cut nodes, then another and within four months it had filled back in. I now prune it every spring without worrying.
The plant is a lot tougher than it looks and the results – a better shaped plant and some cuttings in water on the windowsill – are absolutely worth the effort.