The first time I tried to train my Monstera to climb it was a disaster. I basically just shoved a bamboo stake into the pot and hoped for the best. Probably not a huge surprise it didn’t work!
It just looked like it was trying to escape rather than climb. But after a few years of working on it I’ve now figured out what works.
Training a Monstera to climb is about more than the way it looks, although that’s a nice bonus. It’s part of how they naturally grow. When they are in their natural habitat, the rainforest, they would climb trees to get the light they need.
Our indoor versions might not reach those same heights but giving them something to climb triggers their natural growth and means we get those really striking, fenestrated leaves.
So here are some tips that worked for me and I’m sure will work for you too.
Quick Answer
- Add Support Early (Most Common): Get a moss pole, stake or board while the plant is young so as the stems grow they’ll learn to do so upwards.
- Attach Stems Gently: Use ties or plant clips to help guide the stems toward the support without bending or crushing them.
- Guide Aerial Roots: Press aerial roots into the pole or support so they can grab on keep the growth stabilized.
For more help see Monstera Care Guide: Easy Tips for Growing Monstera.
1. Start with the Right Support Structure
Most people mess up straightaway because they just grab whatever’s cheap at the garden center without thinking about what their Monstera actually needs.
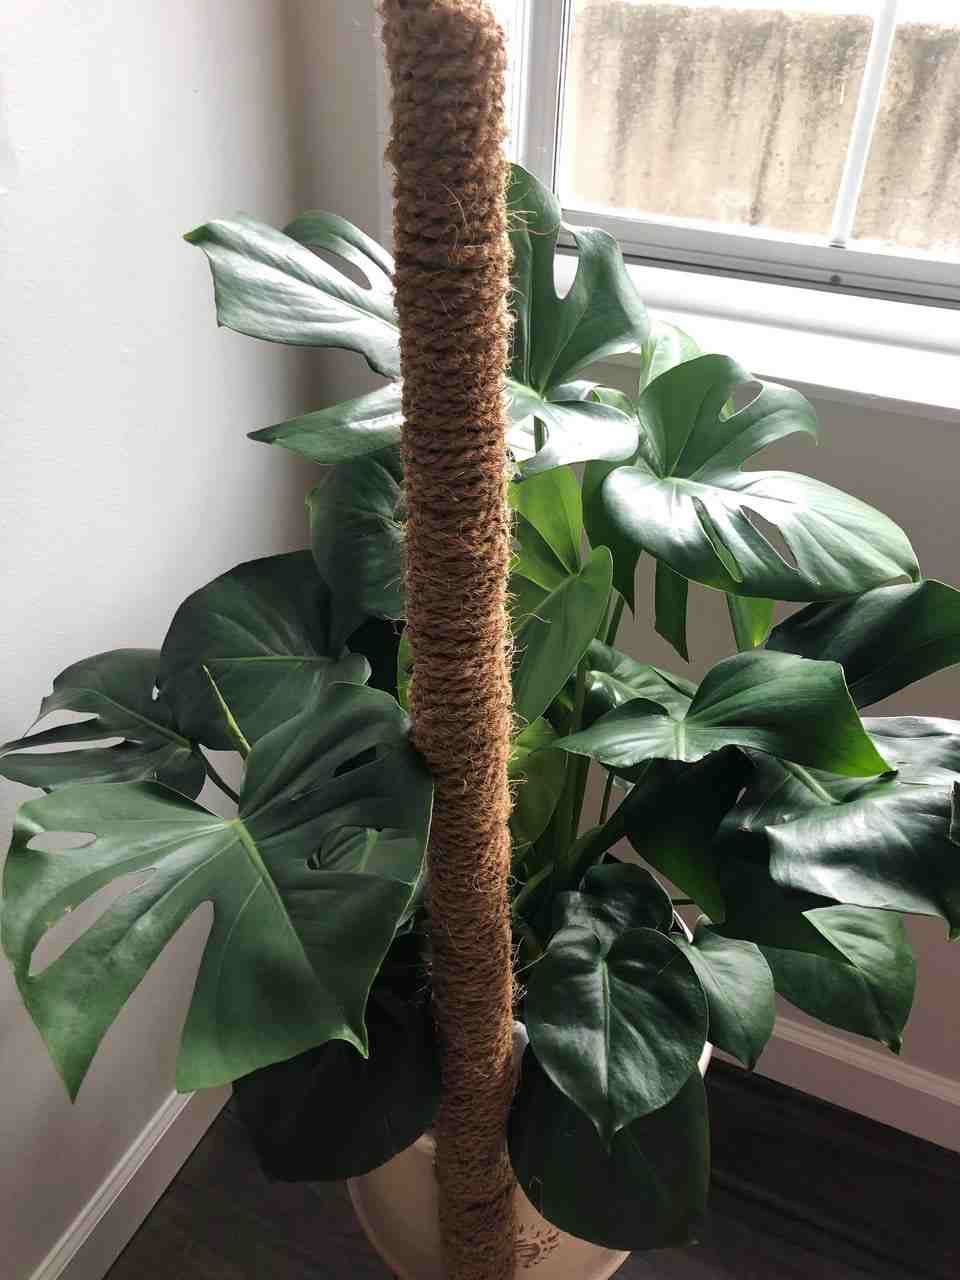
Moss poles are the best option and there’s a reason for that. Monsteras use aerial roots to grab onto tree bark and absorb moisture and nutrients from it.
A moss pole mimics this. I use coir poles (coconut fiber) because they hold a n to the moisture better than sphagnum moss poles in my apartment that gets quite dry. But either of them will work well.
You have to make sure it’s sturdy though. My first moss pole started leaning after about six months.
I use poles that are at least 2 feet tall for younger plants now and I stake them deep into the pot going at least 4 to 6 inches down. For my larger Monstera I have a 4 foot pole and I’m already planning the extension because she’s growing fast.
Some people swear by wooden planks or trellises, and they can work, but you sort get the moisture part that helps the aerial roots to attach. So if you choose to use a wood plank you’ll need to take a more active role in the training.
2. Install Your Support BEFORE Your Plant Gets Massive
I’m telling you this one because I didn’t do it and regretted it. I waited until my Monstera had around eight huge leaves going in every direction before I tried to add a pole and it was close to impossible.
Trying to get those massive leaves around a new structure without snapping any of them stems was horribly stressful. And I failed and damaged my poor plant.
So try to put in your support when the plant is younger and a lot easier to manage. If you’re starting with a small Monstera then put the pole in right away and save yourself tons of trouble later on. The plant will naturally grow toward and around it and you won’t have to do nearly as much corrective training some time down the line.
When you’re installing it put the pole slightly off center toward the back of the pot. This gives you some space in the front and makes it easier to get the plant to grow upward and outward in a way that looks good.

3. Keep The Pole Moist
The aerial roots your Monstera grows In help it to absorb moisture and nutrients as it climbs. If your moss or coir pole is dry then the plant has no reason to attach to it. The roots will just dangle there uselessly and your Monstera will won’t do anything.
I keep a spray bottle near my plant and mist the pole every few days. During the summer when my plant is growing I sometimes mist it every day. Some people go even further and actually water the pole from the top letting it run down it.
4. Use Soft Ties
In the beginning your Monstera isn’t going to magically know what to do. You need to guide it, which means tying its stems to your whatever support you’ve chosen.
The main word here though is gentle. I use soft plant velcro ties or even strips of old t-shirts. Anything that won’t cut into the stem as the plant grows.
Wire ties or tight string is a very bad idea for that reason. I’ve seen too many Monsteras with scarred stems from ties that were left too tight for too long.
What I do is I loosely tie each stem to the pole in one or two spots leaving enough room for the stem to expand as it grows. I make a point to check these ties every month or so and loosen or change their position as needed. Once the aerial roots have properly attached to the pole, I remove the ties.
Put your ties just below a node (where the leaf stem meets the main stem) for the most support without putting pressure on the growing points.
5. Train Early Growth Toward the Pole
When new leaves grow they’re going to unfurl in whatever direction they feel like. If you want your Monstera to grow up the pole instead of off to the side you need to encourage the new growth in the right direction.
I do this by repositioning the new stems when they’re still flexible. That’s usually within a week or two of a new leaf opening.
I’ll carefully bend the stem toward the pole and secure it with a loose tie. The younger the growth the easier it is to train it without risking any damage.
One thing I’ve noticed: Monsteras have a tendency to grow toward light, which makes sense. If your pole is on the side of the plant away from where it gets it light you’ll be fighting a losing battle.
I rotate my plant a a little every week or so to help get even growth but I make sure the side with the pole gets some time facing the light too. This helps the plant see the pole as a good direction to grow in.
6. Don’t Be Afraid to Prune
This one’s tough for a lot of people because we get attached to every single leaf. But doing some good pruning can make a huge difference in training your Monstera to climb properly.
If you have stems that are growing horizontally or in weird directions and won’t do what you want then pruning them can encourage the plant to put energy into the growth you do want – in this case the vertical stuff. Plus you can propagate those cuttings and start new plants so nothing goes to waste.
I’m not saying go crazy with pruning. But once or twice a year I’ll look at my plant and get rid of any growth that’s really fighting against growing up or making the plant look unbalanced.
7. Encourage Aerial Root Attachment
Getting the aerial roots to grab onto the pole is the difference between a Monstera that’s just tied to a support and one that’s properly climbing. And there are ways to make this happen.
First the moisture – I mentioned this already but it’s worth saying again. Moist poles are attractive to aerial roots.
Secondly you can guide the aerial roots toward the pole. When I see a new aerial root growing I’ll try to position it against the moss or coir and sometimes push it into the material a little. You don’t want to force it or you’ll snap the root but a gentle guide can go a long way.
Third some people will make small slits or holes in their moss poles and put the aerial roots in these pockets. It sounds fussy but it works.
The root gets held in place, stays in contact with moisture and eventually starts growing into the pole. Once you’ve got a few aerial roots attached your Monstera pretty much supports itself at that section.
8. Extend Your Pole as Your Plant Grows
Unless you bought a very tall pole from the start you’re probably going to need to extend it at some point.
My Monstera outgrew her first pole in about a year and a half. I could have left it and let the growth at the top of the pole sort of flop over but that defeats the whole purpose of training it to climb. Instead I added an extension.
You can buy pole extensions or you can do it yourself. I went the DIY route and basically attached a second pole to the first using some wire wrapped around both. It was definitely not the most attractive solution but once the leaves filled in you couldn’t see the most of it anyway.
What you should try to do is install the extension before your plant reaches the top of the pole. If you wait until your Monstera is already over the top you’re going to have to fight with its large growth.
9. Give It the Right Conditions to Want to Grow Upward
Training your Monstera won’t be enough if it’s isn’t already healthy and growing properly. You need to give it the right conditions to make it want to put out new growth.
Bright, indirect light is a must. Monsteras grow slower in less light and give you smaller leaves.
They also seem less motivated to climb. I keep mine about 6 feet from an east facing window where it gets morning light but no harsh afternoon sun.
Water often but don’t overdo it. I wait until the top 2 inches of soil are dry before watering thoroughly. Overwatered Monsteras with root rot aren’t going to be growing up any sort of pole.
Humidity helps too, especially for the aerial roots to develop. I don’t run a humidifier specifically for my Monstera but I do keep her in a room that is more humid (the bathroom would be ideal if I had space, but I don’t). If you’re in a really dry place then getting a humidifier might be worth it.

10. Be Patient
When you first start training your Monstera is going to look a bit weird. You’ll be able to see all the ties, the stems will be going off in wrong directions, there will probably be some leaves you wish were positioned differently. That’s all normal.
My Monstera looked really awkward for probably the first six months of training. The bottom growth was quite bushy and the top growth was just starting to reach up the pole and looked sparse when compared to it.
But plants grow and if you stick with it then things will start to come together. New leaves fill in the gaps. Aerial roots attach and start pulling the plant closer to the support. The whole shape begins to look right rather than a mess.
I’ve been training mine for about three years now and she’s finally at that point where she looks like she knows what she’s doing. The new growth goes for the pole without me having to anything, the aerial roots attach without my intervention and the whole thing just looks right.
It took time, though. And repeated changes and tweaks.
Final Thoughts
So yeah, training a Monstera to climb takes some work and definitely some patience. But it’s completely doable, even if you’ve never done it before.
Start with a solid support, keep that thing moist and guide your plant gently but while giving it time to figure things out.
Your first attempt will probably look a little rough. But that’s pretty much how everyone starts out. You’ll just be joining the club! Mine definitely looked awkward. But that’s part of the process, and just makes the eventual success that much better.