Orchids are fascinating plants. Their exotic look and gorgeous flowers are impossible to not be charmed by.
But orchids are notorious for their sensitivity. They have very specific care needs that can be hard to get right.
Many orchid growers, especially those new to the hobby, get frustrated when their orchid isn’t growing or doing anything at all. And figuring out why, especially when you don’t know what to look for, is tough.
So in this guide I’m going to take you through the seven most common mistakes you can make with orchids and give you the ways to fix them.
1. Overwatering: Why Too Much Love Can Kill Your Orchid
Overwatering is probably the number one mistake that kills off orchids. This is especially true for beginners who, understandably, think more water means better care.
If that’s you then put down the watering can! Orchids, unlike most houseplants, do not do well of they’re left in wet conditions all the time.
Overwatering often results in root rot, a condition where the roots become waterlogged, start to decay and eventually die. Without healthy roots your orchid won’t be able to absorb the nutrients it needs and will slowly die.
Signs of Overwatering
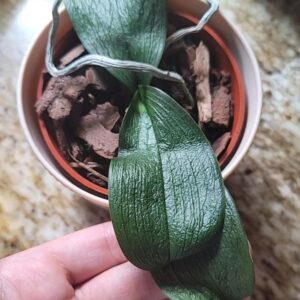
Mushy or discolored roots: Healthy orchid roots should be firm and white or green. If they are brown and squishy you have root rot.
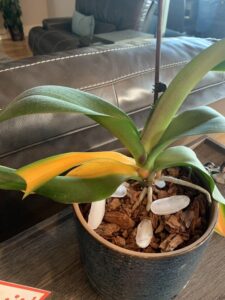
Yellowing leaves: When roots start to rot they can’t transport the water and nutrients to the leaves. This makes them turn yellow and will then eventually drop.
How to Fix Overwatering
Check the potting medium: Use an orchid medium like bark or sphagnum moss that lets the air get to the roots.
Adjust your watering schedule: Water only when the top inch of the medium is dry when you touch it. This might mean once a week or even less often depending on what the weather and conditions are like.
Water early in the day: This makes sure that any excess moisture has time to evaporate before the night which reduces the risk of fungus growing.
Preventative Measures
Repot your orchid: If you think you might have root rot repot your orchid in fresh medium and trim away any rotten roots.
Use a pot with drainage holes: Orchid roots need a decent amount of air to stay healthy. A pot with good drainage will stop water accumulating at the bottom of it which could also lead to root rot.
For a more in depth guide see our step by step instructions to reporting an orchid.
Tip: If your orchid’s roots are too far gone propagation might be your only option. If you’re not sure what this is it involves cutting away the healthy parts of the plant and using those to try and grow a new plant from those cuttings.
2. Using the Wrong Potting Medium
In the wild orchids would grow on trees. They attach themselves to bark rather than grow from the soil.
This means their roots are suited to getting a lot of air and having very little contact with water. So if you use a regular potting soil it often won’t work. It won’t have good enough air flow, it will get waterlogged and the roots will rot.
The Right Medium for Orchids
Bark: Fir or pine bark is a popular choice because it gives orchids the right amount of drainage and copies their natural environment and how they would grow in the wild.
Sphagnum moss: This holds on to moisture but also lets the air flow. It’s especially useful in very dry climates or for orchids that need that little bit more moisture.
Perlite and charcoal: These can be mixed together with bark to make the drainage better and stop the medium from breaking down too quickly.
Customizing Your Mix
For Phalaenopsis orchids (one of the most common types), a mix of 80% bark and 20% sphagnum moss works well. If where you live is very humid then you could also try increasing the ratio of bark to get better drainage.
Dendrobium orchids like a more open mix so add some extra perlite or even small bits of rock to the mix can also help.
Repotting Frequency
Repot your orchid every 1 to 2 years. The potting medium will break down over time and becomes more compact. This means it won’t be able to give the proper amount of air flow and that can result in root rot.
Tip: When you’re repotting always remove any old potting medium that is still stuck to the roots and check for any signs of rotting. Trim any unhealthy roots before you put your orchid back in to fresh medium.
3. Ignoring Light Requirements
Light is very important for any orchids growth. They need bright, indirect light to really do well.
But direct sunlight can be too intense, causing the leaves to burn. And not enough light can result in poor growth and a lack of flowers. So it’s a balance.
Understanding Light Levels
Direct sunlight: This will cause sunburn. You’ll notice this on your orchids leaves as white or brown spots. The sun is particularly strong at midday as this it’s when it’s most intense. So keep your orchids out of it around this time especially.
Insufficient light: If your orchid doesn’t get enough light it will struggle to bloom. Their leaves may become darker green as they stretch to get more light.
How to Optimize Light Exposure
Location matters: Put your orchid near an east facing window to get gentle morning light. West facing windows can also work but you may need to diffuse the light with a curtain.
Rotate regularly: You want your orchid to get light on all sides of it otherwise it will grow unevenly. So turn it every week and make sure every side of it gets light.
Artificial lighting: If you can’t give your orchid enough natural light then you may want to use a grow light. They’ll need to be on for about 12 hours a day and be sure the one you get provides the right spectrum of light.
Tip: Watch you orchids leaves. If they’re bright green and firm then that’s a good sign your orchid is getting enough light. If they’re pale or yellow that’s a sign they’re getting too much, and dark green often mean too little.
4. Poor Air Circulation
Orchids need a good amount of air flowing around them to stay healthy. Stagnant air can give your orchid too much moisture around its leaves as well as leading to pests and fungus growing.
Recognizing Poor Air Circulation
Fungal spots on leaves: Black or brown spots can be a sign of fungal issues. These are often caused by too much moisture and not enough air flowing.
Moldy roots: If your orchid’s roots seem to be covered in a slimy or moldy coating this is a clear sign that they’re not getting enough air.
Improving Air Circulation
Location: Keep your orchid in a room with good air flow. Don’t put it in a corner of your room that is closed off or near to other plants that could stop the air from moving.
Use a fan: A fan that oscillates and you set on a low setting to keep the air moving around your orchid and stop it from drying out. But don’t have the fan blowing directly on the plant as this can cause the leaves to dry out too quickly.
Spacing: If you have more than one orchid space them out so the air can move between them without any problems.
Tip: Clean the area around your orchid and get rid of dirt, fallen leaves, debris etc. as they can have mold and other dangerous things in them.

5. Overfertilizing: Less Is More
It’s a common mistake that people think using more fertilizer will mean you get more blooms from your orchid. But the reality is that orchids are light feeders, and if you overfertilize you might burn the roots and damage the leaves.
The Right Way to Fertilize
Dilute, dilute, dilute: Use a balanced fertilizer that is designed for orchids and dilute it by half or even a quarter.
Seasonal feeding: Fertilize more during the growing season (spring and summer), usually once a month. In the dormant months (fall and winter), slow the feeding down to once every 6 to 8 weeks or stop completely.
Water before feeding: Always water your orchid before applying fertilizer. This will stop the fertilizer burning the roots.
Recognizing Overfertilization
Yellowing leaves: This could be a sign that the fertilizer is too strong or you’re using it too often.
Salt buildup: If you notice any white crusty deposits on the surface of the potting medium then that probably means you have a build up of fertilizer salts.
Tip: If you think your orchid may have been overfertilized flush it with plain water to get rid of the excess salts. Do it once every month to stop those salts coming back again.
6. Misting the Wrong Parts: Focus on the Roots
Misting can be helpful but if you do it wrong it can also cause extra problems. Misting the flowers or crown can actually lead to rot.
Correct Misting Techniques
Focus on the roots and leaves: Misting should be directed at the roots and leaves. This can help to improve the humidity without it causing any rot.
Use distilled water: Tap water can leave minerals on the leaves. Over time this can damage your orchid.
Timing matters: Do the misting early in the morning so the moisture has time to evaporate before it gets colder at night.
Alternatives to Misting
Humidity trays: Put a tray filled with water and pebbles under the pot your orchid is in. As the water evaporates it increases the humidity around the plant.
Humidifiers: These are especially useful if you’re in a dry climate or to be used during the winter when air indoors is dryer.
Tip: Don’t mist the crown of the orchid (that’s where the leaves meet the roots). If moisture builds up and sits there for too long it will end up turning to rot.
7. Repotting at the Wrong Time
Orchids are sensitive plants. If you change things like their pot, potting medium, the temperature around them etc. they can get stressed. Especially if done at the wrong time.
Repotting while they’re blooming can cause the plant to drop its flowers prematurely or even go into shock. If this happens you’re unlikely to get anymore growth the whole season.
When to Repot Your Orchid
After blooming: The best time to repot is just after the orchid has finished blooming. It will be entering a period of rest at this point and so can handle any disruption better than it would at other times.
Signs your orchid needs repotting: Roots growing out of the pot, medium breaking down (which leads to bad drainage) or your orchid has been in the same pot for more than two years.
Steps to Properly Repot
1. Prepare your materials: Get some fresh orchid medium, a sterilized pot (that is slightly larger than the current one) and scissors/cutting tools ready.
2. Remove the orchid: Carefully take the orchid out of its current pot. If it’s stuck try tapping the sides of the pot or run a knife around the edges.
3. Trim the roots: Look at the roots and trim away any that are dead or rotting. Healthy roots will be white and firm.
4. Place in new pot: Put the orchid in the new pot and fill in with fresh medium. You want the orchid to be sitting at the same level as it did in the previous pot.
5. Water lightly: After you’ve repotted it water your orchid a little to settle the medium around the roots but be careful not to overwater.
Tip: Don’t repot your orchid while it’s in its growing phase. You will upset its development and make it less likely to bloom.
Final Thoughts
Caring for an orchid needs you have to a little bit of knowledge and giving them enough attention. But if you avoid the mistakes here you can make sure your orchids not simply survive but are looking great.
Orchids are tough plants when their basic needs are met. Give them the right care and you will get gorgeous blooms for many years.

Your article was very helpful. You might want to know that there are several errors in your article, with words in the wrong order in some sentences. I was able to figure out what you were saying.